Showing posts sorted by relevance for query Corsair Gambit. Sort by date Show all posts

Thursday, May 29

+ inload: Corsair Gambit part III +

+ The Corsair Gambit part III + 

+ I've had a very busy and very enjoyable few days of gaming, hanging out with friends old and new. Saturday was spent with Baraqu droog @seneschal_werhner at Maximal Fire's The Corsair Gambit event for some Epic: Legions Imperialis fighting; and Sunday and Monday was with the PCRC, including a 2nd ed. 40k game. I'll froth about the latter game in another inload, so here's a very quick overview of how the Corsair Gambit played out. +

+++

+ Salamanders and Legio Maximal +

As you can see below, I did manage to get everything painted up in time (hooray), though not quite as polished as I'd have liked (boo). 

The event itself was brilliant. Two games over the course of the day was a good shout for 3,000pts. Epic: Legions is an old-school game that rewards time spent on it: the rules are too byzantine to crash through three games easily, and there's the very practical aspect of moving models from one board to another. To put this in context, at Beachhead, I had five Titans and their terminals to move between games. Here, I had upwards of a hundred, and that's with a sixth of the army taken up in a hefty Warlord Titan.

I also had the good luck to spend time with two great and gentlemanly generals, who made the gaming really enjoyable. Please excuse the lack of pict-captures – there was already a lot going on, and I wanted to focus on enjoying the games!  

First up was Grant's lovely Dark/True Mechanicum, which were supported by a Warlord and Reaver:


The mission involved capturing three objectives, one of which was removed each turn. This shot, from the Mechanicum's table side, shows the end of turn 1, I think. I'd managed to get a foothold on all three objectives, largely thanks to the manoeuverability of the Space Marines.


There was a good mix of forces at the event, with all three big forces (Marines, Guard and Mechanicum) appearing on both sides, along with a healthy sprinkling of Titans and aircraft. 3,000pts really lets the visual side of the game shine, particularly since everyone had really pulled out all the stops to make some great-looking armies.


The Warlord, Consequens Indevitatus, was downed in this game on turn 1 without firing a shot – to our mutual amusement – which gave me an uphill battle. It turned into a real back-and-forth struggle, with the speed of the marines allowing me to adapt to the changing battlefield; while Grant's ponderous Mechanicum were unable to put their (substantial!) power where they needed to be, as the objectives thinned out.

The game ended up being decided on secondary objectives, and was a narrow squeak for the loyal Salamanders. A very fun game indeed, and a great army and opponent to face.

+++

Game 2 involved the Salamanders surrounding and attempting to capture three central objectives, while the Imperial Army held them off. Commanding the traitors was @Tetsugakhan (go check out his awesome painting).


This was a bloodbath from the beginning, with huge damage done to both sides from turn 1. Solar Auxilia have a lot of tricks up their sleeves, and the sheer number of superheavy tanks and artillery was daunting to face. 


The variety in this army made it great fun to play against, with a real feel of combined arms. As with Dark Mechanicum, I'd never played against Solar Auxilia, and they were a treat to fight against. Events like this give me a great opportunity to actually play games, and so it's lovely when you get to play cool new armies against cool people on cool tables.


This shot sums up the visual appeal of Epic: Legions for me – tanks, troops, titans and aircraft all in concert. You'll be pleased to hear that Consequens Indevitatus gave a bit of a better account of himself in this game, contributing to clearing out the central bastions, and surviving everything Tetsugakhan's air wing could throw at him!

This game ended in an honorable draw owing to time, with both sides exhausted!

+++

A really enjoyable event, so thanks to Johnny and Alex from Maximal Fire for organising it, and to all the players involved. The narrative ends with Nabed-Paleae falling to the traitors... so we'll see what the future holds for the Vigilants!

Tuesday, March 26

+ inload: Painting for The Corsair Gambit +

+ The Corsair Gambit +

+ Vanguard Detachment of Outriders +

+ I'm taking my Salamanders down to take part in the investigation and retrieval of critical archeotech from the planet Nabed-Paleae in Maximal Fire's Corsair Gambit event (you can inload the event pack here [+noosphericexloadlink embedded+]) – so I thought I'd track my progress subroutines from 'confident/plenty of time' to 'weeping at 4am'. +

+ Here's where the 1,500pt army currently stands; I have 10 days to get it all up to scratch. If you'd like the painting method, the  colours and process are detailed in this inload [+noosphericinloadlink embedded+]. +

+ MIA +

+ The picture above shows the vast majority of the army. Missing here are:
  • One additional stand of Terminators
  • Two stands of Assault Marines
  • A proper base for the Thunderhawk
  • Three objectives – the are optional, so a bit of a stretch goal.
+ The remaining infantry are at the same stage as the Thunderhawk – primed brown and with a zenithal spray of Colour Forge's Salamander green. I've also got their bases all complete – so they can be stuck on quickly once they're painted. +

+++

+ What needs painting? +

+ Bar the Thunderhawk, which is at the earlier sprayed-green stage, everything has had the black parts picked out. My plan is to tackle an in-game Detachment at a time, which means I have the following to do. From left to right in the picture above:
  • Air Support: Thunderhawk Gunship
  • Support: Four Dreadnoughts
  • Support: Four Dreadnoughts
  • Bastion: Four Tarantulas
  • Transport: Five Rhinos
  • Transport: Eight Rhinos
  • Battle Tank: Nine Predators
  • Transport: Five Rhinos (as three are already complete).
+ That's a Detachment a day, with two days for overrun and quickly polish off the extras. It seems doable – if rather more snug than I'd intended! Some, like the Dreadnoughts and additional Assault marines, will be much quicker than others, and I'm hoping transfers might make the vehicles a bit more swift. +

+ Anyway, that's the plan – wish me luck! +

+++

+ Outriders +

+ This was the most recent detachment to get worked up from a similar green-and-black stage. Painted on a spare bit of sprue and then glued onto pre-prepped bases, they took around two hours. +


+ Built for The Ashes of Armageddon mini-game I'm working on, rules for the outriders in the Horus Heresy era are in the latest expansion for Legions Imperialis, The Great Slaughter. Since these bikers had hung around unpainted since (yikes) 2014, I felt their time had come. +


+ Quick and simple to paint, I adapted the process in the linked inload above for them. The models are a mix of Space Marine 2nd edition plastics and the metal ones released for Epic: Armageddon. I like the variety this creates, and having some of the old plastics will help to blur the gaps between these and any new of the new ones I might add in the future. +


+ You'll spot a couple of Attack Bikes in here – these won't have any in-game effect for Epic: Legions Imperialis, but will allow them to pull double duty for any other Epic games. Besides, they look nice, which is the best reason for ever painting models! +


+ As with the infantry, I varied the markings on the shoulders a little, with the Legion/Chapter badge mostly on the right pauldron, but sometimes on the left and sometimes supplemented by flame markings. +

+ Pure uniformity can look great, but much as I like personality at 40k scale, I think my Marines deserve their personal heraldry at Epic scale. It's a (literally) little thing, but I hope it makes the army as a whole feel more grounded, and give a sense that these are individual soldiers, not tokens. +


+ The infantry have been completed for a while – I've been resting on my laurels a bit with them. It's nice to lay them out, and I'm really looking forward to getting some games in with them. +

+++


Wednesday, May 7

+ inload: Salamanders reinforcements for The Corsair Gambit III +

+ Combat Strategy +

+ Salamanders reinforcements for The Corsair Gambit III +

+ Another Epic-scale campaign event is coming up – the closing part of Maximal Fire's Corsair Gambit. You can get a ticket here [+noosphericexloadlink embedded+], if you fancy joining in. Having taken the Salamanders to the first two, I wanted to be there in the closing stages, too. +

+ Into the Fires of Battle! +


+++

+ Plans and preparation +

The event pack notes that the game size has increased to 3,000pts, so I've got some building and painting to do – though in a pinch I have plenty of Epic Ultramarines and various Titans that can fill in some space, so the pressure is off. Nevertheless, I'd like to have a nice cohesive army, and it'd be good to round off the Salamanders and apply some of the lessons I learned at the previous events. 

You can pick up on the previous panic-painting sessions here [+noosphericinloadlink embedded+], if you're interested in what the rest of the army looks like.

Long-time inloaders will know I like to build campaign-specific stuff for events like this, and since the fighting is taking place on the forgethrone of Legio Maximal, Nabed-Paleae, I'm planning to take a Warlord Titan. The points restrictions for allies (no more than 30%) mean that I'll have to replace Profugon Iratus, the Reaver who spearheaded the previous campaigns, but I do want to make sure that there's at least one Titan from the Legio there, fighting for its homeworld.

+++

+ Salamanders +

While a Warlord Titan will gobble up a significant amount of points (and also help to keep the number of Detachments/Formations down to help with game speed), I've also got some new Space Marines to paint. This is a mix of infantry and armour:


I think Epic-scale games looks best when there's a combined arms approach, with a range of everything from infantry, armour, aircraft and War Engines involved. Happily, GW's new FAQ for Legions Imperialis has addressed quite a few of the bits I disliked about the base ruleset, and has gone some way to rein in the strength and flexibility of infantry.

Nevertheless, what Space Marine army doesn't have lots of Space Marines? I had some Marines left on-sprue from previous events, so it's time for their time in the sun – and guilt-free, as they'll now behave more reasonably than their super-speedy previous incarnation. On the blocks are:
  • 8 stands of Tactical Marines
  • 2 stands of Plasma Support Marines
  • 2 stands of Missile Support Marines
  • 2 Command stands.

These won't add up to a huge amount of points, but will allow me to bulk up Detachments and give my marines some real sticking power around objectives. The Salamanders Legion special rule makes them very resilient morale-wise, and this will combine well with the Demi-Company Formation special rule, which makes supporting non-infantry better at supporting them when capturing objectives.

As you can see above, I have created a monstrous 'painting sprue' to hold the marines while I spray and paint them. To do this, simply snip off the extraneous supports, trim those below, and glue it to the remaining sprue so the models stand upright, in a consistent orientation. The two-part missile marines and plasma marines, some of which are oriented differently to the Tacticals, are cut off individually and superglued straight to the bit at the front of the painting sprue.

Once in position, you can prime with brown (I use Colour Forge's Hyrax Brown), then do a zenithal spray of Salamander Green – that is, keep the sprue at a consistent angle, and spray downwards onto the models, so the brown remains visible in the lower recesses.


The same zenithal spraying approach was taken for the vehicles, though since they're considerably larger, I also turned them upside-down and gave them a quick spritz with a darker green to suggest reflected environmental light. The additional armour units are:
  • 6 Land Raiders
  • 3 Predators
  • 2 Kratos
  • 5 Land Speeders
  • ... and 4 Rhinos, which don't currently have a place in the list, but are on standby to fill in space.
The Kratos are that rare thing in my army – a unit that doesn't have any place in previous editions of the game, and are included slightly begrudgingly as the only Heavy Armour choice currently available to Marines. With that said, I like the models a lot more now I have them in hand, even if they do have the weird half-visible tracks that I find so odd about the newer Marine Armour (Sicarans likewise flashing a bit of thigh).

In terms of armament, I've picked one of each Kratos main gun – primarily to try each one out. These will be Command Tanks, and if time allows, I'd like to go to town on these a little bit with markings and freehand. The Predator squadron is armed with lascannon turrets and heavy bolter sponsons as a bit of a change from the others, which have the old-school autocannon turrets and lascannon sponsons.

+++

+ A minor rant on list-building +

You'll spot that I've got 'spare' Rhinos that may or may not make the list, and that's because I can't bring myself to write a formal list just yet. I find army building in Legions Imperialis a chore. There's loads of fiddly technical hoops to jump through – 'you must have X'; 'you can't have Y'; 'you're only allowed 30%' – but they don't really do much to rein in abuse, as the stories of LI tournaments attests, with armies made of hundreds of Missile Support Marines, Dreadnoughts and Warmaster Titans, with a scant few stands of Tactical Marines to make it legal.

Secondly, the divided nature of the army list across loads of books makes experimenting with lists more awkward; and then there are odd decisions of iconic units like Whirlwinds and Vindicators still not being out, or the Land Raider, the Space Marines' battle tank for forty years inexplicably being made into a Transport...

Oof. All exhausting, and another unnecessary bit of 'mental friction' that prevents people from picking up what is at root a very simple and fun game.

+++

+ Painting +

Once dry, I started painting both infantry and vehicles using the technique outlined in this inload: [+noosphericinloadlink embedded+]. They're ticking over nicely, but I think I'll have to pick up the pace a bit to get them all up to scratch in time for the event. 

Of course, this is where future-proofing comes in handy, because I've got a pile of bases ready and waiting from the last big batch of Epic Salamanders I did – once the marines and Land Speeders are painted, it'll just be a case of gluing them in place.


Speaking of the Land Speeders, the squadron needs a sixth member – en route from the piractical forge-moons of eBay – and because the only ones I can find are pairs, I'll end up with six with the flamer and multimelta option.

It may be objectively worse than the plasma and heavy bolter variant, but who cares when I can indulge the pyromaniacal desires of my mean green Space Marines?

+++

+ What else is new? +

As you'll see below, there are some 32mm Salamanders awaiting a bit of painterly love.


Oh, and this...


Tuesday, August 27

+ inload: Post-event enthusiasm +

+ Gaming at The Corsair Gambit part II +

+ A company of Salamanders Predators sweep in on the attack. +

+ Last inload concerned polishing off a Legio Maximal Reaver Titan for a Legions Imperialis event run by Maximal Fire down at Entoyment in Poole. Very pleased to report that it was a lot of fun! Alex and Johnny who were running things had clearly put a lot of effort into making sure things ran smoohtly, and that was eased along by everyone being a really nice, friendly bunch of players. I'd thoroughly recommend further events down here – Entoyment is a real Aladdin's cave of gaming, and one of my few regrets was the schedule being so packed that I didn't get more chance to explore. +

+++

+ The background for this event was built on the results of the previous Corsair Gambit event earlier in the year, in which the forces of the Warmaster managed to establish a foothold on Nabed-Paleae, Forgethrone of Legio Maximal. As a Salamanders loyalist player, I was part of the taskforce sent to reclaim this critical world. +

+ I won't go into great depth about the games, but suffice to say they were all very fun, and it was a treat to come to a gaming event where everyone was so friendly. +

+ Game 1 +

+ A planetstrike against a defending Sons of Horus army. Highlights included the Kratos tanks that just would not die, the treacherous Reaver Moderatus (I missed all three of its – 2+ to hit – Volcano Cannon shots!), and an absolutely spectacular Sons of Horus army belonging to a great chap called Gary. +


+ I managed a narrow win on objectives here – my strategic skills rather flattered by the fact he had to deploy his army to defend the whole board, while I could pick and choose which parts to contest. +


+ If nothing else, these shots go to show just how cool Legions Imperialis looks on the boards Maximal Fire brought down – and bear in mind that this was one of ten or so, so they'd really put the effort in on terrain. +


+ Green on green. Playing against such a beautiful Sons of Horus army was a real highlight of the weekend. Helps that it was against such a sporting opponent and remained close all the way through. +


+ A shot from the viewpoint of Profugon Iratus. +


+++

+ Game 2 +

+ This game was an ambush scenario, with the Salamanders defending a central ridge against Night Lords attackers, led by a cunning commander whose name – alas – evades my leaking mem-banks. Apologies! +


+ A very different army to face. Rather than tanks with infantry and air support, here I was facing a mass of infantry, Dreadnoughts and jetbikes, largely deployed via Drop Pods. Quite the contrast, and a nice change of pace. At the last event, very little had been released, so most lists were pretty samey – not so here; a very diverse set of lists. +


+ Another very fun game against a lovely opponent who was very patient with explaining the intricacies of drop pods and transports to me. These events are always learning experiences for me; however well-prepared I try to be! +

+ A second close victory here – despite Profugon Iratus being surrounded and brought low by the swift and vicious Night Lords legion. Again, the result could esily have gone either way, and I benefitted from some event special rules that affected morale. The Salamanders' special rules are not quite a hard counter to the Night Lords', but I think were important in how a few close fights fell out. +

+ I had been warned that Titans were a bit pillow-fisted and ineffectual in Legions Imperialis, and I'm sorry to say that was my experience, too. On the plus side, I think having a lot of points tied up in one activation did help my games to go slightly quicker – and of course it was great to be able to field a campaign-specific Legio to lean into the theme of the event. +

+++

+ Game 3 +

+ The day closed with a short sharp shock of a game with the awesome Jon [+IGident: @jonlukedesign +] from Battle Bling – he had designed a lot of the bits in my army, in fact; from the Thunderhawk upgrades to the objective markers. +


+ I had faced his World Eaters at the previous event, and lost in a fairly close tussle across a dense city – but his beautiful army has clearly have been polishing their skills, as they took my army apart in two turns across the salt desert, with minimal casualties! +


+ I'd love to blame tiredness for the number of tactical blunders I made early on, leading to isolated picket forces being bypassed and troops being trapped in their transports, but full credit to him, he kept the pressure up and finished the job in a fittingly brutal World Eater style! +


+ Victories are lovely, but you learn a heck of a lot more from defeats – and when they're in such a friendly, collegiate atmosphere with such a nice gang, there's really nothing to mope about. A third very fun game. +

+++

+ Closing calculations – on Legions Imperialis +

+ I don't think I'm saying anything too contentious to say that Legions Imperialis is a flawed system. It is also, however, a lot of fun. Events like this demonstrate to me that you do get spectacular thematic games, and beneath all the needlessly complex chrome, bells and whistles it retains a good underlying engine that looks great on the table. +

+ You do, however, need to play with the right spirit of cooperation. It would be very easy to abuse the army-building, and if you're looking for the 'best' options in-game, there's rarely even much consideration. With this borne in mind, I was really pleased to see the sheer variety of armies and unit types that people had brought – these were a group of people who clearly love both the setting and the scale, and valued playing the game first and foremost. I'm very grateful to have been playing in this sort of environment. +

+ I hate to say it, but as it stands I'd hesitate to recommend Legions Imperialis to new players until there's a substantial FAQ or revision. I hope that in a year or two the army list, agonisingly incompletely and broken up across multiple expensive expansions, is collected into a single volume. +

+ Of course, when you do get these ingredients together – sportsmanship, beautiful armies, great tables – it's a heady combo, and the game is really very fun. Things largely do what you'd expect them to, and you get the sense of a 'grand sweep of battle'. I just hope GW can get their act together to make Legions Imperialis the success it could be. +

+++

+ Closing calculations – on the Corsair Gambit +

+ On the event itself, I have no real criticisms. Very nicely run, and some flavourful additions that added to the theme. Three games at 2,000pts did feel a little crammed, but we were asked midway through the first whether we'd prefer to cut things to two games. We ended up pressing ahead for three, which I think was the right decision, but for future events – particularly if they're at larger points limits – I think I'd prefer a two-game per day approach. +

+ Personally, I'd have loved this to be done over the course of a weekend; it was nice to meet and catch up with people from last time, but it would have been even better to have less time pressure, and some more time to socialise. +

+ We also got to see a sneak preview of, and free sample from, Battlebuilder – a very snazzy-looking nameplate service that's a collaboration between Maximal Fire, Battle Bling and some others. I hope to do a proper look at that in the near future, but the thing that made it jump out to me is that you can design things 'live' on the website itself. +
 
+ Glittering prizes +

+ I was also delighted to receive the Best Painted trophy, which you can see nuzzled between the free objectives pack we were given, and a flyer for Entoyment's Beachhead 2025 event next year. Winning this was very unexpected, given the quality of armies on display. Turns out that I can thoroughly recommend painting a Titan from the organiser's Legion to score some brownie points with the judges! +

+++

+ The true test of an event is whether you come away filled with enthusiasm, and I'm happy to say that I'm already planning for a potential third event in the Corsair Stars – you can see some additional Land Raider reinforcements above, and as you'll see below, I've also got started on an Iron Skulls maniple for Adeptus Titanicus, too. More on this shortly... +


Thursday, May 22

+ inload: Legio Maximal background and the Warlord Titan 'Consequens Indevitatus' +

+ The Wages of Sin +


+ In which we look at a Lucius-pattern Warlord Titan, scribble down some notes on Legio Maximal, and consider whether to fight Eldar or Orks first. +

+++

+ Who are the Legio Maximal? +

The Vigilants (Legio Maximal) are the brainchild of the Adeptus Titanicus and Legions Imperialis podcast Maximal Fire – hence the name – who ran a contest to explore the background of their Titan Legion, and their surrounding domain. My entry seemed to catch their imagination, and I was lucky enough to win a lovely pile of loot! 

A YouTube video on the background for the Vigilants, or Legio Maximal, can be found on the Maximal Fire Podcast channel in this vid-link [+noosphericexloadlink embedded+] (go subscribe!), but if you prefer written content, here's the text:

Monday, July 22

+ inload: Battle Bling's Reaver Titan armour upgrades +

+ Building Legio Maximal – The Vigilants +

+ Battle Bling upgrades for Adeptus Titanicus +


+ I've got another gaming day coming up at Maximal Fire's Corsair Gambit campaign down in Poole, and will be taking my Salamanders once again – hoping to improve on my record of two losses and – uh, another loss. Themed around the battle for control of Nabed-Paleae, the throneworld of the Titan Legion Legio Maximal, I wanted to make sure that I brought along at least one Titan for theme. +

+ You can read about the campaign here: [+noosphericexloadlink embedded++noosphericexloadlink embedded+] – at time of writing, there are still some tickets available, if you fancy joining in. +

+++

+ Battle Bling to the rescue – Reaver Titan upgrade kits overview +


+ I had the pleasure of meeting Johnny and Jon of Battle Bling at the last campaign day, and having politely cooed over my Thunderhawk (above), which uses their upgrades – you can read more in this inload – they very kindly sent over a selection of Titan upgrades for me to use. I'll focus on the Reaver here, but will come back in the future to show you the Warlord versions, too. +

+ Below is the snappily-named 'Loyalist Armour Plates compatible with Reaver Titans' kit: + 


... and its stablemate, the 'Traitorous Armour Plates Compatible with Reaver Titans' kit: 

+ Both are shown straight from the bubble-wrap bags in which they were supplied; the supports have already been removed, and there's very little clean-up work necessary. +

+++

+ The Titan models from GW are shared by both sides of the Horus Heresy civil war, with spikes and stylised eagles shared by both sides. While you can err one way or the other with the plasic options, they're far less obviously 'Chaos' or 'Imperial' than you might expect from 40k. +

+ These kits allow you to make your loyalties clearer – though it's worth pointing out that with the right paint job, you could happily scatter parts from the 'Traitor' kits across a more savage Loyalist Legio, and vice versa. These aren't upgrades dripping with purity seals or leering daemon faces, but subtle options for variation within your Maniple or collection. +

+ Differing in sculpted detail and trim, both kits use the same underlying plate geometry, and so are cross-compatible – you could mix and match parts with each other (and the standard plastics, of course) on the same Titan. The kits come with 10 pieces each:
  • 2 pauldrons (shoulder armour)
  • Upper and lower carapace
  • Front and rear pelvis
  • 2 parts for each lower leg
+ There are two options for Loyalists (Classic and Winged) and two for Traitors (Heretic and Forsaken). These differ in the decoration of the upper carapace, and the shape of the pauldrons (shoulder armour) – the other plates are common to each kit. You'll note that there are 13 pieces in each picture above – that's because I was sent both options for each. You'll need to pick which bits you prefer; so I'll do my best in this build-along to showcase all the options. +

+++1

+ The key question – fitting +

+ Upgrade kits can be a problem if they're not properly designed and manufactured, as parts end up not fitting properly together. I'm happy to say that, being 3D-printed, these don't have the shrinkage problem of resin manufacture. They fit perfectly to the plastic GW Titan parts. They're also reassuringly sturdy – I've had plenty of 3D printed material that is very brittle and breakable, but whatever Battle Bling uses is a great balance of strength and flexibility. +

+ Having said that, these aren't as flexible as plastic, and won't put up with much pressure from a knife. If you do end up with a breakage, it's likely to be sheer and clean, so a quick fix with superglue will put things right. +

+ The leg armour plates come in two parts, and are a great example how well they fit. On the left you can see the two pieces assembled around the plastic lower leg of the reaver, with the join scarcely visible. On the right you can see the two components, with tongue-and-groove connectors to help slot things into the correct position. +

+ I don't want to pre-empt the finished result, so I'll reserve judgement 'til I've finished building the while thing. Nevertheless, early results are very reassuring that the finished kit is :
a) Going to look ded proppa
b) Be nice and sturdy for gaming.

+++

+ From the ground up – Building a Legio Maximal Reaver part 1+

'Burning cold, biting heat; these are the stressors that led to life.' So begins the Liber Maximalis, the curious record of the Legio Maximal's difficult inception. 

  • Warcry/Motto  'Magno conatu, magnis clamoribus proelii, et festinanter progredi longius quam hostes, triumphabimus.'
  • Founding  Great Crusade 
    • Conscription-contributions from numerous Legios; principally Gryphonicus; Krytos and Tempestus
  • Homeworld  Nabed-Paleae
    • Warden Domains: Corsair World Cluster
  • Allegiance  Unknown  (Fidelitas Scindo)
  • Colours  White, Black and Orange

+ Let's look at how you can put these upgrades to use, then. To give the kits a proper road test, I thought I'd combine their use with a step-by-step on how I go about posing my Titans.  This is the first part: preparing the base and posing the feet. +

+ Theoretical +

+ Posing can add a lot of character to your Titan. Pose is always down to personal preference, so my key recommendation is to do what you like. The basic kit is very flexible and poseable anyway, so I always think it's worth taking some time to make your God-Engine unique. +

+ For me, I like Titans to look huge and ponderous – but not static. The kit will allow you to create great walking poses, particularly on a flat base, but if you want to have a lifted foot, or walk over rough terrain, I find adjusting the feet is critical to giving that extra dose of realism and weight. +

+ In concert with being out of contact with the base surface, even subtly adjusting the toes to hang slightly below the level of foot gives a more natural gait to this WIP shot of Titan. +

+ However, fiddling around with every joint is an easy road towards a rag doll, the joints looking floppy or the overall impression simply looking slumped or stilted instead of predatory and intimidating. +

+ Do some research for a pose you like. Decide whether you want to go for a super-dynamic or more restrained look. Be reassured that even minor changes can make a surprising difference. +

+ To help decide on a pose that will be successful, consider the following:
  • Pace and role – How fast do you want your Titan to be moving, and does this fit its role? Having just a toe or two in contact will make the Titan look very fast – but it fights with the idea of them being big. Even at full stride, larger Imperial Titans will likely have at least one foot in full contact with the floor, simply because of their sheer mass. Lighter Scout Titans can get away with less – perhaps even to the point of jumping.
+ The Warbringer is an artillery Titan; its carapace mount making the centre of gravity even more unstable than other Titans, so a ponderous march is fitting. +

  • Dynamics – The faster the Titan is moving, the more the centre of gravity needs to look right. This is key to selling the post. If the centre of gravity doesn't chime with  the placement of the feet, your Titan is going to look like it's toppling over, rather than speedy. Conversely, if your Titan has both feet braced, you can play about with the centre of gravity and bring dynamism into play from the waist up. 


  • Limits – There are physical limits on the poses available because of the structure of the Titan. The knee, for example, will only bend so much before the armour plates won't fit. Some joints don't have such limits – the hips are very free, for example – but you need to consider the leg as a whole. A knee at full lock and over-extended hip is going to look comical rather than intimidating. You can, of course, trim things away for more dynamic poses, if that's your jam. To maintain movement in a stable, straight line, the centre of gravity will usually be over the foot in contact with the ground.
+ A pacey Warhound is better able to sell a sense of speed and movement than larger Titans. Note that the leading foot is almost directly under the centre of gravity, and that the torso is very balanced. Note also that the trailing leg is directly behind the front leg, rather than out to one side. These are what give the impression of fast – but controlled – forward momentum. +


+ Before you begin, decide on the pose you want. Picture it in your head. If it doesn't make you feel too daft, try standing in the pose yourself, to get an idea of how your legs, feet and pelvis relate to one another. +


+++

+ Practical +

_1  Gather some small rocks. These should be a mix of sizes, and ideally include some with flat surfaces to make it easier to glue them securely to the base. I prefer to find more jagged rocks, to add additional texture – but as the main point of these is to create some variation in height for the Titan's feet and legs to interact with, you could use smooth pebbles and build up texture later.

_2  Use superglue to attach them to the base. Aim for clusters that suggest rocky outcrops, rather than scattering them evenly over the surface. As we're properly testing this armour's flexibility, I've put a large cluster for one foot to rest on, about a third in from one side. For easier posing I suggest you leave plenty of space for at least one of the feet to sit flat, and avoid putting too many rocks down.
_3  Use a spatula or old brush to apply a layer of acrylic texture paste. I used Winsor & Newton's Galeria sand texture gel here, but you could happily use an equivalent art medium, or polyfilla (Spackle in the US, I think). Work this in closely around the rocks, building up the surface and binding the rocks firmly down.

_4  Once covered, spend a little time moving the texture paste around to avoid anything looking like brushmarks or a considered texture. Add some texture on top of the largest rocks, but avoid the sides.

_5  Pour some builder's sand on top and give it a gentle shake. You can press down or give it a spray of clean water to help settle it in and affix it to the texture paste, but this shouldn't be necessary – it's quite sticky stuff.

_6  Tip away the excess and run your thumb round the base to remove any stray particles from the rim. The texture paste will now stay tacky for a few hours, so be careful when handling it. 

_7  We've got a critical hour or so in which we can still embed material in it and substantially change the texture. Here I've dropped in a couple of Maximal Fire crates, but you could use any scatter terrain or spare miniatures you have to hand. Gently press them into the surface, then use your spatula or old knife to held draw the texture paste up to them, as though dust or dirt has settled against them. This helps the objects look seated in the base, and stops them looking weightless.

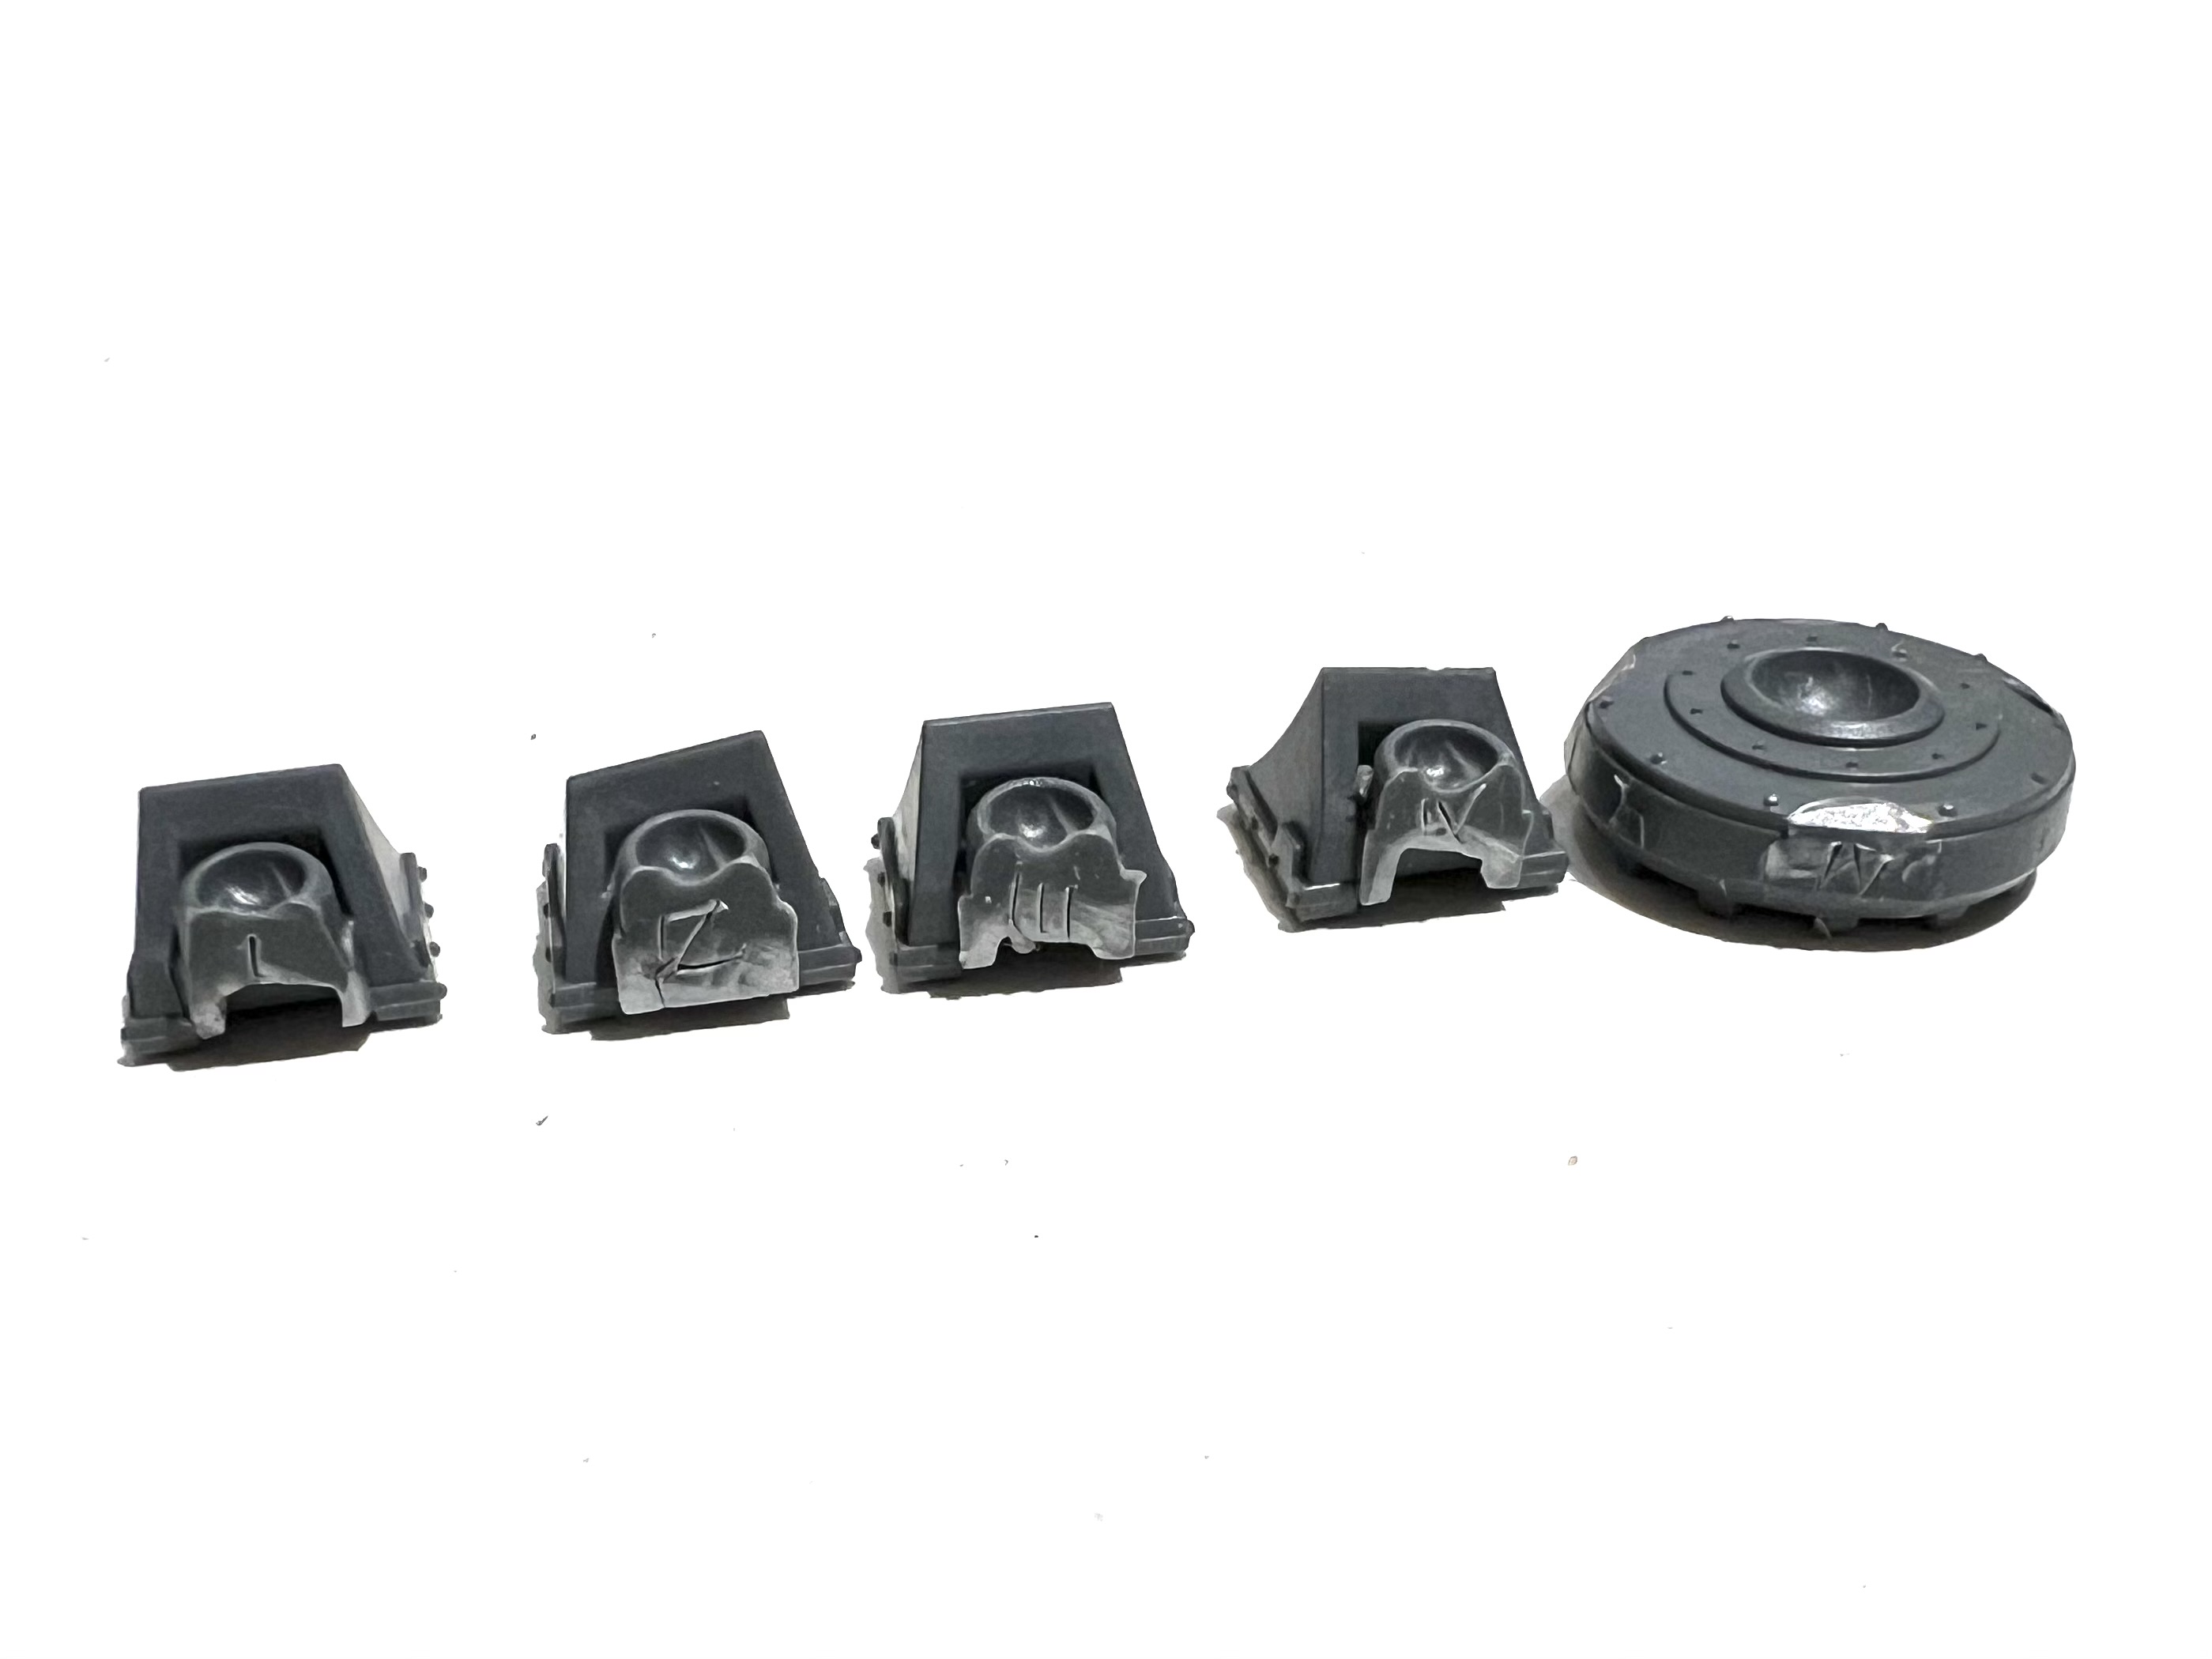
_8  It's time for our Titan to start making footprints. Remove the feet from the sprue, and make sure that you know which is left and which is right – as you can see above, the frontmost and rearmost toes are asymmetrical. Don't be caught out!

_9  Place them lightly on the base to check the basic positioning. This picture shows the problem with using the feet straight out of the kit for uneven ground – they look stiff and weightless. We need to get those toes flexing to account for the uneven ground.

_10  The scary bit! Chopping up the irreplaceable feet can be nerve-wracking, but if you use a sharp, fresh blade, you'll get a nice clean cut. Make a straight vertical cut as close to the central circular part of the foot (the 'sole', for want of a better term) as possible. This will mean cutting partially through the recess/divot for the piston. Don't panic about this – it will largely be hidden by the piston and armour plates later. Still, try to make the cut as clean as possible.

_11  The first removed toe. 

_12  Removing as little material as you can, clean up the area to restore the shape to the sole and remove excess plastic that has been pushed out of shape by the cut.

_13  Use the blade (or a pen or paint) to mark both the toe and the part of the sole from which you removed it with a number or symbol (Roman numerals are easy – and thus safer – to make), and repeat with the other toes. This will make it much easier to reassemble the foot.


_14  Use polystyrene cement to re-attach the front toe at the required angle. You can trim the back of the toe and the area of sole flat at the attachment point to help ensure a decent grip. Here, you can see that I'm picturing the front toe is flat against the floor, with the sole of the foot lifting away. This will be the rear foot, which is in motion.

_15  Attach the side toes in the same way. Before the glue is completely dry, hold the foot in position on your working surface as shown, to check that the placement of the other toes helps sell the movement – in this case, the side toes droop a little and are slightly rotated to keep the parallel with (but not touching) the ground. Note that you can't take this rotation too far, or you'll find trouble with the pistons later on.


_16 The moment of truth! Place the foot in position on your base. It's best to do this before the polystyrene cement is dry, and while the texture paste is still slightly malleable, as you can then adjust. Timing this is – quite literally – a balancing act. Too early and things will slip and fall apart; too late and things will be trick to adjust. Once happy, gently press the front toe down to force the texture paste outwards, letting the foot sink in a little.

It is key to leave enough space for the other foot – and the rest of the Titan! Having the feet too close together will result in a Titan that looks vulnerable or nervous; not the fierce predator we want. Place the foot well to the left or right of the centre line of the base, and interacting with the rocks and details you've put into the base already.


_17 Check the pose works from different angles, and use a modelling tool to carefully tweak things where necessary. Here, you can see the Reaver's right toe has been twisted to bring more of it into contact with the rocks beneath.


_18  Glue on the rear toe. You can see that the join is quite ugly. You can wait until everything is secure to clean it up, or rely somewhat on the pistons and armour sparing your blushes.

_19  We now follow a similar process for the other foot. The difference now is ensuring that the foot pose complements, rather than replicates, the first. Since the trailing foot is lifting away, it can't be bearing the weight of the Titan – thus this leading foot must be doing so. We place the sole of the foot at flat as possible on the base. When placing it, remember to leave a gap for the hips and waist. In this particular example, the rocks make movement awkward for the Princeps – so he carefully places the Reaver's leading foot on the lowest, flattest part of the rocky outcrop, for the most support.

_20  Attach the toes as before to help emphasise the pose. Here, the toes are as flat to the undulating surface as possible, and the rocks mean that they are often tilted upwards to maximise the surface contact with the rocky ground.


_21  Positioning needs to be done on a toe by toe basis. Rely on the physical model in front of you, and let gravity sink the toe into position, before making adjustments to ensure the pistons and armour will line up.


_22  The feet are now complete. Thus far, things have been worked will still flexible and malleable, but we now need our foundations to be as solid as possible to build upon. Leave the whole thing to dry overnight, or longer if possible.

+++


+ This is the end of the first part of the tutorial. We'll come back soon to start to build on top... +