Showing posts with label basing. Show all posts

Friday, June 5

+ inload: Building the Reaver Titan +

+ Scythian Uprising + 

+ Update on building the big Reaver – things are ticking along, and I thought I'd share some notes. +

+++

+ Building the Scythian +


For anyone fluent (or at least conversant) in the technolinguis dialect of printing, my (very kind and indulgent friend) tells me that this was printed in PLA with a 0.2mm nozzle. having handled 3D prints before, I was expecting quite a lot of cleaning up to remove layer lines, but I was pleasantly surprised with how clean it was. There is a surface texture, but it's more like the slight drag you get from running your fingers over the paper in a book, rather than definite steps and coarseness.

I worked over the surfaces with DSPIAE sanding sponges – some very useful little tools I picked up on the recommendation of Stuntwedge – and did a little sharpening and cleaning with a craft knife, but in all honesty it required very little clean up. Even the sanding was mainly for my own peace of mind, and because I'm intending to use oils – I didn't want to have channels for them to flow down.


As shown above, even before cleaning the parts slotted together very neatly on the torso, and it's got a full interior.


After clean up I broke it up and gave it a once-over with grey primer. I've mentioned before that I do this sometimes to help pick out details. I'd like to do a nice job on this kind gift, so I want to give it my best shot.


... quick shot after priming. Grey makes details easier to see, by providing a little tone to the white PLA.


And the reason I've primed it is visible here – can you see those layer lines on the curves on the left-hand side of the picture? These need cleaning up, and there are few areas that would be improved with another light sanding to improve the finish.

+++

+ Building the base +

It's unlikely to see too much gametime, so priority for the base is stability and display. It amused me to have a scaled-up version of the oval Titanicus bases, so I ordered an oval plaque from an MDF supplier. It measures 29 x 42cm (A3 size, with the corners cut off, essentially).


A layer of polyfilla formed the base texture, over which I placed some layers of 5mm thick foamboard  and larger rocks to build up some relief. Very large ones are a great opportunity for adding some height, and you don't have to go completely over the top – just enough to break up the sense of artificial flatness and add some natural scale.

Once dry I added my usual mix of Golden Acrylic texture paste, small rocks and sand to texture, bond and seal the surface. I added a little soil to the mix for variety – just some compost that I baked in the oven at 100 degrees for twenty minutes to kill off any bio-forms and render it inert. A layer of PVA over the top will later seal it all in and help prevent degradation.

I didn't plan the base specifically for the pose – in some ways I wanted to have the model adapt to what's there, as I thought that would be a nice way to add some authenticity. More on the posing and building in a future inload – so for now, I'll leave you with where it currently stands:


Wednesday, March 4

+ inload: Warden Titan base +

+ Warden Titan base +


In preparation for a new Titan arriving via the uncertainties of warp conveyance Royal Mail, I've polished off this 80mm base. 

Not, perhaps, the most exciting inload update I've ever posted, but it does flag a couple of things that might be of interest – scale basing, and lighting.

+++

+ Scale basing +

Last inload I showed a Titan base that included a couple of Epic-scale figures. I include scale hints like this on Epic bases more often than not, and the reason for that is to reinforce the scale. 

As you can see here, however, things are a bit more neutral. There's a couple of small boxes and some sort of resin engine that's come from my bits box, alongside a big rock – but none of these items really tell us much about the size of things. After all, are those boxes shipping crates or small parcels? The grass tufts I've used are no more helpful. Are they long grasses or shrubs? 

Basing is important, but it's easy to get caught up in trying to be too clever by half. Do we need to tell the viewer the scale? It's useful sometimes, particularly when you're trying for a specific effect, but it's far from necessary. Sometimes you can just use the bits you have and rely on the model – or the broader context of the force – to tell the rest of the story.

The thing we learn here is that there are basing items that are scale-agnostic, which just add texture and interest to break up large areas. This is the key here. Rocks, boxes and so forth won't suggest scale in the same way as ruins, vehicles or figures. Roads and foliage offer a halfway house – the scale they suggest will depend largely on other prompts – the markings you add to a flat road will tell us whether it's a single track or a multi-lane motorway. Foliage and greenery can likewise be a bush or a tree with a little work.

+++

+ Lighting +

While I'm no photographer, I do work with them, and their insights have really helped me with getting clear pict-captures. The below notes are intended for absolute beginners to photography, who are struggling to get good shots of their models to share; but there's a huge amount of info available online, so do traverse the noosphere – there's a wealth of brilliant info available to inload from far more talented and skillful adepts than myself!

+++

In an ideal world, we'd all have time, budget, space and inclination to get beautiful colour accurate shots of our models – but I suspect I'm far from alone in taking quick snaps with a camera phone and relying largely on natural daylight. I take the vast majority of the pict-captures for this noospheric node by an east or south-facing window, which means there's a suprising amount of difference. 

Pictured below are two shots taken with the same phone camera, at different sides of the same neutral grey room.


Just look what a difference the daylight and angle can make. The warmth is absolutely washed out of the shot above, and the contast looks really stark. Neither is in direct light, so the shadows are relatively soft – but what a difference the angle makes to the big rock at the back. It's washed-out above, with strong shadows, while below it's much more evenly lit.


If you're finding it hard to get accurate shots of your models, even something as simple as changing where you're taking your pictures can make a real difference. 

Friday, July 21

+ inload: Defenders of Nocturne +

+ A batch of basing +

+ The Salamanders continue to emerge from grey plastic, taking on their adult coloration. The zenithal priming approach is a really quick way to get some basic colour down; and I keep having to stop myself from fiddling too much with it. +


+ These were sprayed with Halford's brown camouflage paint all over. Once dry, they were then hit with Halford's camouflage green with the can held at 45 degrees and from a foot or so away. Having allowed that to dry, I repeated the process with Colour Forge's Salamander green spray [+noosphericexloadlink embedded+]. This is explicitly matched to GW's Warpstone Glow, so it's a very handy colour to have for Salamanders. +

+ From there, I've simply done the basing with Winsor and Newton's Galeria Sand Texture Gel [+noosphericexloadlink embedded+], which was successively drybrushed with Skrag Brown (or Calth Brown) and Balor Brown, before the base rims were painted with a dark brown (Rhinox Hide, I think). +

+ Once that was completed, I used Abaddon Black diluted with a little flow improver and water to paint the weapons, pauldrons and metallic areas. I find adding both helps for basecoating, as the altered surface tension helps it flow. +


+ As to the rest of the force, there's been little substantial progress on the marines beyond painting their gauntlets. This little detail, however, substantially improves the look, as does the basing. Little steps build up to big adavances – but you've got to keep making them! +

+++

+ Legions Imperialis +

+ ...and so to the return of Epic. Warhammer Community must be doing something right in their communications, as the more I'm reading about it, the more enthused I'm finding myself. +


+ The most striking thing here for me is how much better everything looks when it's designed as a coherent range – rather than bit by bit over the years, as with the old Epic range. There's a clear internal consistency of size, scale and aesthetic for the new models, even if – as with the Traitors – GW seem to have chosen a scheme that makes it all but impossible to make out. +

+ Death Guard versus Iron Hands in urban combat – or light grey versus dark grey on grey – strikes me as an... uh... interesting way to catch people's eyes with a new scale. Just compare how the detail – soft as it is – of the older sculpts on the left with the new ones on the right. +


+ This new size is quite hard to compare from the image published on WarCom, so I've done a crude Photoshop job to put one of the old Mark VII plastics next to the new Mark VI. Assuming that the composite image is made up of models taken at the same angle and distancethe size difference between the old models and the new looks quite marked – I'd guess the new Tactical Marines are going to stand around 9mm tall, though this is a bit of a guess. +

+ While the old Epic scale was nominally 6mm, this was notoriously variable, and the Space Marines were notably small when compared with some of the later releases. I'd guess that the Mark VII model here, for example, was barely 6mm when including the round base insert. When removed, the model's probably only 5mm tall. Older Epic models are thus going to look quite puny when pictured in comparisons like that above, but given the sweeping scale of the game, I don't think this is going to be very noticeable at all during a game. +

+ I think rescaling or establishing a 'new normal' for an ongoing Epic line was fairly inevitable, and given the difference in quality, I'm not going to gripe too much. Since I doubt a 'true line of sight' approach will be used, there's nothing stopping people using their old models beyond personal preference, so it's down to the new models to grab people and pull them in. Personally, I'm looking forward to both using old model to try the game out, and to painting  and playing the new ones. I've enjoyed painting 15mm models a lot [+noosphericinloadlink embedded+], and think these 8–10mm models are going to hit a lot of the same buttons. +

+++

+ One final picture for a bit of fun... +


Wednesday, July 12

+ inload: Basing, oils and transfers +


+ Experimental techniques: Salamanders +


+ The problem with batch painting is that everything moves in lockstep; there are few rewarding stages where you start to see how things are progressing. One advantage, however, is when you're trying out new things – or combining things in a new way, as I am here. +

+ Basing +

+ The bases are a fairly obvious development since last time. These were coated with pumice gel for texture and allowed to dry. They were then coated with burnt sienna oil paint. Why oils for basing? The short answer is to see how they worked. The tubes of burnt sienna I have contain far more paint than Citadel pots, so it's quicker, cheaper and easier to mix up a big fluid pool. As I'm doing this in relatively short bursts, I don't mind the additional curing/drying time of oils over acrylics. +

+ Secondly, touching the (dry) textured base with a little thinner causes the solvent to instantly flow outwards into the recesses, so when the oils (themselves diluted with Sansodor solvent) are added, they likewise flow. It's all very quick and clean, and I found it much easier to avoid accidentally getting paint on the model. +

+ Finally, I was planning to use this colour as the oil wash on the figures – and since it would be in the recesses anyway (representing dust and trapped dirt), it nicely suggests how the environment is affecting the marines, tying them in. +

+++

+ Transfers and washes +

+ More subtle additions are the transfers, which were applied just prior to the base texturing. I've not used transfers much, but after seeing so many used so nicely at Golden Demon, I thought perhaps I'd been a bit unfair to them, and figured I'd give 'em a try. +

+ They were applied using water, then allowed to dry. At this point, they stood out as shiny and not sitting quite flat – the problems I'd faced before. Enter two new products to me: Microset and Microsol. These are brushed on (Microset first) and allowed to dry. They soften and slightly dissolve the transfer sheet, leaving the printed pigment in place. I've found they take a couple of coats, so patience – or batch painting – is useful here. +

+ As you can see, a couple of coats of Microsol followed by Microset goes a long way to settling the marking itself nicely, and avoiding the shiny 'stuck-on' look. It does, of course, also influence the style available – I think my usual painterly, grungy look is going to look odd; so a slightly cleaner style is going to be necessary to avoid the transfer sticking out like a sore thumb. +

+ And speaking of transfers, if anyone has some yellow flames (as shown by the sole remaining example on the third line down, just below the Veteran markings) that they don't want, please do get in touch; I'd be happy to buy 'em. +

+++

+ Oil lining +

+ Before on the left, after oil lining on the right +


+ Sometimes called a 'pin wash', oil lining relies on the low surface tension of the solvents to cause the paint to flow down recesses. It's quite a striking (and fun!) effect to watch: you take a brush loaded with the thinned paint to the model, touch it to a recess such as a joint in the armour or panel line, and it rushes out along the line, instantly creating a visual break between the two. +

+ You can do it with any colour oil paint; the important thing is to dilute it to a very fluid consistency with thinner; closer to whisky than milk. I've used burnt sienna for the reasons outlined under basing, above – and note that this warm brown contains a reddish tinge. Red is the complementary colour to green, so it combines to form an attractive neutral, and stands out nicely. +

+++


Tuesday, January 24

+ inload: Warmaster Titan basing and varnish woes +

+ Basing the Warmaster +


+ Well, no surprises about what today's inload's about. With an unanticipated spare couple of hours, I managed to quickly get the base metallics down. I used a dark gunmetal made from a combination (not a complete mix, but a pool of separate slightly intermingled colours) of Valljeo dark stone (a sort of browny grey), Citadel Abaddon black and a little scorched brown. +

+ I used a much of the same palette for the base: dark stone for the road, and scorched brown for the dunes/rocks. Both were then successively highlighted with greys and browns/sandy colours respectively, before a final drybrush of Army Painter's mummy robes. +


+ Why use the same colours in the base and the Titan? Well, this little trick helps to integrate the different elements, so the base and Titan read as a single thing. +

+++

+ Critical damage +

+ Alas, after this successful painting session, things went a bit [+SCRAPSHUNTERRORABORT+]. I sprayed the Titan with enamel varnish. This had a muting effect on the metallics, as you can see above – there's no 'sparkle'. This I had anticipated – it won't be a problem, as I'm intending to work over the top with more metallics. +

+ The problem was when I came to use oils on the yellow – while it applied nicely, and could be removed with a bit of thinner, after about fifteen minutes – just long enough for me to be satisfied that the test panel was working – the varnish began to crackle and flake off, taking the oils with it. Fortunately, the underlying yellow seems intact. +

+ I'm not entirely sure what happened, but I abandoned things overnight to allow everything to settle, and allow me to assess in the cold light of day. This was an experimental process, so I'm not too disheartened – better to stop and re-assess before going to far. Potential issues:
  • Use of automotive spray on the yellow – perhaps this was not allowing the varnish to penetrate/settle properly.
  • Not enough time for the varnish to dry. I left it for just four hours; perhaps overnight would have been more sensible.
  • Use of enamel varnish, rather than the acrylic varnish I've previously used.
  • Use of Sansodor thinner, rather than white spirit.
+ Whatever the cause, some further thinking means that I'll see whether the remaining oils can be removed with thinner without affecting the yellow. If so, then that implied to me that I won't necessarily need to use a varnish – in short, the thinners aren't strong enough to penetrate the yellow paint. +

+ From there, I'll begin to reapply the oils to the yellow on a test area, and start again. +

+++

Wednesday, December 15

+ inload: Building Isorian Tsan Ra +

+ How to build Tsan Ra +

+ Building tips and review of this Isorian Senatax kit for Warlord Games' Beyond the Gates of Antares +

+ Primed and ready for paint... +

'The Tsan Ra are a race of aliens that are also part of the Isorian Senatex. The Isorians’ advanced hybrid human-alien technology is partly derived from the bio-silicate interface spores of the Tsan Ra’s ancestors, the warlike Tsan Kiri.'

+++

+ Aliens! Proper aliens! While I do like the idea that the Beyond the Gates of Antares universe has a focus on future human evolution (induced or otherwise), part of the appeal of fantasy and sci-fi games is the variety of creatures and civilisations you find – a bit of galactic exploration from the safety of your tabletop. It also helps when the models are appealingly weird, like these awesome Tsan Ra models. +

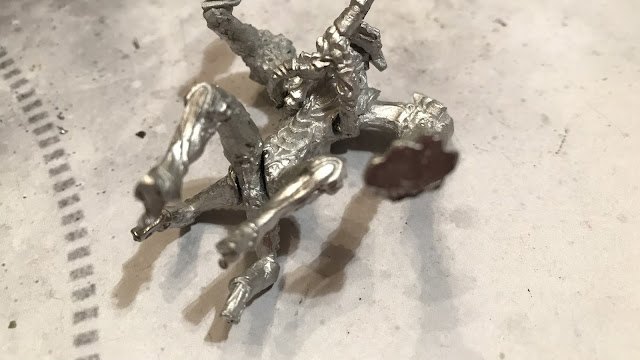
+ A potential downside of building aliens, of course, is that it's hard to find references if you're unsure where things go. It's not like looking at a human figure, where you can quickly tell if their legs are on backwards. Being a fairly experienced modeller, I tend to just crack on with things, but when I received these metal figures, it triggered a wonderful sense of nostalgia – reminded me of rifling through racks of models with my brother in our local shop, Spot On Models – so while I was thoroughly enjoying myself, I thought I'd try and be helpful and document the build. +

+ Here's my experience of building this Tsan Ra Command Squad. I hope it proves helpful – or at least helps you to avoid any pitfalls when building your own.

+++

+ Containment breach: What's in the box? +

+ The box. Nothing much to say here; except that the pictures on the box are all the help you're going to get on construction – though there are useful front and back pictures on Warlord Games' website here [+noosphericexloadlink embedded+]; isn’t the modern IMTel wonderful? +


+ Everything's all neatly packed in a blister. I've removed the protective foam that stops things rattling around (and the packing note), and you can see the flail of anatomy and 40mm bases that makes up the kit. +


+ Speaking of bases, they're a flat design that’s unfamiliar to me – strikes me as nice for hiding the bases; good for immersion. For those interested in swapping things out, they're 40mm across – so the same width as a Games Workshop base at the bottom of the bevel. That's of note in case you're planning (like me) to swap them out. Already cramped on a 40mm base, there'll be a little more overhang for these figures on a GW base. +

+ Included in the pic above is a 25mm Warlord base and (what I've now realised is) a 28mm GW base, so not the best point of comparison! +

+ First steps +

+ Few things in modelling are more annoying than realising halfway through a build that you're missing a piece, so it's worth checking through, particularly if it's an unfamiliar kit or subject. If you are missing a bit, then get in contact with Warlord via their website. +

+ This is what should be in your blister +


+ I gave the bits a once-over to check for no miscasts – though given their unfamiliar alien anatomy, I'm not convinced I would have spotted anything less than glaring! All seemed clear; nice crisp detail. I was particularly impressed with the mould lines – or lack thereof. The metal’s a slightly different mix to that which I’m used to; it seems slightly more prone to breaking than bending (perhaps the quality that allows it to hold detail so well), so I recommend caution in reposing. +

+ The weapon arms and heads (both on separate sprues at the top right of the image) seem to be interchangeable, so I set those to one side and worked out which arms/legs went with which body. +


+ The figures are nicely designed to minimise the traditional problems of multi-part metal models (looking a bit flat, fragility, small contact points for joins etc.) while still retaining dramatic, three-dimensional poses. As much is built into one plane as possible – though the result is that the additional rear legs of this one are built into a pair, creating a cross-structure at the waist. The third part of this model is a big front foreleg (arm?). This has a peg that ensures it fits in one intended position. +


+ The same is true here; and whether through accident or – as I like to think – design, here's it's the other outside foreleg (arm?) that's separate: that makes it impossible to confuse the bits. The rear cross-section of legs (for want of a better term; for who knew we'd need terminology for alien anatomy?) surprised me. From appearances, I assumed the more outstretched legs would fit with this body, but as it turns out, all four legs are bunched up in a leaping pose – check against the picture on the box. +


+ I've left the front forelegs section off this picture, but both form a single piece. It's the small rear pair of legs (top right of image) that confused me here – but they're aligned correctly in the image; the 'knees' hinge backwards for these ones. Don't be tempted to try to fit them in the other way around – the fit is loose, and it seems like you can cram 'em in there at first. +

+++

+ Construction and pinning +

+ Parts chosen and dry-fitted, I got stuck in to building. I mentioned a bit of nostalgia earlier, and 12-year-old me would have gone straight in with the glue. I’d caution, however, that multipart metals are notorious for fragility; so I elected to pin. +

+ If you’ve not pinned a model before, it’s pretty simple. You drill a little hole in one part (I use a small hand-held drill called a ‘pin vice’), superglue a short length of metal rod (I use a paperclip) into the hole, then drill a hole in the opposite part. Trim the rod to length, dry fit to ensure it fits, then superglue the rod and slot it in. +


+ Here you can see both the pin and the hole in the corresponding part +

+ The pin adds strength to the join, helping to keep your model together – and if the worst happens and it does break, you’ll have a good ‘key’ to help you align the repair. +

+ Tips on pinning +
  • Make the pin as long as you can without coming out of the other side of the component. The longer the pin, the deeper the anchor, and the stronger the resulting join.
  • Don’t feel you have to start in the centre of a piece. It’s natural to mimic a natural joint (on a limb, for example) but this isn’t necessary – having the pin at an angle will often work better to hold against gravity, and prevent the joint from rotating.
  • Make use of existing sculpted pegs or fitting aids on the component to complement the pin's securing strength – pins set asymmetrically to another securing point will help ensure things stay stable.
+ You can pin as much or as little as you feel necessary. The kits will doubtless hold together with decent superglue, but pins will give you peace of mind for gaming pieces. With these Tsin Ra, I felt a couple of the sculpted pegs were nice and tight and secure, and so left them unpinned; while there was a bit of ‘swim’ in others, which I pinned. + 


+ Once assembled, I used superglue to attach the figures to the bases. The dynamic poses of these models makes it slightly difficult to work out which feet are on the ground, and which are leaving it. The picture above is for the Leader/Commander figure; showing that the front foreleg and rear first right leg are the ones that need glue. +

+ My advice is to dry fit and make sure you’ve got a good, flat, secure area of contact between figure and base. The flat surface of the Warlord Games base is probably an advantage here - but the gel superglue I’m using should ensure no problems with this GW base. +


+ Terribly dull to hold a figure while glue dries, so I recommend having a few spare bases nearby to support figures – just make sure they're in the right position before you let go. + 

+++

+ Gap filling with Greenstuff + 

+ Like any new material, Greenstuff modelling putty can be slightly daunting first time – so I’ve broken things down a bit (forgive me if I’m teaching you to suck eggs – feel free to skip ahead). Fortunately, filling gaps is one of the easiest things to do with Greenstuff, so this is a good starter if you do fancy giving it a go. + 


+ To start, cut the amount of Greenstuff you'll need off. It's best to err on the side of caution here, as it's inconvenient to run out  halfway through and have to mix another batch. The Tsan Ra is there for scale, so you can see how much you’ll need for these three Tsan Ra. +


+ Greenstuff is a two-part putty; when you combine them, it begins a chemical reaction which makes it cure into a hard material. If, like me, you’ve got a strip where the two parts are beside each other, it’s good practice to cut away the central bit, as this will have cured already. You can purchase greenstuff in separate tubes, which will allow you to avoid this. +


+ To mix, I find it best to lay the two strips next to each other, then twist them into a spiral, as above. Fold the resulting sausage in half, and repeat. +


+ Keep twisting and folding until you have a uniform green mix. When it looks like the above, it will be useable for roughly half an hour, depending on the proportions of blue to yellow you use. The more blue, the faster and harder it will cure; the more yellow, the softer and stickier the mix. +

+ Note the little pot of Vaseline lip balm nearby – this stops the Greenstuff sticking to your sculpting tools. +


+ Next we identify the gap we want to fill. Above you'll see a gap on either side of the legs section where it attaches to the pelvis. +

+ Greenstuff is sticky when first mixed, and gradually becomes less sticky and harder to work until it finally cures. The whole process takes around 24–48 hours, but in practical terms it becomes largely unworkable after an hour or so. The real skill, I've found, is working out the sweet spot of working time. Too early, and it's a pain to work with; too late and it's both hard to shape and won't hold. For gap filling, I leave it for ten minutes or so after mixing.


+ Cut a small amount of mixed Greenstuff off and place it loosely on top of the gap. You can use your fingers for this, but I find it easier to use the end of a sculpting tool. I use a metal carver for wax or clay – these are widely and cheaply available from hobby shops or online. +


+ This angle shows more clearly the depth of the gap – and the fact that it stretches round the legs; hence why I've used this size of dollop. In general for gap-filling, it's more tricky to remove excess than to add more. I therefore find it best to apply less Greenstuff initially, and add more if you need it. You can always poke more in to firm up the fill. +


+ Use the blade of your modelling tool to push the greenstuff into the gap. Don't press so hard that you risk breaking the glue's hold; but do press it in firmly 
until the gap is roughly filled. If necessary, add small amounts of additional Greenstuff. If you find your sculpting tool is sticking to the greenstuff, either wait a minute or two, or dip it lightly in your vaseline pot. +


+ Switch to the spoon end of your sculpting tool and gently smooth the surface flush. Avoid spreading it too far over the figure itself – a little can help hide the gap and make a stronger join, but spreading it too far will obscure detail. If you've applied too much, use the blade end of the sculpting tool to trim it away, then return to the spoon end and smooth again. +

+ Continue until you've filled all the gaps across the figure, then move on. Depending on how confident you are, you can take the opportunity before the greenstuff cures to sculpt on a little extra detail, which will help to blend in and further disguise the joins between parts. +


+ The unit all built. It's common to have a little extra Greenstuff left over (better than running out!). I use it to add a couple of rocks or odd bits of rubble to bases for a bit of interest. +

+ Regarding the bases, the rightmost figure shows what I mean by the slight overhang on a bevelled 40mm base. Because these are gaming figures, and because I've had quite enough metal models getting bashed during transport, I decided to move them onto 50mm bases, as with the model on the left at the front of the squad. You can see that she(?) fits more comfortably on the additional space, and it will also help protect her from getting battered. +

+ Basing using texture gel +

+ I often add some texture to bases at this point, as it means that the basing texture gets primed at the same. I tend to use artists' texture medium. There are lots of different kinds, but they're generally a goopy gel in tubs or tubes. You apply it, shape it, and over a day or two it will gradually harden. Think about it like PVA glue, but with the additional benefit that you can control the shapes. +

+ Depending on the type you get, it will hold the initial shape more or less cleanly; but for our purposes, the main advantage is that it will hold bits like sand, small gravel and other bits. +


+ This fine pumice gel apparently contains a texture (small grains of pumice), but it's so fine as to be essentially smooth. You can get pre-textured pots, which I favour, as that saves a stage. However, this sort is also useful if you have some lying around from your other painting work. +


+ Applying it is as simple as scooping it out on your sculpting tool and scraping it off on the base. You can then push it around and into shape with the sculpting tool. Here, I'm aiming simply to add a little texture and interest to an otherwise flat surface. +


+ Run a tissue or clean finger around the edge of the base to ensure there's no texture paste there, then dip it into a pot of modelling sand. You can sprinkle sand on instead if you prefer; and this is also the stage when you can stick some larger pieces of gravel, or model bits for wreckage in. +


+ Lift the figure back out, run your thumb around the edge once more to clean off any errant sand particles, and then leave to dry. +


+ Repeat for the rest of your unit to finish. You can see how the texture paste and Greenstuff 'nobbles' add a bit more relief to the large flat surface of the base than a layer of PVA. +

+++

+ Thoughts on the Tsin Ra Command Squad +

+ Overall  A great kit that I found a lot of fun to build. The models have a lovely heft to them, and the design is fantastically alien without abandoning all sense of being a (fairly) believable creature. +


Production  Nice and high quality overall. I'm not particularly into packaging, but if that's important to you, then I'd note the box and packaging is sturdy enough to protect things, and neatly packed so you're not going to get too much rattling around. Once built, the figures won't fit back into the box, so you'll need some other way to transport them – probably wise anyway for metal figures. +

+ In terms of the figures themselves, the casting is immaculate. No slippage, barely any mouldlines... I sat poised with a file and craft knife, but beyond trimming a few bits of flash at ejection points, there simply wasn't anything to do. +

+ It's been a long time since I've worked with metal, and either casting practices have improved or these were unusually clean. Very impressive. Further, the ejection points have been sensible placed, so most of the cuts you have to make (for example on the weapon arms and heads) will be either completely hidden once assembled, or tucked away on the underside. Very neatly planned. +


+ Material  They're metal, which is likely going to be divisive. If, like me, metal figures like this evoke pleasant memories, you'll probably find this a plus. If, on the other hand, you remember metal chipping and bits dropping off your models, then likely a negative! A related point on the material is that nostalgic indulgence tends to wane – so building multiple kits is likely to get a bit wearing...  Ask me again when I've built my Tsan Ra infantry. +

+ I'd also note that the metal is stronger but more brittle than I'm used to; perhaps slightly more tin in the mix? The small tentacle things on the commander (x-sling?) in particular are very fine, and one has already snapped. I'd be inclined either to simply leave them off or to replace them with guitar string or similar in future. The positive of this is that the details are rendered very cleanly and crisply. +

+ Design  Given the material, I'm really impressed with the dynamism of the sculpts and the posing; there's a real sense of these creatures barrelling forwards, and the way the squad are cradling their guns while the leader gestures gives a great sense of intelligent combat rather than being mindless beasts. +

+ The design is also beautifully carried over from the human infantry, so there's a definite sense that these two species are on the same team and utilising variants of the same equipment adapted to their particular biology. It's a very novel touch; one I can't really think of from many other ranges. +

+ Isorians: Tsan Ra Command operating beside a Panhuman Phase Squad +

+ The variance in size will make the force as a whole look suitably unusual on the gaming table, and I think this will help to further differentiate the Isorian Senatex from their opponents in the Concord Combined Command. +

+ I've already started laying down some paint on the primed figures, and hope to show them off in a future inload. +

+++

+ Appendnotes: Beyond the Gates of Antares and the Isorians +

Beyond the Gates of Antares seems to be in design limbo at the moment. There were rumours in 2018 of a new edition, which I'm assuming either proved false or met the unfortunate and impossible to predict effects of the Pandemic – but I'm hopeful that we'll see something soon. After a number of years of no releases, there are at last some green shoots – see below. If there is a new edition on its way, I'm sure the designers are all but screaming to let us know! +

+ New Isorian Phase Troopers. Image courtesy of Tim Bancroft on the IMTel Facebook page.  +[+noospherecloadlink embedded+]


+ So why get into the game now? Well, having been mildly interested in the aesthetic and concept of the game since it was first Kickstarted. I've dipped in and out of keeping up with the game, but was the reveal of new Isorian sculpts at the Warlord Games Open Day that pushed me over the edge. I like the new ones (pictured above). I like them a lot! However, I also really like the originals (pictured below), and thought this was likely a case of 'now or never'. +


+ Current Isorian Phase Trooper squad +

An idle closing thought: I'm not sure what it is about the Beyond the Gates of Antares models in general, but they're so much nicer in hand than they appear in pictures online. There's something wonderfully tactile and sculptural about them that's lost in flat pictures, which seems a shame. The Tsan Ra in particular initially struck me as fun, but not must-rush-out-and-buy-cool. Having bought them during the sale and having built them, I think they're fab! +

+++