+ inload: Omu +

The Omu Conflict


Backwater. Wilderness space. Unimportant.

And then suddenly, a warzone.

The Dream of Isor, history of the Seventh Age expansion of the Isorian Senetax

+++

Omu. The few records of the world were little more than legends of the 5th Age, when it had supposedly been the centre of a petty Empire belonging to a non-human species cryptically named the Inheritors, or the Lend-Duçn. Little besides remained – and thus it was to remain after the collapse. Seemingly undisturbed for the entirety of the Sixth Age, when its Gate re-opened, this backwater found itself becoming a new front in the ongoing conflict between the Concord Combined Command and the Isorian Senetax.

The Gate opened peculiarly closely to the lone planet of the system – some 3 SAU; barely a few light minutes of travel for Seventh Age military craft. This left the world in imminent and immediate danger of ground invasion, with fleet pickets all but useless. Indeed – the war for the world was characterised by repeated waves of invasion and counter-invasion.

Why, and how, the Gate and world came to be so close was a mystery that was only to be revealed after the opposing sides had become embroiled in a grinding and bitter war for supremacy – and the answers made it clear that far from being undisturbed during the 6th Age, it had been the fulcrum of an event that would characterise this entire front of the war.

+++

Planet Omu

A large rocky planet, some twice the size of Lost Earth and with concomitant mass, Omu orbitted a blazingly bright star that had battered its thick ionsphere for aeons. Sheltered by the same atmospheric umbrella, life had sprung in its deep and brackish seas many millennia hence – likely before the rise of man and the First Age.

+ C3 Strike Troops march through one of the equatorial desert structures. +

When the Concord Expeditionary Force arrived to stake a claim to the planet in the mid-14th Century of the Seventh Age, they found a world more not merely habitable, but positively pleasant. Granted, the extreme poles were hostile, and a broad band of desert on either side of the equator made overland travel between hemispheres difficult, but the remainder of world was covered in numerous temperate biomes ranging from cloudforest to rolling plains.

They found not only virgin land, however. In the depths of the desert, they stumbled upon ruins, well-preserved by the aridity and heat. Clearly of non-human origin, a number of the extensive ruins had troubling signs of more recent occupation and adaptation to accommodate species of a very different stature...

+++

+ Isorian 8854th Kleisoura – Karbas' Huntsmen +

+ Fellow PCRCer Lucifer216 asked if any of us had plans for the Christmas break. I – boldly or foolishly – declared that I'd get all my Antares stuff painted and table-ready. It's a doable project, I think... and the last thing I want is another side project that lingers in the cupboard of opportunity. Apart from anything else, it'd be great to have at least one setting for which all my models are painted! +

+ Isorian Senatex Phase Squad – the basic infantry +

+ Pictured here are the latest additions to the force that I've been building up over the past couple of inloads [+noosphericinloadlink embedded+]. Above are a new Isorian Phase Squad. These are mostly from the short-lived variant sculpts that aren't readily available through retail – presumaby something to do with SKUs. Happily, while reporting a missing bit to the Warlord team, I enquired about them. Cutting a long story short, I ended up with the little pile of cool bits you can see here! +

+ The poses are more dynamic than the standard box, so I'll have a nice variety. Duplication is always a risk with metal figures, but these double the available poses. I can't imagine needing many more Phase Troopers... right? +

+ Tsan Ra Phase Squad +

+ The Senatex is an equal opportunities employer, and these eight-limbed aliens readily serve alongside their human allies. One thing I rather like about this is that whoever wrote the army list resisted the urge to make the aliens inherently better than humans. Sure, stat-wise they're a hint tougher and considerably stronger, but that's rather balanced out by the disadvantages incurred by being 'Large' in-game. +

+ Quite refreshing to have options that are just that: I don't feel I'm making a 'wrong choice' by taking Phase Squads from either species. +

+ X-howitzer+

+ A big ol' artillery piece – bought in the sale, and indirectly (ho ho) the reason I got the other bits. As noted in my Tsan Ra building notes linked above, I suggested that you check all the parts are present. Alas, that was prompted by this kit, which was missing half the base. I didn't want to mention it there, because it's a bit mean to complain without giving the company a chance to make things right – and they certainly did! The salesperson I contacted was hugely helpful, responding first thing on a Saturday, helping me to find the running Isorian sculpts above, and sending along a couple of extra figures along with the free replacement part. Three mechadendrites up for the customer service. +

+ The kit is my first experience with Warlord resin; and aside from the misstep on the initial packing, it's pretty positive. The detail's nice and crisp, warping minor, and 


+ Plasma light support team +

+ This is a light piece of field support; equivalent to a modern machine gun team, I guess. I really like the crew sculpts – it's cool to have so many unique poses for the gunners across the various artillery pieces. +

+ Tzimisk Karbas +

+ And finally the freebies. I was miffed when I first opened the parcel, as I thought the 'sergeant' figure had been supplied instead of the running one above – then I realised that I'd been sent both 'sergeant' sculpts; along with a free extra Plasm Lance-wielding gunner. Lovely stuff! Since I have one of the same officers already, I converted this one slightly with a different head and new arm. +

+ Anyway, wish me luck on my mission to paint the army up and get to exploring Omu – hoping to get the first figures finished while the undercoat dries on these ones. If you'd like to get involved with Omu – whether writing, painting along, or anything else, you'd be most welcome! Whack a note up on the Facebook group [+noosphericexloadlink embedded+] +

+++

+ inload: Building Isorian Tsan Ra +

+ How to build Tsan Ra +

+ Building tips and review of this Isorian Senatax kit for Warlord Games' Beyond the Gates of Antares +

+ Primed and ready for paint... +

'The Tsan Ra are a race of aliens that are also part of the Isorian Senatex. The Isorians’ advanced hybrid human-alien technology is partly derived from the bio-silicate interface spores of the Tsan Ra’s ancestors, the warlike Tsan Kiri.'

+++

+ Aliens! Proper aliens! While I do like the idea that the Beyond the Gates of Antares universe has a focus on future human evolution (induced or otherwise), part of the appeal of fantasy and sci-fi games is the variety of creatures and civilisations you find – a bit of galactic exploration from the safety of your tabletop. It also helps when the models are appealingly weird, like these awesome Tsan Ra models. +

+ A potential downside of building aliens, of course, is that it's hard to find references if you're unsure where things go. It's not like looking at a human figure, where you can quickly tell if their legs are on backwards. Being a fairly experienced modeller, I tend to just crack on with things, but when I received these metal figures, it triggered a wonderful sense of nostalgia – reminded me of rifling through racks of models with my brother in our local shop, Spot On Models – so while I was thoroughly enjoying myself, I thought I'd try and be helpful and document the build. +

+ Here's my experience of building this Tsan Ra Command Squad. I hope it proves helpful – or at least helps you to avoid any pitfalls when building your own.

+++

+ Containment breach: What's in the box? +

+ The box. Nothing much to say here; except that the pictures on the box are all the help you're going to get on construction – though there are useful front and back pictures on Warlord Games' website here [+noosphericexloadlink embedded+]; isn’t the modern IMTel wonderful? +


+ Everything's all neatly packed in a blister. I've removed the protective foam that stops things rattling around (and the packing note), and you can see the flail of anatomy and 40mm bases that makes up the kit. +


+ Speaking of bases, they're a flat design that’s unfamiliar to me – strikes me as nice for hiding the bases; good for immersion. For those interested in swapping things out, they're 40mm across – so the same width as a Games Workshop base at the bottom of the bevel. That's of note in case you're planning (like me) to swap them out. Already cramped on a 40mm base, there'll be a little more overhang for these figures on a GW base. +

+ Included in the pic above is a 25mm Warlord base and (what I've now realised is) a 28mm GW base, so not the best point of comparison! +

+ First steps +

+ Few things in modelling are more annoying than realising halfway through a build that you're missing a piece, so it's worth checking through, particularly if it's an unfamiliar kit or subject. If you are missing a bit, then get in contact with Warlord via their website. +

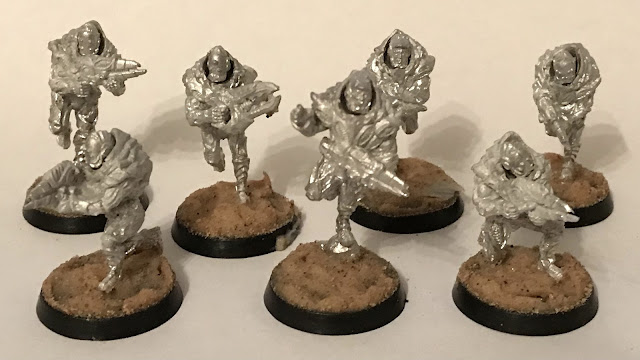
+ This is what should be in your blister +


+ I gave the bits a once-over to check for no miscasts – though given their unfamiliar alien anatomy, I'm not convinced I would have spotted anything less than glaring! All seemed clear; nice crisp detail. I was particularly impressed with the mould lines – or lack thereof. The metal’s a slightly different mix to that which I’m used to; it seems slightly more prone to breaking than bending (perhaps the quality that allows it to hold detail so well), so I recommend caution in reposing. +

+ The weapon arms and heads (both on separate sprues at the top right of the image) seem to be interchangeable, so I set those to one side and worked out which arms/legs went with which body. +


+ The figures are nicely designed to minimise the traditional problems of multi-part metal models (looking a bit flat, fragility, small contact points for joins etc.) while still retaining dramatic, three-dimensional poses. As much is built into one plane as possible – though the result is that the additional rear legs of this one are built into a pair, creating a cross-structure at the waist. The third part of this model is a big front foreleg (arm?). This has a peg that ensures it fits in one intended position. +


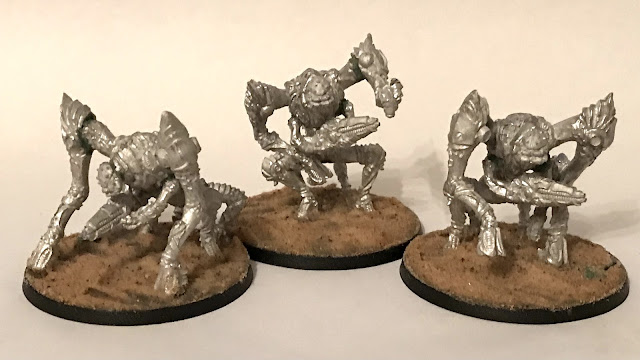
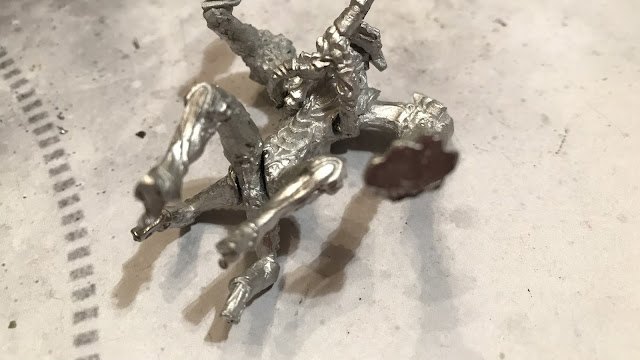
+ The same is true here; and whether through accident or – as I like to think – design, here's it's the other outside foreleg (arm?) that's separate: that makes it impossible to confuse the bits. The rear cross-section of legs (for want of a better term; for who knew we'd need terminology for alien anatomy?) surprised me. From appearances, I assumed the more outstretched legs would fit with this body, but as it turns out, all four legs are bunched up in a leaping pose – check against the picture on the box. +


+ I've left the front forelegs section off this picture, but both form a single piece. It's the small rear pair of legs (top right of image) that confused me here – but they're aligned correctly in the image; the 'knees' hinge backwards for these ones. Don't be tempted to try to fit them in the other way around – the fit is loose, and it seems like you can cram 'em in there at first. +

+++

+ Construction and pinning +

+ Parts chosen and dry-fitted, I got stuck in to building. I mentioned a bit of nostalgia earlier, and 12-year-old me would have gone straight in with the glue. I’d caution, however, that multipart metals are notorious for fragility; so I elected to pin. +

+ If you’ve not pinned a model before, it’s pretty simple. You drill a little hole in one part (I use a small hand-held drill called a ‘pin vice’), superglue a short length of metal rod (I use a paperclip) into the hole, then drill a hole in the opposite part. Trim the rod to length, dry fit to ensure it fits, then superglue the rod and slot it in. +


+ Here you can see both the pin and the hole in the corresponding part +

+ The pin adds strength to the join, helping to keep your model together – and if the worst happens and it does break, you’ll have a good ‘key’ to help you align the repair. +

+ Tips on pinning +
  • Make the pin as long as you can without coming out of the other side of the component. The longer the pin, the deeper the anchor, and the stronger the resulting join.
  • Don’t feel you have to start in the centre of a piece. It’s natural to mimic a natural joint (on a limb, for example) but this isn’t necessary – having the pin at an angle will often work better to hold against gravity, and prevent the joint from rotating.
  • Make use of existing sculpted pegs or fitting aids on the component to complement the pin's securing strength – pins set asymmetrically to another securing point will help ensure things stay stable.
+ You can pin as much or as little as you feel necessary. The kits will doubtless hold together with decent superglue, but pins will give you peace of mind for gaming pieces. With these Tsin Ra, I felt a couple of the sculpted pegs were nice and tight and secure, and so left them unpinned; while there was a bit of ‘swim’ in others, which I pinned. + 


+ Once assembled, I used superglue to attach the figures to the bases. The dynamic poses of these models makes it slightly difficult to work out which feet are on the ground, and which are leaving it. The picture above is for the Leader/Commander figure; showing that the front foreleg and rear first right leg are the ones that need glue. +

+ My advice is to dry fit and make sure you’ve got a good, flat, secure area of contact between figure and base. The flat surface of the Warlord Games base is probably an advantage here - but the gel superglue I’m using should ensure no problems with this GW base. +


+ Terribly dull to hold a figure while glue dries, so I recommend having a few spare bases nearby to support figures – just make sure they're in the right position before you let go. + 

+++

+ Gap filling with Greenstuff + 

+ Like any new material, Greenstuff modelling putty can be slightly daunting first time – so I’ve broken things down a bit (forgive me if I’m teaching you to suck eggs – feel free to skip ahead). Fortunately, filling gaps is one of the easiest things to do with Greenstuff, so this is a good starter if you do fancy giving it a go. + 


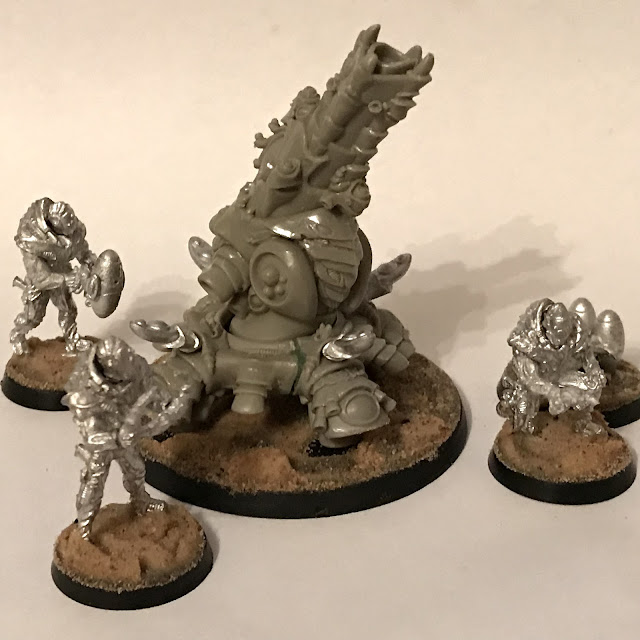
+ To start, cut the amount of Greenstuff you'll need off. It's best to err on the side of caution here, as it's inconvenient to run out  halfway through and have to mix another batch. The Tsan Ra is there for scale, so you can see how much you’ll need for these three Tsan Ra. +


+ Greenstuff is a two-part putty; when you combine them, it begins a chemical reaction which makes it cure into a hard material. If, like me, you’ve got a strip where the two parts are beside each other, it’s good practice to cut away the central bit, as this will have cured already. You can purchase greenstuff in separate tubes, which will allow you to avoid this. +


+ To mix, I find it best to lay the two strips next to each other, then twist them into a spiral, as above. Fold the resulting sausage in half, and repeat. +


+ Keep twisting and folding until you have a uniform green mix. When it looks like the above, it will be useable for roughly half an hour, depending on the proportions of blue to yellow you use. The more blue, the faster and harder it will cure; the more yellow, the softer and stickier the mix. +

+ Note the little pot of Vaseline lip balm nearby – this stops the Greenstuff sticking to your sculpting tools. +


+ Next we identify the gap we want to fill. Above you'll see a gap on either side of the legs section where it attaches to the pelvis. +

+ Greenstuff is sticky when first mixed, and gradually becomes less sticky and harder to work until it finally cures. The whole process takes around 24–48 hours, but in practical terms it becomes largely unworkable after an hour or so. The real skill, I've found, is working out the sweet spot of working time. Too early, and it's a pain to work with; too late and it's both hard to shape and won't hold. For gap filling, I leave it for ten minutes or so after mixing.


+ Cut a small amount of mixed Greenstuff off and place it loosely on top of the gap. You can use your fingers for this, but I find it easier to use the end of a sculpting tool. I use a metal carver for wax or clay – these are widely and cheaply available from hobby shops or online. +


+ This angle shows more clearly the depth of the gap – and the fact that it stretches round the legs; hence why I've used this size of dollop. In general for gap-filling, it's more tricky to remove excess than to add more. I therefore find it best to apply less Greenstuff initially, and add more if you need it. You can always poke more in to firm up the fill. +


+ Use the blade of your modelling tool to push the greenstuff into the gap. Don't press so hard that you risk breaking the glue's hold; but do press it in firmly 
until the gap is roughly filled. If necessary, add small amounts of additional Greenstuff. If you find your sculpting tool is sticking to the greenstuff, either wait a minute or two, or dip it lightly in your vaseline pot. +


+ Switch to the spoon end of your sculpting tool and gently smooth the surface flush. Avoid spreading it too far over the figure itself – a little can help hide the gap and make a stronger join, but spreading it too far will obscure detail. If you've applied too much, use the blade end of the sculpting tool to trim it away, then return to the spoon end and smooth again. +

+ Continue until you've filled all the gaps across the figure, then move on. Depending on how confident you are, you can take the opportunity before the greenstuff cures to sculpt on a little extra detail, which will help to blend in and further disguise the joins between parts. +


+ The unit all built. It's common to have a little extra Greenstuff left over (better than running out!). I use it to add a couple of rocks or odd bits of rubble to bases for a bit of interest. +

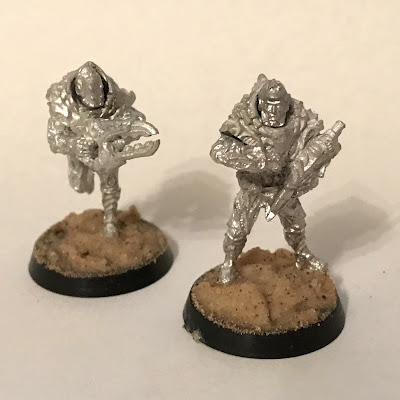
+ Regarding the bases, the rightmost figure shows what I mean by the slight overhang on a bevelled 40mm base. Because these are gaming figures, and because I've had quite enough metal models getting bashed during transport, I decided to move them onto 50mm bases, as with the model on the left at the front of the squad. You can see that she(?) fits more comfortably on the additional space, and it will also help protect her from getting battered. +

+ Basing using texture gel +

+ I often add some texture to bases at this point, as it means that the basing texture gets primed at the same. I tend to use artists' texture medium. There are lots of different kinds, but they're generally a goopy gel in tubs or tubes. You apply it, shape it, and over a day or two it will gradually harden. Think about it like PVA glue, but with the additional benefit that you can control the shapes. +

+ Depending on the type you get, it will hold the initial shape more or less cleanly; but for our purposes, the main advantage is that it will hold bits like sand, small gravel and other bits. +


+ This fine pumice gel apparently contains a texture (small grains of pumice), but it's so fine as to be essentially smooth. You can get pre-textured pots, which I favour, as that saves a stage. However, this sort is also useful if you have some lying around from your other painting work. +


+ Applying it is as simple as scooping it out on your sculpting tool and scraping it off on the base. You can then push it around and into shape with the sculpting tool. Here, I'm aiming simply to add a little texture and interest to an otherwise flat surface. +


+ Run a tissue or clean finger around the edge of the base to ensure there's no texture paste there, then dip it into a pot of modelling sand. You can sprinkle sand on instead if you prefer; and this is also the stage when you can stick some larger pieces of gravel, or model bits for wreckage in. +


+ Lift the figure back out, run your thumb around the edge once more to clean off any errant sand particles, and then leave to dry. +


+ Repeat for the rest of your unit to finish. You can see how the texture paste and Greenstuff 'nobbles' add a bit more relief to the large flat surface of the base than a layer of PVA. +

+++

+ Thoughts on the Tsin Ra Command Squad +

+ Overall  A great kit that I found a lot of fun to build. The models have a lovely heft to them, and the design is fantastically alien without abandoning all sense of being a (fairly) believable creature. +


Production  Nice and high quality overall. I'm not particularly into packaging, but if that's important to you, then I'd note the box and packaging is sturdy enough to protect things, and neatly packed so you're not going to get too much rattling around. Once built, the figures won't fit back into the box, so you'll need some other way to transport them – probably wise anyway for metal figures. +

+ In terms of the figures themselves, the casting is immaculate. No slippage, barely any mouldlines... I sat poised with a file and craft knife, but beyond trimming a few bits of flash at ejection points, there simply wasn't anything to do. +

+ It's been a long time since I've worked with metal, and either casting practices have improved or these were unusually clean. Very impressive. Further, the ejection points have been sensible placed, so most of the cuts you have to make (for example on the weapon arms and heads) will be either completely hidden once assembled, or tucked away on the underside. Very neatly planned. +


+ Material  They're metal, which is likely going to be divisive. If, like me, metal figures like this evoke pleasant memories, you'll probably find this a plus. If, on the other hand, you remember metal chipping and bits dropping off your models, then likely a negative! A related point on the material is that nostalgic indulgence tends to wane – so building multiple kits is likely to get a bit wearing...  Ask me again when I've built my Tsan Ra infantry. +

+ I'd also note that the metal is stronger but more brittle than I'm used to; perhaps slightly more tin in the mix? The small tentacle things on the commander (x-sling?) in particular are very fine, and one has already snapped. I'd be inclined either to simply leave them off or to replace them with guitar string or similar in future. The positive of this is that the details are rendered very cleanly and crisply. +

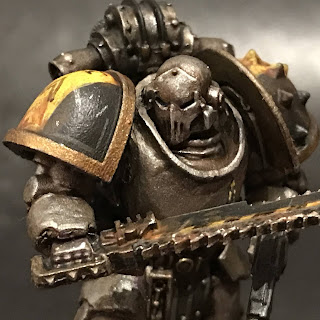
+ Design  Given the material, I'm really impressed with the dynamism of the sculpts and the posing; there's a real sense of these creatures barrelling forwards, and the way the squad are cradling their guns while the leader gestures gives a great sense of intelligent combat rather than being mindless beasts. +

+ The design is also beautifully carried over from the human infantry, so there's a definite sense that these two species are on the same team and utilising variants of the same equipment adapted to their particular biology. It's a very novel touch; one I can't really think of from many other ranges. +

+ Isorians: Tsan Ra Command operating beside a Panhuman Phase Squad +

+ The variance in size will make the force as a whole look suitably unusual on the gaming table, and I think this will help to further differentiate the Isorian Senatex from their opponents in the Concord Combined Command. +

+ I've already started laying down some paint on the primed figures, and hope to show them off in a future inload. +

+++

+ Appendnotes: Beyond the Gates of Antares and the Isorians +

Beyond the Gates of Antares seems to be in design limbo at the moment. There were rumours in 2018 of a new edition, which I'm assuming either proved false or met the unfortunate and impossible to predict effects of the Pandemic – but I'm hopeful that we'll see something soon. After a number of years of no releases, there are at last some green shoots – see below. If there is a new edition on its way, I'm sure the designers are all but screaming to let us know! +

+ New Isorian Phase Troopers. Image courtesy of Tim Bancroft on the IMTel Facebook page.  +[+noospherecloadlink embedded+]


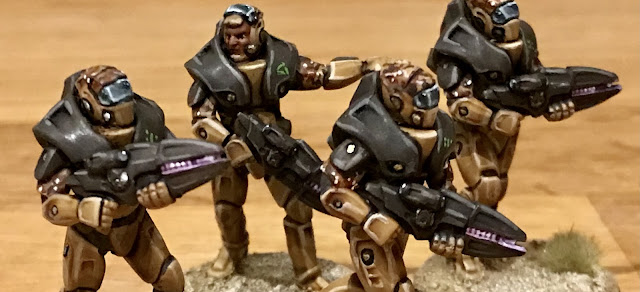
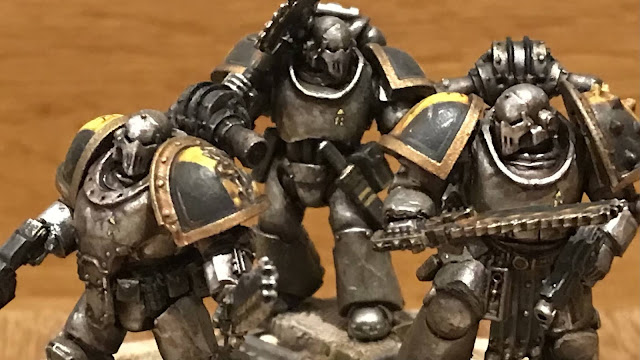
+ So why get into the game now? Well, having been mildly interested in the aesthetic and concept of the game since it was first Kickstarted. I've dipped in and out of keeping up with the game, but was the reveal of new Isorian sculpts at the Warlord Games Open Day that pushed me over the edge. I like the new ones (pictured above). I like them a lot! However, I also really like the originals (pictured below), and thought this was likely a case of 'now or never'. +


+ Current Isorian Phase Trooper squad +

An idle closing thought: I'm not sure what it is about the Beyond the Gates of Antares models in general, but they're so much nicer in hand than they appear in pictures online. There's something wonderfully tactile and sculptural about them that's lost in flat pictures, which seems a shame. The Tsan Ra in particular initially struck me as fun, but not must-rush-out-and-buy-cool. Having bought them during the sale and having built them, I think they're fab! +

+++

inload: Beyond the Gate of Antares

+ Joining the Concord Combined Command +

The PanHuman Concord is one of the two great panhuman, most technologically advanced factions of Antarean space, the other being it’s ‘parent’, now known as the Isorian Shard or Senatex. The Concord is a society of both human and machine sentience bound together by integrated machine intelligence or IMTel. It is in practically every respect a utopian society in which humans are free to devote their lives to chosen endeavours entirely free of compulsion, or the necessity of toil and unwanted responsibilities. The IMTel anticipates the needs of each and provides a benevolent governance to all within its reach.
From the Gates of Antares Nexus [+noosphericinloadlink embedded+]

+ I'll be honest, the above read like gibberish when I first looked into what the models I was painting were. On the other hand, it was intriguing gibberish – the sort of gibberish I remember from reading the Warhammer Fantasy Battle or Rogue Trader manuals for the first time when I was still in single chronodigits. In answer to the unasked question, yes, I did want to read more. +

+ As I understand things, in the Beyond the Gates of Antares (BTGoA) universe, there is no need to be welcomed to the IMTel (the Integrated Machine Intelligence) that benevolently oversees the PanHuman Concord faction, as once you're in it, you become part of it. +

+ All across the (colossally huge number of) worlds of the setting, the planets and ships are mostly immersed in a soup of nano-machines that infest the materials around you and the very air you breathe. So far, so dystopian; but as you read more into it, it's all surprisingly – refreshingly – neutral. Far from there being a centralised robot hivemind, it seems more of an extended internet with a very accurate set of algorithms. Most humans require implants to integrate – much like an on-board internet browser – and the IMTel itself is a gestalt of their thoughts and experiences together with the colossal number of machine intelligences (and aliens) that make up day-to-day society. Y'know, an actual hive or swarm mind, with no single controlling intelligence. +

'Driven by the collective desires, needs and anxieties of its citizens, the IMTel of a world simply does what is best for everyone.'

'Taking everything into the balance, the IMTel is unable to make mistakes'
[Beyond the Gates of Antares rulebook]

The rulebook's narrative 'voice of god' mostly plays the above straight – for the members of the PanHuman Concord, the largest of these sort of societies, and one of the prime movers of the game background, the life of most members appears utopian. Fortunately, however there are a lot of those very British smirks at authority in the rulebook – mostly in the little bits of colour text and in-universe quotes – that make it clear there's very definitely more than one point of view... +

That's not to say, however, that the PanHuman Concord is evil, either. One of the things I'm finding very appealing is the fact that while you could just as easily base your Concord Combined Command, or C3, (the military arm of the PanHuman Concord) army that leans towards a Matrix-like local IMTel, with humans largely subjugated and exploited; or a more neutral one that plays around with the themes of Aldous Huxley's Brave New World; or a genuinely optimistic Star Trek-like post-scarcity society. +

+ For a game ostensibly about recreating fictional future war, then, the background raised some very interesting implications of questions about how the IMTel tallies up with freedoms and liberties; of how a benevolent dictator's intentions marry up with the messiness of real life – and more besides. In short, it's a very rich setting – and that's within just one faction. +

+++

+ Show me the models +

+ Well, quite. +

PanHuman Concord Strike Squad

+ Starting as a simple palette cleanser between other projects, I've enjoyed painting these models. I put my thoughts on building them in an earlier inload [+noosphericinloadlink embedded+]. In terms of colour scheme, I used a similar approach for my Lamb's World Guard, but wanted to include some more eye-catching visual 'pop' – something usually outside my wheelhouse for regular  puny hu-mans. +

+ With the scheme decided, I looked at techniques. I probably wouldn't have opted for edge highlighting for these figures (given their size, it's easy to make them look crude and blocky, which didn't fit with the background) except for the fact that the models I'm most excited about for the setting – the creepy biomechanical Isorians – have much more organic shapes, and I want to contrast the two styles. Since the Isorians won't allow for edge highlighting, it seemed okay to use it here sparingly. +

+ Being quite slight, the figures painted up quickly. I got the squad of eight completed in two evenings' work. The detail's sharp enough, though there are a few softer areas that required a bit of head scratching on whether to add an edge highlight or not. +

WIP shot – after one evening's painting.

+ The group above show the basic scheme. Granite-grey hard armour and weapon casings, and desert yellow for most of the remainder. I've added a few patches of camouflage to the helm and upper arms, on a whim more than anything planned. It adds a little visual interest. +


+ In terms of other colours, I've used a blue-grey for the visors and sights,  hints of gold as metallics, and flashes of purple, green and orange for accents. Using all the secondary colours gives a balanced, unthreatening palette, and keeping the accents small helps to ensure they don't overwhelm the overall scheme. +

+ The group above show three members with plasma rifles and one with a plasma lance – a specialist weapon. I've marked it out with a different colour glow – quite refreshing to colour code things on a whim after many years of working out what colour X 'should be'. I think the scheme's got a nice semi-realistics/semi-fantasy feel that fits for me. +

Test figure

+ The final scheme varies little from the test figure above. I substituted gold for silver on the test figure, and changed the gold plate above the visor in favour of extending the camouflage area. +

+ I'm not really intending to do a giant army of C3 for gaming. These were fun, but I think I'd like to explore some of the other factions. Isorians were the ones that had the biggest vissceral appeal to me, and I've got a few on order. Given that I'm unlikely to find anyone local or in the PCRC (my gaming group) to spontaneously pick up the game, I thought it'd be nice to have a squad or two of each for small games. That way, if I manage to twist any of my friend's arms, I've got little preset forces to play with – a bit more like a boardgame than a full tabletop wargaming experience. +

+ It was with that in mind that I opted for a desert basing scheme. It allows them to be folded into my Lamb's World Imperial Guard army if it never takes off – but more pertinently, the light-coloured bases will contrast wonderfully with my planned Isorian scheme. +

Other half of the squad

+ The green icons above the heart mark rank. The 'First' (leader) has a little triangle to hint at the C3 (see what I did there?), the others a largely abstract sigil of dots and a line. +

+ Although I say the squad is finished, it's worth noting that BtGoA includes lots of drones – little flitting machine intelligences that enhance your squads in various ways. I think they're a nice way to differentiate these spacemen with laser guns from my lower-tech Imperial Guard armies, so I'm planning to paint up a few – they come on the same sprues, so it's just a case of building 'em. +

+++

+ Making my own army +

+ Part of the appeal of the game is its largely blank slate nature. Despite a hiatus caused by events in the real world, the background is continuing to be expanded and built. There's lots of space to build and develop the story as you wish to. +

+ Indeed, there are a huge number of open doors even within one faction's background. The Concord is a colossal place – millions of worlds – but it's not a monolithic culture. Because of the nature of its integrated technology,  the 'future internet' requires physical interaction – world to spacecraft, spacecraft to world – in order to stay roughly aligned. +

+ Extended isolation from other Concord worlds sees the local IMTel evolve slightly to better serve its own needs, just like a geographically isolated animal species will start to evolve away from a common ancestor. You need continual interpollination to prevent these 'shards' (as the individual groups – worlds, factions, even military squads – are called) from diverging too far. Small divergences are gradually diluted away when meeting again but, to reiterate, there's not a central government or centralised leader that decides. Instead, integration, development and agreement is unconsciously decided upon by the involved IMTel shards until a compromise is reached. +

Worlds can protect themselves against Concord nanospore by not allowing their technology to interface with it, but the Concord technology enjoys the advantage of total integration, allowing it to overcome resistance given time. The surest defence against contamination comes in the form of nanites called nanophages designed to identify and destroy unrecognised intruder nanospore. Ultimately, if sufficient Concord nanospore can be generated to become a self-sustaining shard, they will inevitably overcome any planetary defence and form a nanosphere, after which the world effectively becomes part of the PanHuman Concord.

So, perhaps the worlds of the Determinate have good reason to fear the IMTel civilisations. The IMTel itself is devoid of ambition and malice yet is intolerant and pitiless. Although IMTel technology is highly prized, contact with the IMTel nations is risks absorption: it is safest to acquire it through intermediaries such as the Freeborn who are capable of sterilising the technologies attachment to its parent IMTel.
[Beyond the Gates of Antares rulebook]

+ Background-wise, that's intriguing and full of depth to explore. In terms of tabletop gaming, it sets up some good opportunities for fighting! And on that note, here are a couple more shots. +


+ inload: Iron Warriors trio +

+ inload: Scions of the 242nd +


'Footsore no more.' Ostrod murmured, half to himself. It was a peculiar half-honour. He wouldn't be making landfall with the rest of the 242nd Grand Company. Instead, he was being made a Palatarch of his own Chain. Sergeant, he thought for a moment, before considering that there was no reason – none at all – to use the old Terran term now.

+ Ostrod +

Promotion and transfer. He, along with two others, were on a shuttle to liaise with a new Grand Company. The other two sat opposite him in the mostly-empty bay. Masked behind his helm, he sat rigid as his eyes scanned them.

One was unfamiliar. Ubricz he knew in passing. In their plate, he could be the twin of Ostrod. Identical armour; only details differentiated them. Ubricz had a rigid approach to armouring; as coldly efficient and unsentimental as the Iron Circle that he so admired. Besides the temporary transfer marking that had been stamped above each of the new officers' primary hearts, Ubricz's armour was unmarked by any personal honorifics or personalisation. Ostrod felt a peculiar sense of shame at the spiked pauldron and pseudleather apron he bore; the skull-shaped finials at the end of each strap seemed somehow opulent; needlessly boastful.

Ubricz sat as rigidly as his observer, hands resting on his knees. Besides the occasional rocking of the shuttle, he might easily have been an empty suit of armour.

Admirable, for an Iron Warrior.

+ Ubricz +
 
Spitefully, Ostrod looked for faults. It came easily to him. He noted the non-standard backpack – doubtless some recent replacement. Even Ubricz, it seemed, was not infallible. 

Frustratingly, that seemed to be it. Even the combat blade at his belt was perfectly placed for cross-draw. 

Dismayed, he looked for criticisms in Ubricz's armament. Newly-issued bolt pistol – that matched his own – and a chainaxe. Peculiar. An unusual, though not frowned-upon, choice. The axe swapped speed and finesse for power and reach. Ostrod smiled thinly. 

Variance. Weakness.

Satisfied, in some strange, unplaceable way, Ostrod turned his attention to the third warrior. Ident-runes flagged him as 'Ixod Konstantz'. The Space Marine bristled and turned to Ostrod with a clanking of heavy plate and grind of pistons. Ostrod barely stopped himself – shamefully – from flinching. Active reports. Konstantz had clearly tweaked his armour to alert him when being scanned.

+ Konstantz +

Ostrod looked away, feigning disdain, and the other Legionary turned back to the combat-ready slump he had been in before. He had, in any case, seen all he needed. Konstantz's armour was older than Ubricz's, or his own. Mark III plate, battered and war-worn. Ostrod wondered if it was a 'pure' set, issued as Mark III; or a mongrel suit, adapted and refined from a suit of Crusade armour like that worn by the other two on the shuttle.

There was something of the fanatic in Konstantz, Ostrod considered. Bristling, reactive, angry. He even wore trophies: an old ork tooth – judging from the discoloration, from some ancient battle – and a human skull. Ostrod couldn't help turning back for a second.

No, not a human skull.

That had belonged to an Astartes.

+++

+ Commission complete +

+ After a wait for the final bits, these three vicious warriors are all finished and ready for deployment by their new commander. I thought I'd get a few shots of the finished models, and post up a couple of thoughts and notes. +

+ Everything looks swish in a bell jar! Trazyn the Infinite would be proud +

+ This was a really enjoyable project – small, self-contained, and a welcome return to a favourite army of mine. I always judge the success of a commission by whether I want to keep it afterwards. I'm pleased (if slightly regretful!) to say that these three pass the test. +


+ Part of the reason that I keep coming back to Space Marines – despite thinking of myself as a Guard player at heart – is that they have such a broad and deep background. Each Legion, Chapter or Warband seems to riff on the basic concept of 'Space Marine' slightly differently, so there's a joy both of familiarity with the shapes and building blocks, and of opportunity in going slightly further or in a different direction with each model. +


+ One of the things that I wanted to do here was make use of bits that had appeared since I last worked on my Officio Monstrosa project – in the example above, a Space Marine Heroes series 2 Terminator. These figures are push fit and include integrated bases, which I think is one of the best things GW does in helping to create evocative poses. There are obvious drawbacks (for multiples, matching existing basing schemes), but where they work, there's no substitute for how integrated bases help with the posing of figures. +


+ A disdainful upright posture for this marine. I wanted to convey a confident, dutiful impression for this marine, so kept him largely clean. The resting chainaxe implies he's not at all on edge about executing his duty – the angle of his pistol suggesting finishing someone off, rather than honourable combat.+ 


+ As a rule, Iron Warriors are bitter and resentful types, restrained and efficient, and I wanted to get that across. As we know, 40k doesn't have any goodies – and it's sometimes good to reinforce that with a slightly swaggering, bullying posture for villains like the Fourth Legion. You don't have to be screaming to be evil. +


+ A plainer, battered and more traditional look for this last Iron Warrior, up-armoured in (appropriately enough) a battered Mark III Armourum Ferrum breastplate. With most Space Marines colour schemes, I think it's easy to fall into a trap of doing too much of their accent colours – Ultramarines with more gold decoration than blue, for example – and this is particularly the case with black or metal schemes, where any addition will draw the eye. The hazard striping so common to the Iron Warriors scheme has been restricted to the chainsword, where it adds Iron Warriors flavour without being too eye-catching. The combination of yellow and black is retained in a simpler, cleaner form on the pauldrones. +


+ Modern-looking Tactical markings and trophy-hunting makes for a stark juxtaposition. You can suggest a lot about an army with little details like this. +
+++


+ To finish, here's a little group shot. Onwards to victory! Iron Within! Iron Without! +