+ inload: No brakes on the Epic train +

+ Epic scale painting +

+ Salamanders infantry +

+ Work on the Salamanders continues, and I'm getting towards the end of the first box of infantry. It's still slow progress, but I'm reassured that this is mainly owing to lack of opportunity rather than the process itself being slow. +

+ Thus far I've completed thirteen stands, with more well on the way. Since I'm theming these around the M41 era, I'll have to start to be a bit careful with planning – the Salamanders' shoulder pad and icon changes colour depending on the Company. As you can see above, there are eight stands of boltgun-armed marines finished up, which equates to four Tactical squads. +

+ A Codex Battle Company consists of six Tactical squads, two Assault Squads and two Devastator Squads – but this is slightly muddied by the fact the Salamanders operate a non-Codex organisation, with slightly larger Companies in different proportions: seven Tactical squads, three Devastator squads and two Assault squads. This gives me a little leeway, and helps to explain the plasma gun stands. +

+++

+ Regardless, I'm going to have to start thinking about army composition – but this sort of minutiae can be part of the fun of planning an army. I'm also looking forward to the visual appeal of different companies appearing on the board – the 'grand sweep' is part of what makes Epic so appealing to me. +

+ The paint scheme is detailed in a previous inload [+noosphericinloadlink embedded+], but here's a better close-up picture. +

+++

+ Salamanders armour +

+ The tanks are also progressing – and much quicker than the infantry. The harder lines make drybrushing and washes work better than on the curves of the foot soldiers. +

+ Drybrushing is one of those techniques that's often dismissed. It's quick, effective and easy to understand – and as a result is often one of the first techniques beginners pick up. As painters develop, the distinctive slightly textured results start to look a little amateurish, they move on to more technically challenging techniques such as edge highlighting, wet blending or zenithal highlighting instead, and the technique is filed away for basing and little else. +

+ I think that's a shame. Amateur, after all, simply means that you're doing it because you enjoy it, rather than for payment, so I encourage you to pull this often derided technique back out of your box of tricks. +

+ These tanks were sprayed brown, then Colourforge's Salamander Green sprayed on at an angle. Once dry, I gave them each two successive drybrushes; firstly of a mix of Warpstone Glow and Moot Green, and then a mix of Moot Green and cadmium yellow. +

+ Drybrushing relies not, as is commonly thought, simply of having very little paint on the brush, but rather the paint on the brush having little liquid in it. If the paint has any fluidity, it'll tend to catch, flow and streak – you can see the effects on the Predator on the right. The blotchy, scratchy look caused by being heavy-handed with the technique is generally what people associate with drybrushing – done properly, the effect is much more subtle, as you can see in the example on the left. +

+ My tips for getting good results from drybrushing:

  • Use a relatively large, soft brush. A make-up brush is ideal.
  • Work in a cool area so your paint doesn't dry too quickly on your palette. This seems counter-intuitive, but you want the paint at just the right consistency – once there, you don't want it to dry completely, or it'll start clumping, giving more textured results.
  • Try to work in an irregular way, rather than back-and-forth.
  • Load the brush with small amounts of paint
  • Slowly and gently roll the loaded brush over a piece of kitchen paper to draw out the carrier from the paint, leaving the pigment and binder.
+ The technique is rarely perfect on its own, but it's a great time-saver. A subtle drybrush, as shown above, will establish lines and help you to pick out areas to develop further. The example below shows a Rhino taken to the next stage, which warms the green up quite a bit and knocks it back from appearing quite so emerald as they currently are. +

+ Here, I've added Agrax Earthshade into the recesses (easier to pick out, because they're the bits missed by the drybrushing) and used Moot Green to selectively develop some of the highlights established by the drybrushing. Finally, any unwanted texture could be softened back by glazing with the basecoat (Warpstone Green in this example). +

+ The result balances speed with visual impact – the entire process detailed above takes just few minutes. +

+ It's worth noting that Games Workshop are giving away a free sample Rhino during the month of December, so if you're got a local store, pop in and ask for the miniature of the month. It's the perfect excuse to have a go. +

+++

+ Markings +

+ My copy of the rulebook (finally) arrived a few days ago, and I was happy to see some pictures of the Salamanders' Horus Heresy colour scheme and markings. Since picking up the Chapter/Legion, it's notable how scanty information on them is when compared with Chapters like the Ultramarines and Blood Angels – and even Iron Hands. +

+ I quite like the black bar and flame on the door. I think I'll add something similar to my vehicles, which are currently looking a bit anonymous. Some flame markings will help to sell them as specifically Salamanders. +

+++

+ Waa-Ghazghkull! 'Ere we go +


+ And in the... uh, other green corner we have the orks. These are Wakes Emporium sculpts, 3D printed. You can buy them from Etsy – here's an example seller [+noosphericexloadlink+]. They're quite hefty models, standing between 8mm and 9mm tall, so scale well against the new Epic: Legions Space Marine models. In fact, they're so beefy that it's a bit of a struggle to fit them onto 25mm bases. I'm probably going to regret basing them before painting, and recommend that if you order a set that you:
  • Paint the models first
  • Mix and match them with other, slightly smaller, ork kits. You'll get a more natural range of sizes and suitably orky variety.
+ The set I ordered is still slightly sticky – as you can see from the amount of sand stuck to the ones I started basing – so I'm leaving them in the sunlight for a few days to cure more before coming back to them. They're beautiful little sculpts, packed with character, but sadly have the little disc bases that make basing them a paint in the [+SCRAPSHUNTERRORABORT+] +

+++

+ Steel Legion +


+ Unpainted but assembled, these models are beautiful little sculpts, and go together even more quickly than the Space Marine equivalents – primarily because they don't have four tiny little individual engines. +

+ Again destined for The Ashes of Armageddon, I'm going to build these using the Epic: Armageddon weaponry; namely three squadrons of three with battle cannons led by just one with a Vanquisher cannon. Neatly, these will match my Lamb's World tanks exactly, as they're the same longer-bodied Mars Alpha pattern design. +

+++

+ inload: Into the fires of battle! +

+ Pellas Mir'san's Second Company Salamanders +

+ It is a relief to finally polish off some models – there have been far too many worked up to a decent WIP, then perforce put to one side. Epic-scale models like these are a nice way to feel like you've done something substantial – even if they only took a few hours. +

+++

+ Painting Epic Salamanders +

+ Here's a rundown of the process as an aide-memoire:

_1  Prime models Halfords camo brown.

_2  Use Colour Forge Salamander Green to spray them at a 45-degree angle from two opposite sides, to give a bit of zenithal lighting.

_3  Infantry: Paint the backpack, shoulders and gun with Black Templars contrast. Vehicles: Tracks, guns, front recess things, exhausts.

_4  Pick out metals on backpacks, guns and exhausts with Iron Warriors (or Boltgun Metal).

_5  Paint the gun casings with Charadon Granite (or similar dark grey).

_6  Wash the models with Agrax Earthshade.

_7  Once dry, use a mix of Snot Green and Warpstone Glow to highlight the green, concentrating on the head, arms and trailing legs of infantry; and upper edges of the vehicles.

_8  Pick out the markings with an off-white colour (I mixed Vallejo's cold white with Ushabti Bone for a pale cream). Use this to paint the Legion markings.

_9  Add other details – red crests, banners, plasma gun radiators etc. – plus any freehand.

_10  Use a very light drybrush of Ushabti bone over everything. This last step is subtle and east to overdo, but helps ever-so-slightly tie everything on the model together, and integrate it into the base. You could use a light grey if you're on urban bases.

+++

+++

+ Thoughts on the scheme at this point +

+ Banner  I didn't get a very clear picture of the banner, but it's a miniaturisation of the 40k Salamanders' 2nd Company. A fun little challenge to get across the idea of crossed flaming hammers above a row of volcanos, and I'm quite pleased with it. +

+ Markings  The Chapter icon is necessarily simplified, being reduced to a small teardop shape with a black dot nearer the top, and two short lines off it. It was only after I started painting on the details that it struck me that the bonding studs of Mark VI mean that the icon has to go on the marine's left shoulder. Since the bonding studs are a pain to paint anyway, I'm quite tempted to trim them off the remaining marines so that I can have the Chapter symbol on the right pad, and flames on the left. +

+ The Rhinos also look a bit anonymous, so I'm probably going to add side doors (and maybe top hatch) in the Company colour, then add flames on those. I think that should make them read more clearly as the Salamanders. You'll note the little club symbol on the front and top. The idea for this came from an old White Dwarf article for the markings [+ref: pictcapture below+]. +

+ The text for the Salamanders bit reads:

These designs are based on a number of symbols found within the the STC system. Although their origins are unclear, the Salamanders adopted them as soon as Warmaster Horus became a traitor, as a gesture to confirm their allegiance to the Imperium
+ The use of card suit symbols refers to their use in the Horus Heresy, but since the Ashes of Armageddon project allows me to explore retro ideas, I thought it was a fun little Easter egg. I couldn't find the image when I was painting them, so went with clubs for Tacticals, rather than diamonds as shown above. I might tweak these, but more likely will keep them – after all, it's more the spirit of the idea that's important, rather than the letter. +


+ They look nice in this little group, I think – and the more I add, the better it's going to look. As this inload starts to show, the painting of an army is an ongoing process, so don't get disheartened if something's slightly amiss early on. You can adapt and change the scheme organically as you go – but far better to have something actually done that you can then tweak, than to suffer from analysis paralysis and never put brush to model. +

+++


+ inload: Epic Salamanders +

+ Salamanders in the Dust of Armageddon +


+ While still work in progress, I thought I'd exload some notes on the painting process for these new Epic models. +

+ The stands above have been sprayed as detailed in the previous inload, shaded with an oil wash, lightly drybrushed with Snot Green and had the black areas (shoulder pads, boltguns) painted in with Black Templar contrast paint. +

+ They have been glued to bases that have been painted with Averland Sunset (on the desert aras) and drybrushed with Ushabti Bone. The tarmac was painted with a neutral grey that was a combination of those two colours, plus a spot of a blue-grey (an Army Painter paint, I think) to make a dirty yellow-grey. Each rim was then painted with Scorched Brown. +

Zenithal spraying and a quick oil wash go a long way to getting models ready in minutes.

+ Having spent so much time preparing them, it was a treat – albeit a slightly apprehensive one – to glue the individual models into place on the stands. While rough-and-ready, the effect is pretty good, I think – and all they really need now is a bit of detailing and tidying-up. + 

+ Jumping straight into painting a force like this can be slightly nerve-wracking, as you're putting quite a bit of time and effort into things without any reassurance that it's going to look good at the end. +

+ The alternative is doing a test base or two. That's not a bad idea, but from experience I know that it's very easy to overdo those test stands, producing something that's practically very difficult to replicate en masse.+


+ The lesson here, I think, is that sometimes relying on your experience and instincts is okay. Don't overthink painting Epic: get the bases complete, paint the models in substantial numbers, and get them to a definite stage all together. The formation above is (give or take a few models that fell off the sprue I was using to support them) roughly half a box, and the other half only awaits the drybrushing and details before they can be similarly assembled. In all, it's taken me perhaps three hours actual work, spaced across a few evenings to allow for drying time. That's perfect at this busy time of the year. +

+++

+ Now I've had a chance to starting painting the new models, I'm favourably impressed. The slightly larger size means that they're sturdier than older Epic kits and also means it's simply easier to paint detail, as there's more surface! +

+ While I don't think it's been stated, it wouldn't surprise me to find that the kits were designed specifically for use with GW's contrast paints, for the details are simple but clear, and the paints work well with them. +

+++

+ Gaming plans +

+ So... what next? I hope to polish off this box of Salamanders over the weekend, by which time my box of Legions Imperialis should – I hope – have arrived. Thank goodness I queued on the dreadful new website for an hour to pre-order two weeks ago, only for it not to turn up, right? +

+ Grumpiness aside, the combination of this infantry kit with the big box should give me a good head-start on an army. Doubling up the Legions Astartes kit means that I'll have the flexibility to use things as separate formations as well as upgrades. +


+ Thought for the day: Hope is the first step on the road to disappointment. +

+++

+ inload: Trailblazers +

+ For Yarrick!/Waa-Ghazghkull! +

+ Your next Challenge Event: #foryarrick #waaghazghkull

+ What is The Ashes of Armageddon project? +

+ If you're not aware of The Ashes of Armageddon, it's a standalone blog themed around The Battle for Armageddon – and specifically, the Second War, where Ghazghkull led his first invasion against the defending Steel Legion. You can catch up and find a list of articles in this handy Overview article. +

+ As usual with these standalone projects, I run occasional 'Challenge Events', each of which is an open invitation to build and paint cool models around a particular theme. These are then showcased on the blog, and used to illustrate (and inspire) the ongoing story. +

+ The first one for this project was themed around the backlines of the war, and you can see the results in this article: [+noosphericexloadlink embedded+]. The second one is starting... waitforit... now! +

+++

+ The basics +

  • Build and paint a character for the Second War for Armageddon
  • Post it to Instagram with the tag(s) #ForYarrick and/or #WaaGhazghkull
  • Do it before January 31st 2024

+++

+ Sounds fun – what's the theme this time? +

Buzuruuk da Eadbiter, by @argaastes

+ This time you're invited to create a model for one of the heroes or villains of the conflict (which is which, of course, will rather depend on your point of view!) – or in other words the characters at the heart of the conflict. +

+ Where the previous event looked at the everyman, this one challenges you to create your take on famous warriors and personalities of the Second War for ArmageddonThese can be:
  • Your own Armageddon-themed characters 
    • The Warboss or important member of a particular ork warband
    • Commanding officer of a Steel Legion regiment
    • A Hive Governor, Mechanicus Techpriest, Squat Landtrain commander or Legio Metalica Princeps
    • Perhaps you've read about a figure in one of the articles that's caught your imagination?
  • Characters mentioned in the lore that do not have models
  • Your interpretation of a character with a model
    • Ghazghkull Thraka himself
    • Commissar Yarrick
    • Chapter Master Marneus Calgar, Commander Dante, Mad Dok Grotsnik
+++

+ What do I need to do? +

Steel Legion General, by Sam Shand/@the_steel_legion

+ Once you have picked a character, you need to build and paint him, her or it up. There is no arbitrary standard of quality – beyond you feeling you've done your best work. +

The key is that the model is themed to some point in the 2nd War for Armageddon. There's a timeline here for you to browse. How you interpret this is entirely up to you. +

+ Nor does the model have to be converted – though I'd suggest that this is a great way to help put your personal spin on a character, or show a slightly different interpretation than GW's studio version. As a couple of prompts:
  • A Ghazghkull that nods more towards his original 2nd edition model than the current version.
  • Your take on a pre-Black Rage Captain Tycho
  • Mad Doc Grotsnik in his 'sergery'.
  • Sebastian Yarrick in his personal study.
  • A recreation or interpretation of one of GW's awesome artworks.
+ Other than the theme, it's up to you – you can do a single model or an entire diorama – whatever you fancy. +

+ Once you've got your model complete, you can enter by:

+++

+ How long have I got? +

+ The challenge runs from December 8th (that is, tomorrow) to January 31st 2024. +

+ Feel free to post WIPs as you go – and please do share to let as many people as possible get involved. +

+ Don't worry about treading on someone else's toes – in fact, I'd encourage multiple different interpretations of the same character. +

+ As a perfect example of the sort of thing I'm after, here's Gonzalo Gonzalez's awesome take on Commissar Yarrick – combining the claw from the original with the more dynamic Brian Nelson version:


Gonzalo Gonzalez's (@forge_of_gonfrask) awesome Yarrick conversion 


+++

+ And another thing +

+ I was very pleased to be interviewed by @the_iron_within about The Ashes of Armageddon project for the German-language podcast Beim Imperator Nichts Neues [+noosphericexloadlink embedded+], so if you speak German you can here my pontifications over there. +


+++

+ inload: A look at Legions Imperial infantry +

+ A look at the Legions Imperialis Astartes Infantry box +

'Shouldn't we be smaller?'
'Yes, but GW's shipping seems to be taking inspiration from the Adeptus Munitorum, so they'll have to make do with 40k-scale Salamanders for the moment. +

+++

+ First thoughts 
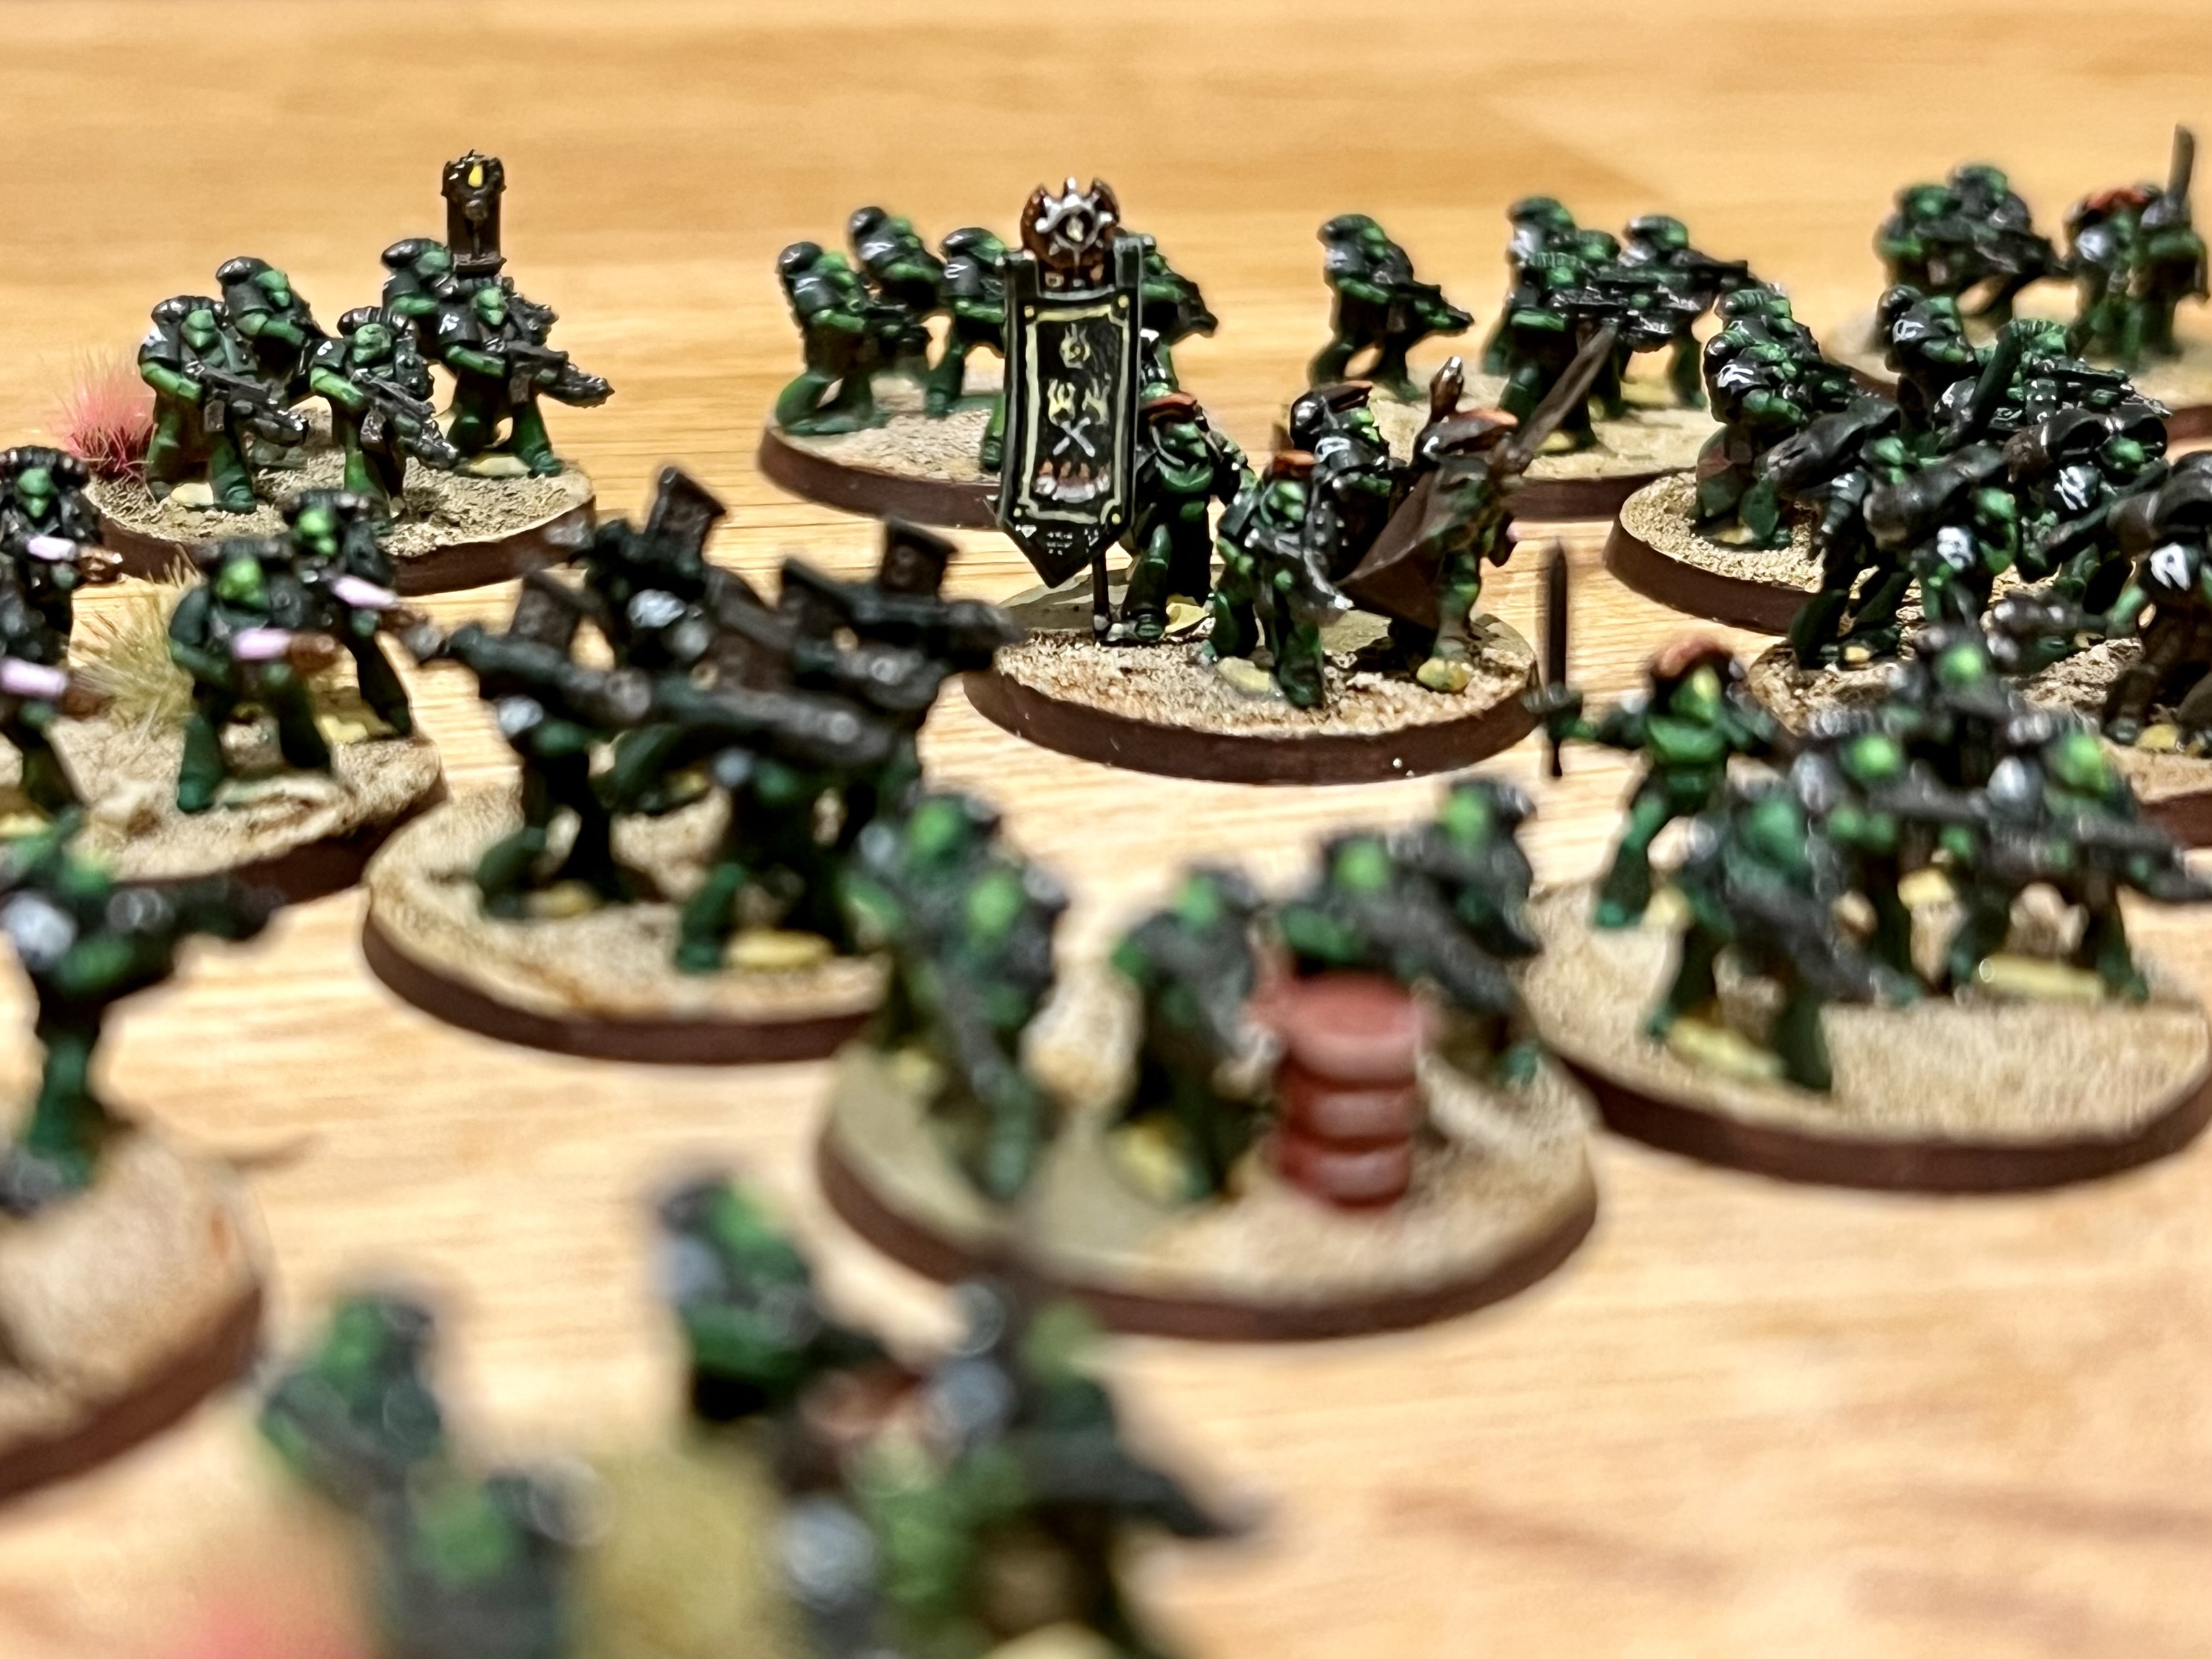
+

For those who played older versions of Epic, you'll find much that is familiar in the new Legions Astartes Infantry kit for Legions Imperialis. Each sprue contains a variety of troop types, so more akin to later releases than the very early single model sprues. You get two identical sprues in the box, each intending you to build:
  • 4 stand of Tactical marines
  • 1 stand of Assault marines
  • 1 stand of Devastators
  • 1 stand of Marines with plasma guns
  • 1 Command stands
  • 1 stand of Terminators
  • 2 Contemptor dreadnoughts
+ Double this up and you end up with... not quite enough to build standalone detachments for the new game. Unless you buy two boxes, or combine it with the models you get in the big game box, most of these stands will have to be upgrades to a Tactical detachment, rather than their own thing. +

+ Is this a problem? Well, your mileage will vary. I think the take-up of Epic 40,000 (E:40k) suffered because the boxes both dropped in content and increased in price in comparison with the earlier giant boxes for Space Marine (SM2) – and likewise you ended up with one or two stands of (say) bikes rather than the entire formations you used to get. I'd hate for those on the fence to be put off by the prospect of buying multiples to get useable formations. +

+ Another problem of the two sprue approach is variety. The big SM2 boxes were so packed that they allowed huge amounts of variety right from the off, while I think the cost/value ratio here will mean that people will want to squeeze everything possible out of it. That'll lead to very samey armies, which is a shame. +

+ From my point of view, while it's certainly nice to get lots of variety on the sprue, I think I would have preferred Dreadnoughts and Terminators to have been released separately and have a more focussed box. If there is anything here that you don't want, then the already high price (£30) is a good excuse to leave it on the shelf. +
+++

+ Chapter Astartes – using them in the 41st Millenium +

I am pleased to say that the new models in and of themselves are a lot of fun – though not perfect. They are without a doubt a substantial improvement on previous generations of GW's Epic Space Marines. Standing ~8.5mm from foot to the top of the model, there are a variety of poses and lots of lovely detail. As much detail as I'd like? Well, that's arguable. There are lots (and lots) of alternative power-armoured 6mm models, and freely-available files for 3D printing for pretty much every combination of Space Marine you might wish. Lots of those, to be frank, beat these into a cocked hat in terms of absolute detail and lack of design compromises. +

+ I do like to support the creators of the IP where possible, and the convenience and resilience offered by these plastics is a strong point in favour – but I can quite understand anyone who comes to the conclusion that third party models are a better choice for them. The elephant in the room addressed, let's get back to the kit itself. +

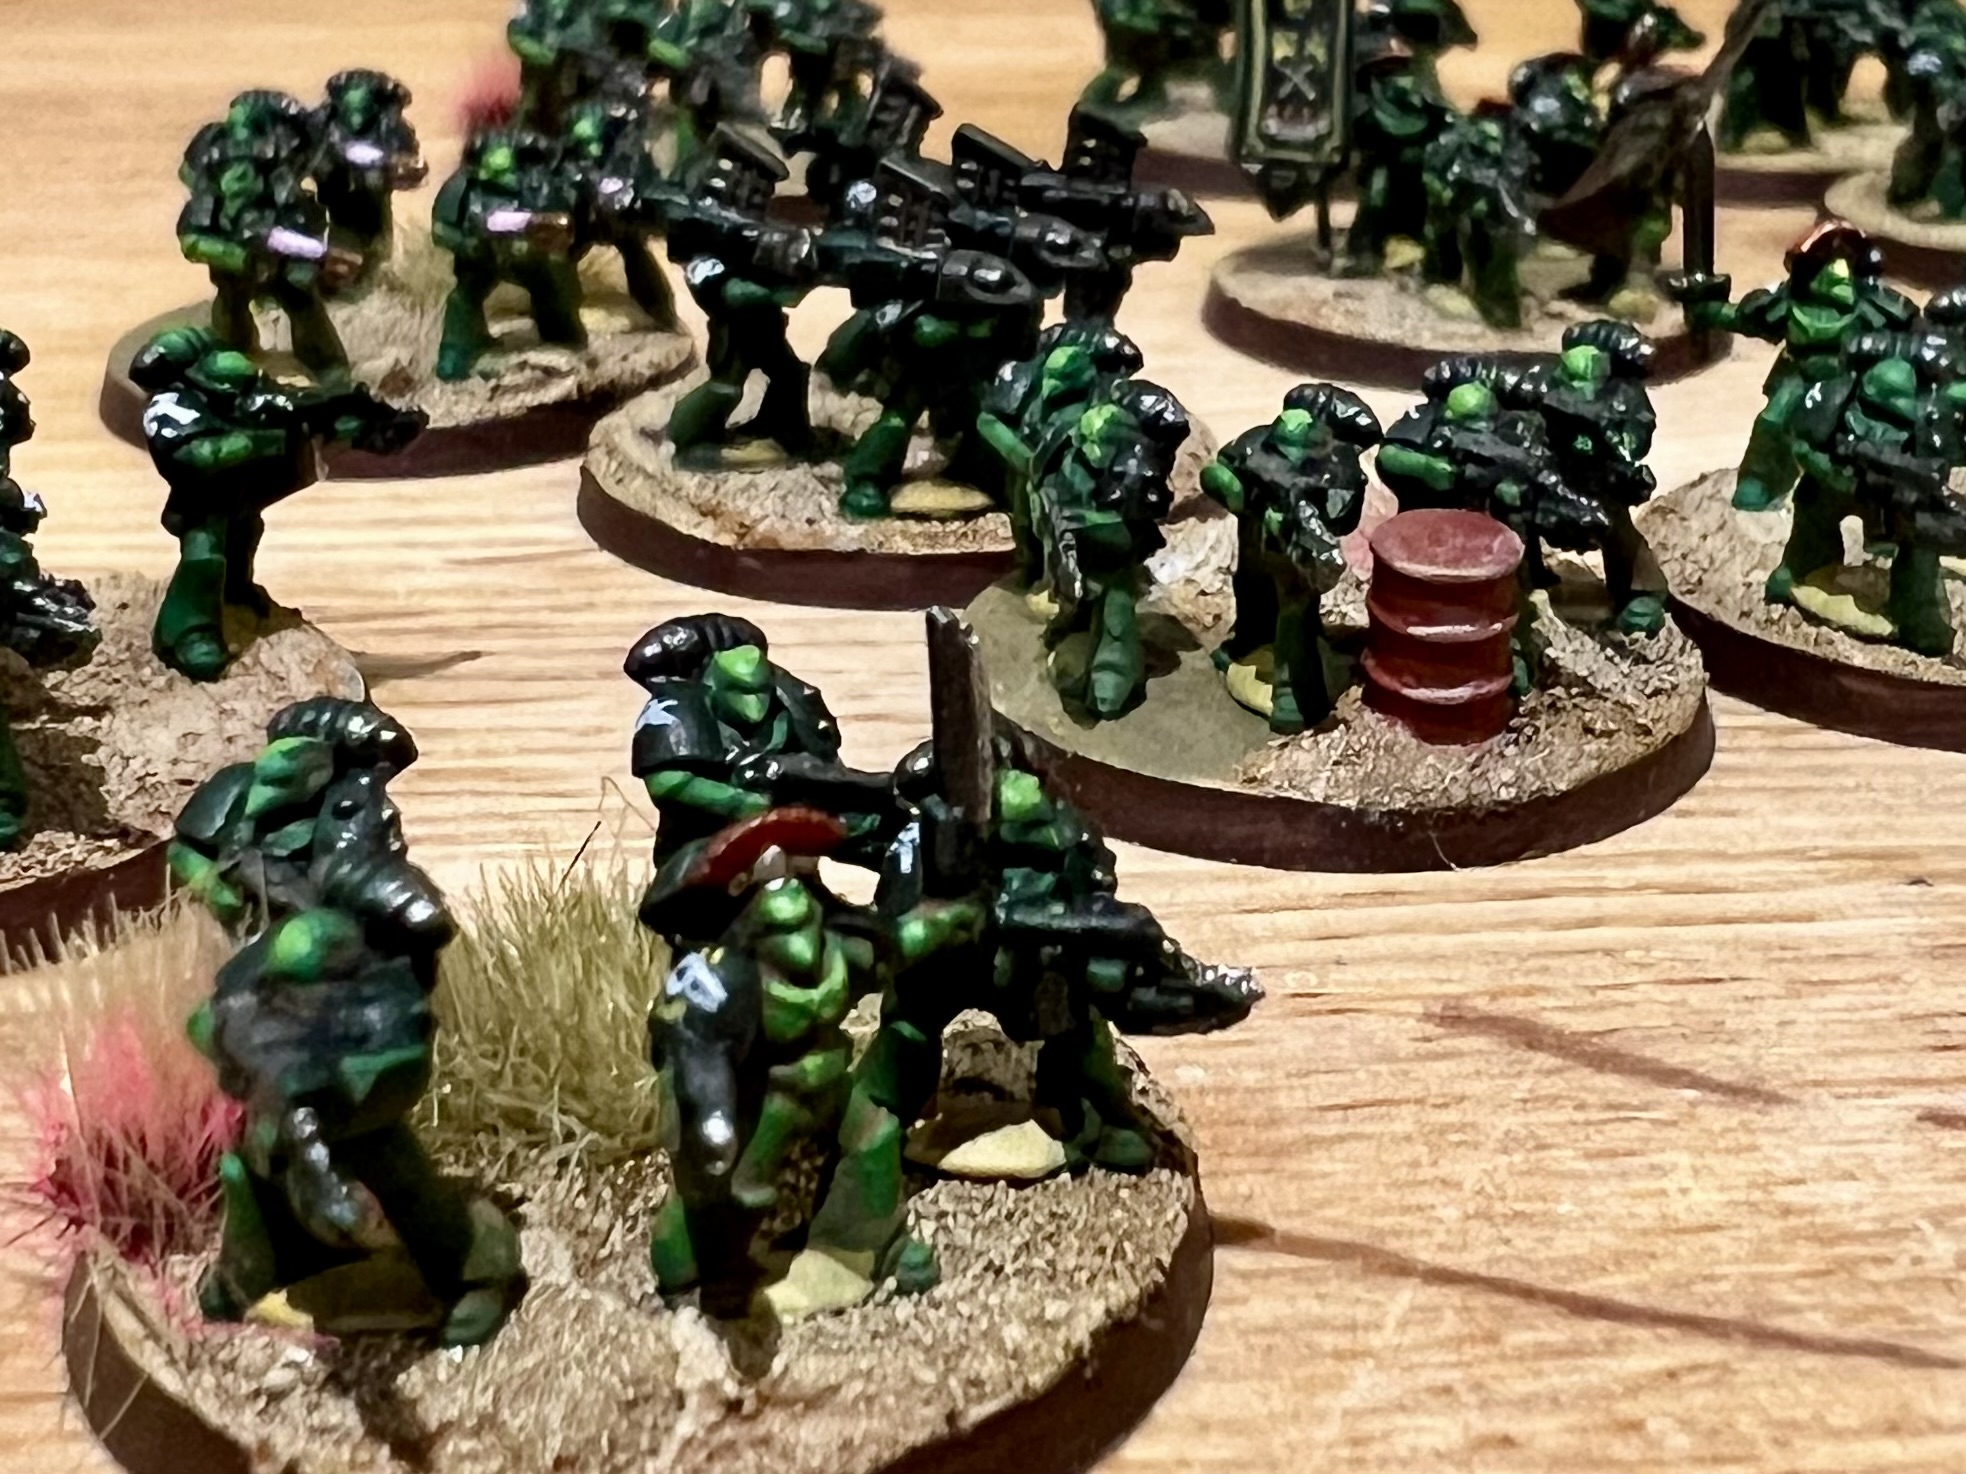
+ The kit combines various Mark VI Space Marine infantry models (that is, beakies) with two Contemptor Dreadnoughts. You get quite a few options for Contemptor legs, oddly – four individual legs for each body – while other options are essentially model swap-outs. For example, there are sufficient marines with jump packs to allow for different sergeant load-outs. This is a nice little touch, and means that even if you stick rigidly with the suggested way of assembling, you'll end up with some nice visual variety across your force and even a few spares to scatter about – perhaps on Titan bases or the like. +

Contemptor dreadnought, marine with plasma gun and marine with boltgun.

+ Refreshingly, there are multiple poses for even the basic troops, and this is a step-change for GW's Epic models. The larger absolute size means that it's generally clear which models are which – and painting will help make distinct those very close, like the two above. While it may seem a little thing that you've got more than one Tactical Marine pose, it will make a huge difference to the look of a whole army – and that variety will (I hope) grow with further releases. +

+ It's not all sunshine and rainbows, however. Even a cursory search for the new models online will reveal the extrusions/stretching caused to the poses of some of the boltgun marines by the limitations of the manufacturing method. I'll show you how I fixed this to my satisifaction in a future inload, as I didn't have time to get shots for this one. For the moment, it's enough to say that it's a (thankfully) quick and simple fix. While I personally don't think it's a catastrophic  decision – and my overall impression remains very positive – it's a definite black mark against the sprue for me, and I hope that further releases take the complaints into account. + 

+ The models are designed for the Horus Heresy setting, but as most of the PCRC – my most likely opponents – have ork or Tau armies, I'd like to make sure that these will fit in with the 40k setting; and specifically the Second War for Armageddon. If possible, I'd also like them to pull double-duty and not look too out of place in the HH setting. +

+ While I haven't made any firm decisions on how to finally glue them, it strikes me that the kit is as well suited to building a 40k-style Space Marine Battle Company as it is a 30k style force – and I think scattering the plasma guns and missile launchers around Tactical Squads would both look cool and help differentiate the force from its 30k equivalants. +

+++

+ Painting Epic-scale Salamanders +

+ The 'Winterblade', Pellas Mir'san of the 2nd Company +

+ Salamanders are a natural choice for me here – present in both 30k and on Armageddon in 40k; and also a lovely vibrant colour scheme that stands out well. This force will let me expand The Ashes of Armageddon project – and I think it'll be fun to explore. +

+ It's worth emphasising two very important features of the new sprue: by and large each infantry model is attached by just one point to the sprue, and they have little puddle bases rather than the old big round. These two changes seem minor, but they make all the difference. I'm willing to forgive a little delay for this, as it will make a huge leap in actually getting the models painted and on the board. +

+ Painting +

+ The green I've used to spray them gave me a jolt of nostaglia, as it's the same green as the sprue on my mate Malcolm's original box of Epic +

+ I started off by spraying the sprues with Halford's Camo green. This provided a mid-toned base. Once dry, I removed the infantry from the sprue and cleaned them up – or rather, I tried to. Thankfully, the new sprues benefit from GW's excellent manufacturing, so there are no visible seams, flash or mouldlines that needed cleaning. Even the burrs caused by clipping them from the sprue are on the puddle base, safely hidden away. Whatever reservations I have about GW's logistics and management, I have none for their sprue layout designers. +

+ I also assembled the Contemptors at this point – and while I'm equanimous about their presence of the infantry sprue, I must confess that they are jolly nice little fellows that went together well. The designers have integrated pegs and sockets in the legs, allowing for variety and preventing the bugbear of old Epic – monopose muliples – while also making it a breeze to create cool poses. +


+ The method used is a development of that I've used for my 40k-scale Dust of Armageddon related project. +

+ The next step was to use little dots of superglue to reattach the models on the top of the sprue frame – see the image above for what I mean – and give them a zenithal spray of Colour Forge's Salamander Green, creating a hint of preshading. That completed the preparation for the Space Marines, so onto the bases. +

+ Next up will be an oil wash and picking out details –  and I think that'll pretty much be it. +

+++

+ Bases +

+ From squares to strips to circles, it's not Epic without changes to basing. While my pre-ordered copy has yet to grace my doorstep (grumble grumble), I can't imagine that the base style you use will have any effect on the game – but if you want to try something else, you'll need twenty-two of them, as that's how many 25mm bases you get included in the kit. +

+ First and foremost, you'll notice no recesses in the new bases – and good riddance. The five little holes made placement of models rigid and awkward, highlighting their nature as game tokens rather than cool models. It was a pain to get to the centre figure, unnecessarily awkward to apply and paint basing material, and the slight gaps always seemed to show. I am very much looking forward to putting the models on the bases in arrangements more suggestive of combat than the parade ground. + 


+ The bases come pre-textured with an urban style. Nice enough if that's what you're after, but not great if you want something different. I very nearly decided to just use 2p pieces – they're the same size and give the stands a bit of heft – but then spotted that the underneath of the new bases is ever so slightly recessed. This seems a minor thing, but having the centre of the base raised even a hint makes a surprising difference when playing on the Realm of Battle board I've just painted up. +

+ I therefore got to work with a bit of texture paste and sand. I was going to completely cover each one, but found that some of the detail works quite nicely left exposed, as you can see below. You'll spot I also added some larger bits of grit and a couple of bases from the Titanicus industrial terrain sprue.+

+ Once dry, these were sprayed Halford's camo brown. Once dry, I gave them a light dusting from a shallow angle with Halford's camo khaki to pick up the detail – a very quick scheme indeed! +

+++

+ Closing thoughts +

+ This is a good but flawed kit, and while well-engineered, I think GW ought to up their game. Plastics have many advantages over other materials for Epic, but a key one – economy of scale – is not being used here, and as a result the decision to buy these or source alternatives is not clear cut at all. The compromises made to the sculpts for the sake of single-piece models is (in my opinion) fine, but at full price, and with so many good alternatives, this is a kit I feel reticent to recommend whole-heartedly. +

+ Are these models nice? Yes. Are my opinions coloured by nostalgia? Doubtless. Are these models worth picking up? Well, as always that'll depend on your own preferences. They are unarguably a huge improvement over previous editions – and not merely the expected result of thirty or so years of manufacturing developments. These have clearly been very carefully planned and thought-out, and invested with a lot of love by the designers. Nevertheless, there are also some unarguable niggles that even someone keen to like them and prepared to overlook a few flaws might find not merely annoying, but properly off-putting. +

+ To finish on a positive note, in isolation, these are a delight. For a fan of older editions of Epic, if you'd put this kit in front of me ten years ago, I'd have been absolutely blown away. Full of the weird charm of their bigger cousins, this kit is varied and interesting, and a good balance of crisp detail, and gameworthy sturdiness. These are perfect little miniatures of your miniatures, and I defy anyone to build a few stands of them and not end up with a big grin on their face. +

+ inload: Hurry up and wait +

+ The Rear lines of Armageddon +

+ #AshesInvite +


+ Polished off this tank crew member last night, leaning against his Leman Russ as the sun goes down. + 

+ The deadline for this challenge event is dusk tonight, but as it's finished enough for pict-captures, I thought I'd take a few. +


+ The theme for the challenge is 'back lines of Armageddon' – a fairly open brief that I hope allowed people to pick up something for Orks as well as Imperial Guard. My riff on the theme was to show a tank crew from the 2nd Division, waiting to be sent into battle. +

+ The crew member is a Stationforge print, bought from BattleprintsUK on ebay. I'd like to write a little bit more about them in a future inload, but I'm happy to give them three mechadendrites up – excellent sculpts, excellent service. I had intended to have a few more figures on the tank, but in the end decided the close-up on one worked well. I will, however, add some others when I come back to polish off the rest of the tank. He was painted in exactly the same way as my other Steel Legion forces, with the exception of the Army Group icon, which is a double-pronged white thunderbolt on a red field – marking him as part of the 2nd Tank Division of the Armageddon Steel Legion. +


+ The challenge was also handy to cut down the cupboard of opportunity – gaving me a chance to finally finish off a Leman Russ Vanguisher sprayed (about a decade ago) for my Lamb's World army, and combine it with a scenic base that's even older than that – I think it was bought for my Ultramarines! It's one of those bits that I never wanted to use, because I always felt something more fitting would come along. I'm very glad to have finally pulled the trigger and used it. +

+ The undercoat is Humbrol Desert Yellow 93. I added a couple of layers of drybrushed highlight using Buff Titanium to give a slightly 'dusty' look, then used thinned burnt sienna oils to weather the vehicle and pick out the recesses. After that, it was really just a case of picking out a few details and applying some edge highlighting and weathering. It's a rather loose finish. +


+ inload: Painting The Ashes of Armageddon gameboard +

+ Third Army: The Wastelands of Armageddon +

+ A Steel Legion Heavy Bolter team hopes to chalk up some kills against the orks of Waa-Ghazghkull. +

+ No, not the Steel Legion 3rd Army Group described in this article [+noosphericexloadlink embedded+] on The Ashes of Armageddon blog, but the Third Army of wargaming: the tabletop scenery. +

+ Armageddon Wasteland terrain +

+ I've been threatening to repaint my second-hand Realm of Battle board for ages. I bought it painted in a white polar scheme, and used it for many years for various games. In fact, the Steel Legion I'm currently repainting were originally painted white specifically to have an army to use on it – and since they're getting a glow-up, I thought the board ought to follow suit. +


+ This was a surprisingly swift process. I used a dish sponge to apply some slightly diluted raw sienna acrylic over the surface, excluding only the exposed rock, which was already painted grey from its previous incarnation. I used Pebeo studio acrylics, which are affordable and tough enough to stand up to the inevitable bumps and bashes of tabletop warfare. +

+ Once dry, I repeated the process with raw sienna and buff titanium – not in an even mix, but allowing them to mix and mingle on the surface, leaving the pure raw sienna visble in recesses. I then gathered some sprays – black primer, camo brown and camo green from Halfords, plus GW's Wraithbone spray and used them to add some quick smoky detail here and there. +


+ Once that had all dried, I went back in with a large soft brush and buff titanium to pick out some texture with dry brushing. I then heavily diluted some Skrag brown and Liche purple (I think Phoenician purple is probably the modern equivalent) and used these to work into the cracks and crevices to boost the contrast in tones. +

+ I also used these very dilute mixes to add a few discoloured patches – surface vegetation? Chem-waste pollution? Dirt and debris? – it doesn't really matter which, as such additions are mainly there to avoid weird blank gaps in the surface. +

+++

 + The board in use +

+ It was a treat to use the board in a game with Bob Hunk – keep your occulobes peeled for an upcoming The Ashes of Armageddon battle report – but I'm keeping that secreted under my hood until it's all written up and fits into the narrative. +

+ For the moment, then, here's a couple of shots of the finished elements of my gradually-being-repainted Steel Legion force:


+ These details show two things of note: firstly, the importance of contrast between your models and your table if you want them to make an impact. The rims of the bases frame the model and make a statement, while the dark armour, guns, gloves and boots define the features and make the models 'read'. That's even the case here, where the figures are intended to read as camouflaged. Without that built-in (and unrealistic) framing and contrast, the models would be literally camouflaged against the surface, and you'd lose a lot of the visual appeal of a game. Bear this in mind when deciding on your schemes! +


+ Secondly, the difference between basing and terrain. One could, of course, prepare and paint the whole board using the same paints and techniques as used on a model's base, but it'd be considerably more time-consuming and expensive, not to mention more likely to be fragile. You'd end up with something more akin to a diorama rather than a playing space. +

+ The 'Third Army' needs attention, but it also need a slightly different mindset – happily, a more forgiving one, for the gaming table will rarely garner as much attention as your models, and thus can be treated with less attention to detail. +


+ While explicitly intended to represent one of the many Wasteland areas of Armageddon, the finished result is pretty flexible, and can pull double-duty for other games – or simply as a pict-capture backdrop. +

+++

+ inload: Kindred calling +

+ The Kindred of the Bloody Moon make haste to Paradise XXII +

+ WIP Baggage Knarloc and kroot gunslinger +


+ Ahead of their deployment to Paradise XXII, the kroot Kindred of the Bloody Moon receive some reinforcements – and a little warpaint. +

+ Pictured above are the results of a second box of the new Kill Team Kroot together with some older metal Kroothounds, along with a few 3D printed extras designed by FelixtheCrazy and printed by generous Lucifer216, and some accessories from the original Kroot Carnivore kit. +

+ The kroot background has a lot of appeal for me – on the one hand, they're savage flesh-eating aliens, but on the other, they've got a great tribalistic and explorative angle. They're self-reliant and self-improving, with a culture based around very different values from any of the major factions in 40k. Perhaps most appealingly, they're not an overblown galaxy-ending influence on the broader stage – merely an exemplar of the many, many hundreds of minor xenos that riddle the 40k galaxy. It's a refreshingly understated and surprisingly thoughtful area of the background, ripe for development. +

+ Kill Team: Into the Dark expanded a little on the Kroot background, and provided us with some insight into their motives and way of war – and it's little snippets like this that really set my mind alight. Of course, the beautiful models and cool aesthetic really help, and I don't think I'd be anywhere near as interested if Brian Nelson hadn't made such a great job of sculpting the first batch of the basketball-playing parrot-Predator creatures. +

+ Painting +


+ The Knarloc – a 3D-print from the ever-awesome Warmtamale – is painting up nicely. Thus far I've been concentrating on developing texture on the skin, and having a whale of a time. While most of the non-Carnivore Krootforms in the Kindred vary in colour, I thought orange would work nicely for this Knarloc, so he's clearly a relation of some sort. +


+ The face has been worked up a little more than the rest, but there's still plenty to go. You'll spy some chalky highlights here, which I'll be softening down with glazes – possibly oils, once I can research how they're likely to interact with printed resin. +


+ ...and there's more on the horizon, as Warmtamale also printed me these rather charming Knarloc riders and variant kroothounds, pictured alongside some of my recent Steel Legion for The Ashes of Armageddon. As an aside, I think it's great how the 'digestive-evolution' concept of the Kroot not only allows but encourages variations on the models you use. Just like Tyranids and Orks, this is an army that lends itself to using older and third party models. +

+ You'll also spot a holy Kroothawk in the centre – perhaps destined as an objective marker! +

+++

+ Gaming +

+ Out of interest, I worked up a quick 10th edition list using the models at my disposal – it comes to 810pts. +

Faction: Tau Empire

Detachment rules: Kauyon

Units

  • Kroot Shaper – 40pts
    • Precision of the patient hunter – 20pts
  • Kroot Shaper – 40pts
  • Kroot Farstalkers – 70pts
    • 1 Killbroker, 9 kroot, 2 kroothounds
  • Kroot Farstalkers – 70pts
    • 1 Killbroker, 9 kroot, 2 kroothounds
  • Kroot Carnivores (10) – 55pts
  • Kroothounds (4) – 30pts
  • Kroothounds (4) – 30pts
  • Kroothounds (4) – 30pts
  • Krootox Riders (2) – 70pts
  • Great Knarloc100pts
  • Knarloc Riders – 110pts
  • Ambull – 85ps
  • The Archivist – 70pts
+ Background-wise, the Kindred aren't associated with the Tau, so it's more themed around mercenaries rather than auxiliaries. You'll spot a couple of units that come from the 'Legends' rules – the Ambull and Zoat – because this seems the perfect project to include all the weird and wonderful models that I've collected over the years. +

+++

+ Models + 


+ I had a lot of fun building these models. Pictured here's some sort of personality bearing a polearm/religious banner or similar. When playing around with bits, sometimes it's nice to not have too many fixed ideas! +


+ Pictured alongside another recent purchase, the Catachan with grenade launcher that had a limited release. While she's a relatively slight figure, even in the context of the 2nd/3rd-edition period, it's clear how tall and intimidating a kroot would be to a human. +


+ Having a couple of kits and variant bits allows you to build fun little variations like these sharpshooters. +
+++