+ inload: Worldbuilding – a load of old cobbles +

+ Purefinder Chanterwick +

Imperial Fist soldiers oversee construction.
+ Progress continues on the gameboard [+noospheric link embedded+] I'm building. A loose part of the Court of the Sun King project, I've given it a little bit of background. +

+ Purefynderre Chaunterwycke +

+ Wherein the deck ys stacket +

Finding his place, he began tracing a finger through the uneven pages of the old history. 
"The style is a little florid, I'm afraid, but that was the accepted style –" the underscribe stopped as he saw Northgrass' eyebrow rise and mouth set sternly. "Perhaps another time." He coughed, and began:
'Lamplit and now largely derelict, the settlement of Purefinder Chanterwick has, like most of the City, served many purposes over drawn-out centuries. Of its origins, none can be sure, for histories have been written of its histories; and much now is lost that might once have been remembered. '"
"'For now, it suffices that it sits between the docks and the leathermaker's district; and on a thoroughfare that connects more important parts of the city to one another. A fairly anonymous area, it encapsulates the lot of the Imperial peon. This is the domain of the Purefinders, a vital part of the leatherman's art; for it is they who gather the nuisances used in 'bate'; an infusion of fecal matter from animal species used to soften hides for tanning. The transit of equids, riding-dogs and cavalieravans as they pass through means that much of the road is filled with – unpleasant – giftings of these riding and draft beasts.'" 
Having finished reading out the extract, Ferlinghetti closed the book slowly. The old leather cover sat awkwardly on the yellowed and buckled pages. Veck smiled inwardly as the underscribe placed the book down slowly and unconsciously wiped his metallic fingers on his robe.
The Inquisitor rose to his feet.
"So, dwellings in the dung district, Ferlinghetti? You've come up in the world." He said, wryly. "Unglamorous, under the web. Why, Manderghast'll make an agent of you yet.'

+ As well as being fun to write, making up a story about the location necessarily makes it a bit more personal – much like making up a name for your general. It will also start sparking ideas. Here, for example, the idea of the area sitting on the outskirts of the leathermaker's district might spark some ideas for shopfronts; the sort of rubbish that'll be scattered about, and so forth. I like the idea of stringing up some washing lines, too – purefinders probably like a good scrub! +


+ Practical: paving +

+ With the roads in place and board dry, I took it outside to get rid of any stray bits of glue or sand using a scraper. +


+ A few minutes work left me with the bare streets +

+ I then began the process of paving the streets, following this tutorial [+noospheric link embedded+] from Rob Hawkins' Hobby Blog. To add a little extra detail, I decided to add some manhole covers, which are made from small decorative wooden bits from Hobbycraft. These were glued in place first, aligned with one another. + 


+ I then began gluing on the paving slabs, placing a couple of larger ones and building up the shapes around and between them. +


+ I gradually began filling in the gaps with smaller pieces. In hindsight, I wish I'd made them all a little smaller to enhance the sense of scale (these are fairly huge at 28mm/32mm), but I think it works quite nicely. +


+ A couple of hours – and a couple of cups of tea – later, it was starting to look a bit more developed. You'll notice that I've added smaller stones around the manhole covers. This has a practical purpose (covering the area around a cirle), but also looks much prettier. +


+ Here's the board at the end of the evening. The bulk of the roads are done, though I now need to go back add fill in some spaces with smaller stones. I'll leave a few gaps for broken or missing slabs, but I hope the addition of tinier stones will help sell the scale. The picture above also shows the pavement started on the lower side (bottom of the picture). For this, I glued stones of varied size along a line, roughly 5mm (¼in) away from the gutter. I'll fill this line with kerb stones, and fill the space behind the main slabs with smaller cobbles. +


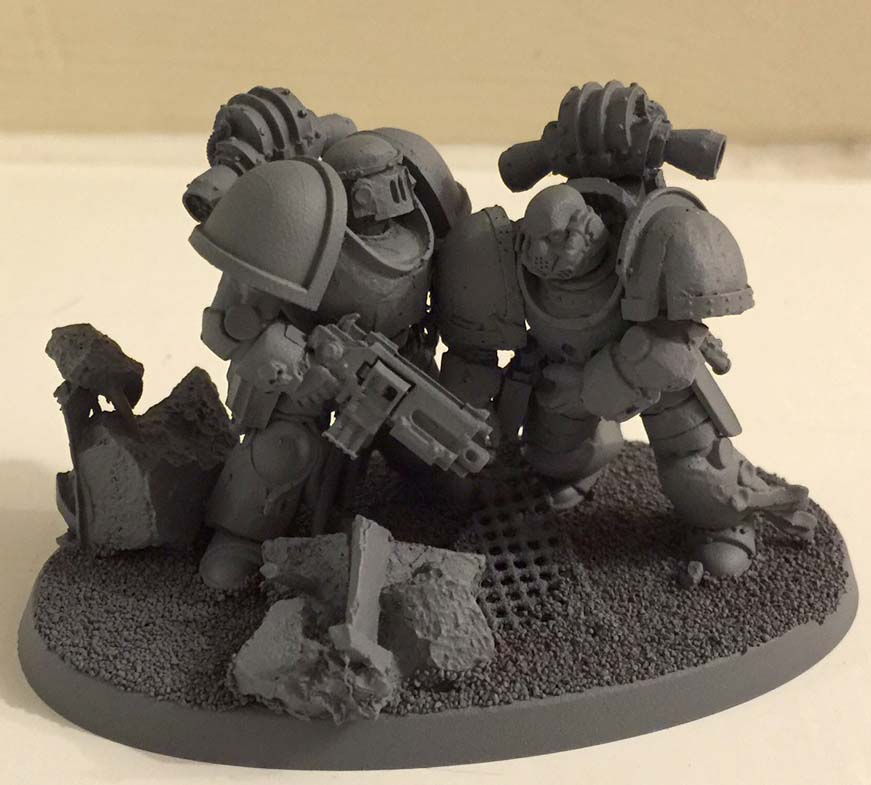
+ I couldn't resist playing with toy soldiers at this point, so I'm going to pretend that this shot is to demonstrate the different levels and show the scale. The marine on the left is standing in the gutter, and the second on the pavement step. While only 25mm wide, you can see that a 30mm base still sits steadily on it. When the paving is added to the pavement, the drop will be even less. The sergeant (with the banner) is on the pediment. As you can see, there's a nice height difference between the different levels. +


+ A slightly arty shot of the streets, this also shows one of the buildings on its own base. Again, this base gives some extra levels and height. I don't think this will cause much in-game effect, but it'll improve the realism of game photographs, and add to the sense of immersion. +


+ A closer (if very dark!) look at the building across the road. +

+ inload: The Dolor Liberation Crusade +

+ A return to Dolor +

+ The Dolor campaign was fought back in the misty days of 2003(ish); it was the first organised campaign we played as a group; prior to the formation of the PCRC [+noospheric link embedded+]. It coincided with Codex: Cityfight being released, and we ended up playing out the fate of a dismal little planet called Dolor [+noospheric link embedded+]; scrapping over the wintry streets of the capital city, Dismay. +

+ Whatever the end result of the campaign, the world fell under the influence of the Tau's Brightsword Protectorate, the blueskin's domain in our group's shared sector. We've since played a number of campaigns, and the Tau seem to have got a bit big for their boots. Ten years has passed in the real world, and in the dark future, it appears the Imperium has decided to reclaim the world...+ 

+ Strike from Starfire +


+ The Imperial force pushed in from the Starfire Sector; bypassing a great deal of the Tau's defensive lines with a sudden strike. After a decade of uneasy rule by the Protectorate, the peoples of Tau'lor now peered nervously from windows as the Imperial warmachine began to march through their cities; loudhailers announcing liberation. +


+ Armoured vehicles, whose like had not been seen in years, drove up thoroughfares still broken from the original conflict. +


+ The Lamb's Worlders has returned – the 117th determined to make up for the failures of the regiments involved in the earlier war. +


+ Jealous alien eyes marked their arrival; and moved to retaliate; keen to defend the lands and peoples who had joined their federation. +


+ High-tech xenos artifice met human mettle and courage. +


+...with (sadly for the Imperium) less than romantic results. +


+ Imperial foot troops made their way through broken rubble, keen to meet the Tau in combat. +


+ Sharp-eyed snipers traded fire with pathfinders. +


+ Alien armoured might +


+ Dutiful Fire Warriors took up position... +


+ ... and then took aim. +


+ Trading withering firepower, both sides were whittled down in storms of red las and blue pulse shots. +


+ Armoured vehicles worked in close support. +


+ Both sides' special forces made their presence felt. +


+ Auxiliaries played their role; though humans loyal to the Protectorate were kept from the front line. +

...

+ Addendum +

+ Dolor became part of the Antona Australis Sector [+noospheric link embedded+], which grahamgilchrist later built up into a rather fetching map – go and have a little explore through the link when you have a few minutes: there's loads of cool little story hooks for you to use. +

+ inload: Worldbuilding: mean streets +

+ Progress on the gameboard +

+ I've used strips of pine to add the shapes of the roads, pavements and to add some structure to the board. Not an exciting-looking stage, but I hope putting in multiple levels like this will go a long way to helping the finished board look more realistic. +


+ I bought some 7/8ft strips of pine from B&Q for a couple of quid each. Pine is cheap, easy to cut, and comes in lots of different shapes. After measuring and cutting the pieces, I secured them to the board with wood glue and held them down with some dumbbell weights overnight. +

+ The next stage was to run PVA down the gutters and fill them with sand. I used a pot of sand that I've pre-dyed by pouring in brown ink and swirling it around. It's lasted years, and gives a nice dark base to paint upon – useful for hiding gaps in recesses when priming or minimising the effect of chipped paint or damage. +


+ This close-up detail shows the road (the broad strip of lighter wood on the left), the gutter (filled with PVA and pre-dyed sand), the pavement (the double-layered section on the right. The pavement is currently lower than the road, and this is because I'll be paving this with thick card, which will bring it up to the same height. The D-shaped  section adds detail and helps to provide a step between the pediments (the original big square board panels, which are the dark wood on the right), and the paving. +


+ Here's one of the broader 'hard shoulder' gutters that border the central strip of road. I could have had a double-width road, but I think this will add more visual interest, and keep a bit of consistency.  I imagine this area would be used by market stalls, people parking their horses, travellers and the like. A little bit of inefficient use of space is both realistic (look at the waste ground on any industrial or housing estate, for example) and interesting from both an aesthetic and gaming point of view. These areas can be left open, or filled with scatter terrain barriers like trashpiles, parked cars, barricades or decorative flowerbeds, which should help keep things fresh. +

+ Durability and playability are important considerations. I've tried to ensure the pavements are at least 25mm wide so that most infantry bases sit securely on each of the five levels (squares, pavement step, low pavement, gutter, road). You'll also notice a glossy effect in the picture above. This is diluted PVA. Once the sand was glued in place with pure PVA, I let it dry then ran a diluted mix of warm water and PVA over the gutter areas, encouraging it to spread and settle. This should provide one more layer of security by flowing between the sand and binding it together. +

+ Paving +

+ The next stage is to pave the streets. I'm using this tutorial [+noospheric inload embedded+] from the fantastic Rob Hawkins Hobby Blog in order to prepare the paving slabs. On the left of the picture you'll see a red-textured panel. This is one of the 'bases' I had cut, which are intended to provide variety of ground height (some are 3mm thick, some 6mm). +


+ Ground height is a bit of a weird concept, but one I think adds to the ground-level aesthetic. A perfectly flat board has the advantages of being completely stable (for terrain and models) and more compact for storage (particularly if your board is modular or on a mat). Conversely, having a variety of ground heights has the advantage of visual interest and realism. Balancing the two is important to get a good game – I don't want my models to tip over and get chipped in the middle of a game; let alone my guest's! +

+ In this instance, the table will vary from gutter level (the lowest point), paving and road level (2mm off the ground), step level (4mm), pediments (6mm), low building bases (9mm) large building bases (12mm), and large building bases with low building bases on top (15mm). That's before we add any terrain! These are small increments, but I think they will add up and both look and 'feel' good when playing. +

+ Perhaps more importantly, I'll be able to add details like leaf litter, rubbish etc. safely in the lower recesses while protecting them a little so they won't get knocked off in storage. +

+ inload: Building a gameboard +

+ inload: Board, board, board +

+ The table on which you play can add a lot to the atmosphere, to the tactical challenge, and thus to the enjoyment of a game. As I get older and have more time, skill and – perhaps most importantly – interest in terrain-making, I'm enjoying building and painting the worlds in which our figures fight more and more. I've banged on about it before [+noospheric link embedded+].+

A generic grassy plain I built from board, foam and towelling (and staples).

+ Concept +

+ I've had some ideas bubbling under for a skirmishy urban board for years now; with the idea that I could get a dense multi-level board with the feeling of a sort of distressed Victorian slum built over a near-future city. +

+ The image I want is one of distress rather than damage. Cepeheus – the planet I had in mind when thinking about this board, and the one which it will mostly be used to represent – is poor and deprived, but not broken. I want the sense that the inhabitants are making the best of what they have → but they live in a decaying culture, and are simply incapable of maintaining the older buildings. In this case, I want to invert expectations, so the older buildings are far more modern-looking to our eyes. Rather than gleaming glass and concrete springing up from brick terraces as in most UK cities, it'll be a case of brick terraces being built to shore up crumbling marble and glass. + 

+ Practicality +

+ I've already got the buildings sorted [+noospheric link embedded+] +


+ ...and a while back I ordered a load of MDF boards cut to shape so I could give the buildings bases – intended to create the impression of a surrounding pediment and pavement. These are multi-level, which I hope will create detail and realism. I'll get some shots of these for a later inload, as there's some bits I'd like to point out that I found interesting. +

+ The one thing I was missing was the board – a fairly critical part! A lucky find in a disused corner of the warehouse mezzanine at work revealed this desktop, which will form the basis of the board. It had lurked there since the previous owners (a printing company) had gone out of business, so it was a bit mucky. I used a spray bottle with a mix of vinegar and water to give it a good wash and a scrub (the vinegar kills any moulds, and the smell dissipates fairly quickly – though do leave it outside until it's dry). +


+ Plans +

+ The dimensions here show the basic structure: two large 'plates' which can act as building pediments, market squares, coal tips etc., a t-shaped road/river (or simple part of a larger paved area), and a border. It's obviously quite a small playing area, but I'm hoping the height and building density should help with that. +

+ Last night I used some filler to go over the holes and create a flat surface on the 'plates' on the board, and began putting the buildings on to the bases. +

+ inload: Infinity – Panoceanian soldier Santos Santana +


+ The Infinity range is full of spiffy models; more so now than ever. The manufacturer, Corvus Belli, have done a great job in jumping over to CAD sculpting which, while bringing its own problems, does mean that there are some beautiful fine details and a very clean appearance to their figures. I think variety's the key to enjoying my painting, so while I love hand-sculpted figures, these are a nice change – a palette cleanser, if you will. +


+ Most Infinity figures I've seen painted up have been done in a very clean, futuristic style. That doesn't really float my boat (though I admire the skill in achieving such a clean, smooth result), so I've gone for my typical grungy, low-heroic approach. This decision is in part because none of the PCRC play Infinity, so the figures will likely see more use in Inquisitorial skirmishes (using a variety of rulesets) rather than in the Infinity universe. +

+ However, I didn't want to completely cut them off from their possible use in the 'correct' universe, so I've kept the scheme realistic – or at least believable. I usually avoid trying to make things multi-purpose (as they tend to end up not fitting properly in any game), but I think that because the figures are not particularly stylised in proportions, or hugely distinctive from tabletop distance (in the same way as say an orc is), they should work well as 'grunts' for everything from near-future special ops to the oppressive vision of the forty-first millennium. +

+ Another important point to make is that I don't have a dedicated Infinity-styled set of terrain. The 'third army' is becoming more and more important to me in my enjoyment of the game, and so almost any figures I paint have to conform to the world in which they'll appear. +


+ The basing reflects this. I've got some plans bubbling under about a new urban board upon which the Iron Warriors, these chaps, and my Court of the Sun King figures will likely be used. To break up the concrete grey, I'll be using creams and some orange and gold accents on the ground, along with patches of these static grass elements. I get these from Gamer's Grass [+noospheric link embedded+], which are a great little company – good variety, the prices are cheap, and the parcels have come securely packed and promptly sent. +


+ This shot best shows the scheme – dark grey rifle furniture, muted camouflage fatigues similar to my Lamb's World army (there's a tutorial here if you'd like to know how it was done [+noospheric link embedded+]), and pinky-red armour. These are sci-fi figures after all, and I'd just been listening to a programme on the wireless about Mars. Must have got into my subconsciousness! +

+ A fairly obvious question is 'why desert camouflage for an urban table?' The answer is simply 'contrast'. Camouflage works by breaking up the silhouette and tonal contrast, making the figure harder to see. Great if you're being shot at; not so desirable in a figure for a game. There, I think it's better to suggest the idea while still making sure the figure is on display; otherwise you spend a long time painting realistic camouflage only for the figure to disappear when you play with it. Better to slightly stylise things. + 


+ It is here that it becomes clear why tone is more important to impact than hue. Look at the strap holding the sidearm on the thigh. It's a completely different colour to the underlying fabric of the fatigues, but this is not obvious because the two areas are similar in tone. This helps to get a realistic feel, and not distract from the focal point. Compare that area with the head (the focal area), which is painted with a skintone much lighter than the surrounding area. This draws the eye. Even within the face, the features (particularly the eyes) are noticeably darker in tone than the rest of the face. These small areas of high contrast are the most important part of miniature painting for impact. +


WIP – the completed figure is pictured on the left-hand side.
+ This chap has been sitting on my painting table for months and months; with only his fatigues painted, so I'm glad to have finished him off. There are some others that fit with him, so perhaps this'll spur me into finishing them, to. +

+ These realistically-proportioned figures look quite odd in comparison with the heroic-styled Games Workshop and Privateer Press figures (and your taste will dictate which style you prefer), but I think they work quite nicely with the larger marines based on Terminators. What do you reckon? +


+ inload: What the Rubricist did next +


+ King of Hands: Interrogator Yvo Anzotric +

+ While I await resupply for the Iron Warriors, I thought I'd return to my Inquisitorial project, the Court of the Sun King. This is one of Veck's more promising protégés +

He was, in many ways, the best of us. That the Catipünan World-Turners took him is an object lesson that none of us are truly safe. I pray they didn't take him alive. I have no doubt that Veck would put him down if anything of Yvo returns, but even an Inquisitor has human connections.
Don't they?


+ As you can see, he's currently headless at the moment. I have a feathery-hatted head to add, as well as a few more bits and bobs. Oddly enough, I bought this model with the plan to create Anzotric, but got sidetracked by the cool standard head – which in turn sparked the Iron Warriors project! +


+++


+ Site redesign +

+ You might have noted that I've changed the design of Death of a Rubricist a little bit, in order to make more use of Blogger's various handy widgets and doobries. Over the next few weeks, I'll be adding labels to older inloads, which should makes things easier to find. I'd really appreciate it if you could let me know what you sort of links would be most useful to you. More general ones like 'tutorial' and 'background', or more specific ones like 'Praetors of Calth' and 'Tallowland'? +

+ Also, could you let me know if anything's gone wrong, or doesn't read properly, please? Ta! +

+ inload: Iron Warrior vignette – design and composition +

+ Wait, what's a vignette? +

+ In miniature modelling, the line between a vignette and a diorama is a fine one, and often blurred. Both aim to capture a moment in time, and involve one or more figures. I term something a vignette when it's looking at giving information about a character, and a diorama when the story is of equal, if not greater, importance. +

+ This vignette, from Golden Demon winner Ed Gladdis' blog, tells us a little bit about the Space Marine Captain – we get a sense of him being brave and inspirational, and the composition leads us to him. It's a closed space, with the lines leading us from the other figure to the Captain. +

+ It's a character piece that doesn't tell us much about what is going on. It's open to interpretation whether he's giving a speech to rouse his men, or in the middle of a firefight. This keeps the focus tightly on the Captain, even though there's another figure and some ground present. +

+ This diorama, from Victoria Lamb, also a Golden Demon winner, is more concerned with the story. While it's equally well composed, with the eye being led from the red-clad rescuers across the central figure to the bound figure, there's a clear sense of narrative – of something going on. + 

+ Even without the title, it's clear that something is going on; a sense of dramatic tension – will Joan be rescued? +


+ I don't pretend my stuff's up there with those two! Nevertheless, these (and many like them) have been great inspirations, and it's always fun to try out something a bit new. For that reason, I've been working on a vignette of injured Astartes that started out as two separate figures: 


+ I decided I'd prefer to make them into more of a visual piece than gaming ones, so transferred them onto a single base:


+ While I liked how they were looking at this point, I decided I'd prefer the piece to work from a number of different angles. At the point above, there's very definitely a 'front' to the piece, which felt rather forced. Either the marine on the left is rather unkindly dragging his injured fellow back into the battle(!), or he's very definitely in combat, in which case his colleague's pose looks too resigned. He's upright enough to be walking, but his shoulders and head are slumped. It just didn't feel right. Finally, there's very definitely a main character; with the injured marine becoming more of a prop. I wanted to get away from that. +

+ Pathetic aesthetic +

+ The grim darkness of the far future is a horrible place filled with fear, terror and monsters. Even the shining heroes of the Imperium are fascist oppressors. Since I was turning this from a gaming piece into a scene, I thought I'd play up the horror and uncertainty of the setting, by giving a more obvious sense of injury to the right-hand figure, and making the left-hand figure look less sure of himself. This would also make both figures equally important, and help to show a moment in time: creating a vignette that is about both figures' uncertainty and fear, rather than a diorama of a rescue from a firefight. +

+ Turning the lead figure's head and altering his rifle arm to be pointing down, rather than firing, leads the eye back into the scene to the other figure. It also means that the head is facing away from the angle of either foot (and thus the direction of travel), which elicits an uncomfortable, uncertain feel. I replaced the heads with less aggressive ones, giving the injured marine a bare head to humanise him a little. He's an Iron Warrior, and thus a 'baddie', but I wanted to elicit some sympathy from the viewer. +

+ This change also means the vignette works from different angles:


+ I ended up reinforcing the right-hand figure's pose and sense of injury by moving the arm up and adding a hand cradling his abdomen. This further draws the eye around the two, making the focus on their relationship rather than as two separate figures:

+ A few scattered bits of ruined building and flooring, along with some dirt and soil, finish the composition. They're simple and ensure the focus remains on the figures. I kept them on one side to develop the sense of discomfort and upset balance. This also left the injured marine looking more exposed, increasing the sense of vulnerability. +


+ Overall, I think the vignette works well from a number of angles, each of which gives a slightly different feel, but still leading the eye around and telling us a little about the characters' thoughts. + 


+ Now just to paint the thing! +