Tuesday, October 27

+ inload: Tutorial – building 'true-scale' Astartes part II +

+ This inload forms part of a tutorial. The first part is here [+noospheric inloadlink embedded+] +

+ Part 2: Legs II +


+ We left the legs looking like this, with much of the detail removed or trimmed back using a craft knife. This stage will show you how to use greenstuff. If you have never used modelling putty before, don't worry. It's much easier than it might seem; and a lot of the skills you have in modelling or painting will apply: patience, a sharp eye and a steady hand. +

+ Working time and lubricant +

+ When freshly mixed, Greenstuff can be sticky. As it cures, it gradually becomes less sticky and more manageable – until eventually it is stiff and unresponsive. Eventually, it will cure completely rigid. The time between mixing and curing is called the 'working time'. +

+ Experience will teach you about best working time for different effects. For hair and similar textures, you generally want a stickier consistency, so the best working time is within a few minutes. For smooth areas, you will want the green stuff to be more resistant, so you will need to wait a little longer. Wait too long, and the greenstuff will not attach to the area you are working upon – it's all a balance. +

+ For this project, we will attach freshly-mixed greenstuff to the area, then let it cure in place for a bit. Once it is more workable – i.e. it stops sticking to your tools – you can use the sculpting tool to smooth it into shape. +

+ This is all very well in theory, but in practice, it's very dull to mix tiny amounts to do a small area. You will more likely want to work more than one bit at a time, and this means working with greenstuff that is slightly too sticky or stiff. A tiny lip balm of vaseline is your friend here. +

+ You can use any lubricant – sunflower oil, water etc. – the critical point is that it keeps the modelling tool smooth. This is what prevents the greenstuff from sticking to it. My tips are simple:


  • Use clean tools – any nicks or blobs of old putty will cause new putty to stick to them.
  • Use a tiny amount of lubricant – just dab the tool lightly on the vaseline.
  • Do not use it at all if you can get away with it. I only tend to use it when using very freshly-mixed greenstuff, or trying to smooth the very top layers.
+ That said, experiment – you should find what works best for you. +

+ Sculpting upper leg detail +

I_ Use your sculpting tool to carve off a small amount of two part greenstuff putty. I suggest a ½cm (¼in) length as shown. This will give you enough to do all the legs, chest and arms in this tutorial. 

Cut away and discard the tiny bit where the two colours meet. This will have mixed and cured a little; creating a hard bit.

II_ Begin mixing the two colours together using your fingers. The image above shows the green colour starting to appear as the blue and yellow mix. 

Note the 'marbling' effect, which indicates the putty has not been sufficiently mixed. It is important to get a uniform colour and texture, or you risk parts curing at different rates (or not at all).

III_ To help mix the greenstuff, stretch it into a rod, fold it back on itself and twist it into a spiral as shown. Repeat this five or ten times until the putty is thoroughly mixed.

The putty is now beginning to cure; but don't panic. There is plenty of working time before the putty becomes unusable, so don't rush.

IV_ At first, the putty will be quite sticky. Leave it for five or ten minutes, then tear off a small piece and roll it into a rod that is approximately the same height as the shin, as shown.

+ While you wait, you might remove the second hip plate in the same way as the first; or spend the few minutes trimming the next set of legs. +

V_ Use the stickiness of the putty to stick the rod to the centre of the inside of the thigh.

+ Ideally, you'd do each greenstuff element separately, but this is not always practical. I tend to start on the upper legs, as they're protected a little if you want to work more than one part at a time. +

+ An alternative approach is to use a 'factory-line' method and prepare ten or so sets over the course of a few days, leaving each element to cure overnight. This reduces the risk of accidentally squashing or distorting your work. +
VI_ Press the putty gently into place with the spoon-ended part of your modelling tool. Aim to fit it within the existing plastic detail of the thigh plate, and do not let it overlap the top or bottom of the armour. If it does spill, scrape it away with the sharp edge of the modelling tool and use the spoon-ended part to smooth the cut.

VII_ Work gradually round the whole thigh, so that the putty wraps round the leg within the boundaries of the armour as shown. Don't worry about it being messy at this stage.

VIII_ Let the putty cure until it is no longer so sticky. Place the spoon-ended part of the modelling tool flat on the surface and use tiny circular movements to gently begin to smooth the putty into the surface.   


IX_ Continue smoothing right round the upper leg. Aim to fill the recesses in the armour between the supporting rods of the armour, working the putty right up into the crevices of the leg armour, creating a smooth cylinder. 

You can see in the image that the putty does not work right to the edges of the original plastic detail, but uses that. Aim to create a smooth transition so that the putty blends into the existing detail.

X_ Repeat on the other leg (ideally, leave to cure overnight). 

You can leave the greenstuff work here if you are happy. Alternatively, you can sculpt a more natural and realistic-looking leg, which suggests musculature. 

XI_ For the more developed leg, tear off a smaller piece of greenstuff than before (approximately half the size), roll it into a rod, and place it over the top part of the leg as shown. 

If – being an impatient soul, or carried away with enthusiasm – you are working straight on top of uncured greenstuff, be careful not to use any pressure or you risk distorting the underlying greenstuff work. If you have let your greenstuff cure, you don't need to worry.

XII_ Using the same smoothing technique as earlier – tiny circular motions of the spoon-ended part of the modelling tool – gradually work the greenstuff into the upper part of the leg, creating a curved cylinder. 

+ Find some examples of real plate armour for reference to guide your work. +

+ Sculpting lower leg detail +

XIII_ With the upper legs complete, tear off a small piece of greenstuff – approximately half the height of the shin [+see step IV+]. Roll it into a rod and press it firmly onto the back of the calf.

XIV_ As before, gently but firmly push the greenstuff into the recesses of the leg, using the existing plastic detail to guide you. 


XV_ This image shows how the putty has filled the recesses, creating a smooth transition between the plastic detail. Work right into the very corners.

I prefer to look of a reinforced front plate and lighter rear armour on the lower legs, but if you want a one-piece lower leg, then use more greenstuff and the edges of the front plate to guide your placement instead of the reinforcing rods. +

XVI_Continue working round the lower leg. If you have some excess greenstuff at the end, use the sharp edge of the modelling tool to trim it away before smoothing it back over the area.

XVII_ Repeat the process on the second leg. If the result is not smooth, then use a little vaseline to smooth the spoon-ended part of the modelling tool and draw it across the surface in vertical strokes. Continue until you are happy, and the greenstuff follows the existing lines of the armour, with no bulges or lumps.


+ This completes the lower legs. Before continuing, it is safest to leave the legs to cure completely overnight. If you choose not to, then be careful not to touch the smooth greenstuff work or you risk spoiling it (or at least creating more work for yourself as you tidy it up). +

+ If you decide to continue before the greenstuff has cured, you have the option of creating inlaid detail (see step XIX below) – just be careful to hold the part by plastic, as shown in the pictures below. +

+ Infilling and creating detail +

+ In part 1 of the tutorial, we looked at carving away plastic detail, but what if it's recessed into the surface, like the text on Grey Knight legs? In these case, we're going to fill them in to create a smooth, unbroken surface on the plate. +

XVIII_ Take a tiny piece of greenstuff and draw it out so that it sits over the area you want to fill. 

+ It's better to start with too little greenstuff than too much, as it can be a pain to clear away and you can always add more. +

XIX_ Use the spoon-ended part of the modelling tool to smooth it into the recesses with the same tiny circular movements you used earlier. If it overflows the area just a little, that's fine. You're aiming to break up the underlying shape, so drawing the surface out very thinly over the surrounding plate will help to hide the work.

This shot also shows a small panel line in the thigh on the left-hand side. These details are optional, but easy. Simply use the edged part of the modelling tool to create a rough rectangle by pressing very gently into the uncured surface.

XX_ Use the point of the modelling tool to add a couple of dots in the middle. You don't need to worry about neatness too much, but try to get them central and the same size.

XXI_ Working from the centre of the detail area outwards, use the spoon-ended part of the modelling tool to smooth the surface ever so gently with the same circular motions. Work very gently to avoid distorting the detail. You're aiming to close the displaced putty in on itself evenly, to create a sharp recessed line or dot.

+ The tip of an empty propelling pencil is great for creating recessed buttons with this technique. +

+ This completes the basic legs. We will return to them for an example of detailing (with Mark IV kneepads), but for the moment, put them safely to one side to cure. +


+ Coming up in part III: The torso +

+++

[VAL-request=OPTIONAL] + If you find this tutorial useful, please consider using this Ko-fi exloadlink to support the creation of more free tutorials. + [+exload:GRATITUDESPOOL//+]

+++

+ inload: Tutorial – building 'true-scale' Astartes part I +

+ The Emperor's work: truescale Space Marines tutorial +


+ Apologist's guide to building true-scale marines. +

+ I've been building 'true-scale' or 'art-scale' marines for a while now, and have written a few explanations of how I go about building them – generally when someone has asked for a detail of a particular element. I thought it might prove helpful to show a full step-by-step process of making a bigger marine. +

+ This tutorial will show you how to build a marine based on a Terminator. The result will look something like this:


+ What do I need? +

+ I'm well aware that this can be an expensive hobby! For that reason, this tutorial is based around the least monetary outlay possible. My hope is that you will be able to build a squad of 'true-scale' marines for minimum outlay: with just a box of Grey Knight Terminators and your bits box. + 

+ It can also be intimidating to start modelling work like this, so I've used as few tools and materials as possible. The great joy of making miniatures is getting your own ideas into the figures. For that reason, I encourage you to use this tutorial as a springboard rather than 'holy writ'. It will show you how to make a basic marine, but please feel free to vary the parts used based on what you have, to embellish and improve on the basic marine I show here. +

+ With that said, for this tutorial you will need: 
  • Greenstuff putty
  • Superglue
  • Craft knife and cutting mat
  • Polystyrene cement
  • A tub of lip balm (or similar lubricant)
  • A sculpting tool with a point, edge and smooth end; such as this [+noospheric inloadlink embedded+]
  • The following parts from a plastic Grey Knight Terminator kit:
    • Torso front
    • Torso back
    • Left arm
    • Right arm
    • Legs
    • Two shoulder pads
  • The following parts from a plastic Space Marine Tactical kit:
    • Right hand with a weapon
    • Left hand
    • Backpack
    • Head
+ The exact part you select will depend on the pose etc. you want; experiment and enjoy. Equally, if you have some other cool bits – a Forge World head, some grenades and holsters etc., feel free to embellish the marine. Similarly, if you prefer larger hands, substitute the hands from the Grey Knight Terminator kit. +

+ This marine will be wearing a Mark IV armour suit. Once this basic tutorial is complete, my intention is to show some tips and variations for other marks of armour. If there's a particular type you'd like to see first, please let me know in the comments. + 

+++

[VAL-request=OPTIONAL] + If you find this tutorial useful, please consider using this Ko-fi exloadlink to support the creation of more free tutorials. + [+exload:GRATITUDESPOOL//+]

+++

+ Part 1: Legs I +

+ Cutting away flared armour +

I_ The first thing we need to do is trim the legs from the sprue. The flared knee armour is the first thing to go.

II_ Carefully cut up towards the joint, taking the knife up parallel with the lower leg armour. Do not cut through the central part (with the indent).

III_ Press the knife down at the angle shown, cutting through the plate.

IV_ Gently cut away the section by repeating the cuts earlier until the section drops away. Aim to keep the surrounding area clean, revealing the shape of the lower leg armour.

V_ Repeat the process at the top; cutting under towards the joint, then near the joint. 

VI_ Continue until the top of the flared shield drops away.

VII_ Carefully cut away the 'point' this leaves at the back of the knee joint, trimming until you have a round shape as shown.

+ Removing raised surface detail +

VIII_ Use the blade of the knife to trim down the surface parallel with the armour plate. Work gradually for large areas of raised detail – trim away layers rather than lumps.

IX_ To smooth the surface, draw the back of the blade back over the area – as though shaving – to remove any slight imperfections.

X_ The hip plates need to go. Hold the legs as shown, and press the knife in to make a guide cut parallel with the top of the upper leg armour. Note that the flared knee shield has been removed here, as described earlier. 

XI_ 'Roll' the blade round the upper leg along the line of the upper armour, using the guide cut to start you, and finishing at the top of the armour visible on the inside of the leg.

XII_ You should end up with a cut like this, that follows the shape of the upper leg. Deepen the cut with gentle, gradual pressure.


XIII_ Using the instructions for cutting away flared armour (see above), carefully and gradually trim away the hip plate. It's almost inevitable that it'll look a little ragged, but aim to be as clean as you can. When trimming down the plate on the leg, use the raised 'piping' reinforcement rods on the thigh to guide you; cut the hip plate down to this depth, not down to the underlying armour.


+ This completes the first part of the tutorial. In the next part, we'll introduce the putty and start modelling. I hope this has been useful – please let me know if anything's unclear and I'll do my best to revise the tutorial. +

+ The second part can be found here: [+noospheric inloadlink embedded+]

Monday, October 26

+ conceptinload: Plans afoot +

+ Worldbuilding +

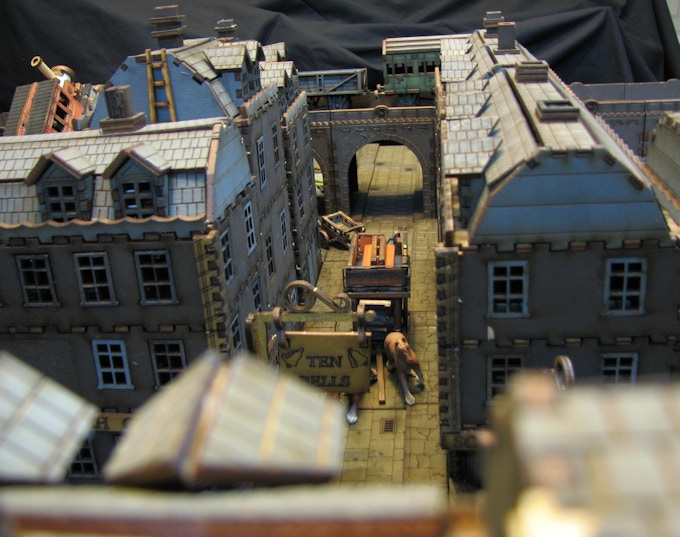
+ Buildings – structures – rubble. These are what turns a wasteground into a settlement. A few people have asked what sort of buildings I'd like for my new board, Purefinder Chanterwick. Here's the plan:

+ Gloomy streets +

+ Victoriana is not as well represented in gaming terrain as some other themes, but there is stuff out there. I recently stumbled upon this current kickstarter campaign [+noospheric inload embedded+], which has some fantastic buildings. I've pledged for the tenement set, which can be seen here (amongst some other bits):


+ As you can see, it looks like it should fit nicely with the other stuff I already have, so I'm looking forward to receiving it. +

Renaissance Miniatures, who are running the kickstarter, have a number of successful campaigns under their belt, and look like a lovely little company – so I hope this turns out to be another successful campaign for them. +

+ Existing material +

+ Bought a while back, this selection of Micro Arts terrain, from their Wolsung kickstarter, will form the core of the board's structures:

+ I've already attached the large buildings to baseboards, which you can see here on the WIP board: +


+ I also have another structure from Microarts; one from their range intended for Corvus Belli's Infinity. It's mounted on a larger square, and will probably make for a slightly more interesting game. I want to include a variety of architectural styles to give a sense of history and overbuilding. +


+ What else? +

+ I'll be producing a step-by-step on Word Bearers, akin to the Iro nWarrior one I did a while back. +

Wednesday, October 21

+ inload: Iron Warriors Predator +

Ba-bang!

The Predator rocked back as though kicked; the tracks quickly settling with a rhythmic clanking as a cloud of dust billowed from every flat surface. The engines' idling grumble kicked into a whine and a metallic tinkling as the tank wheeled away and turned down a side-alley.

The crack of the double-retort echoed and re-echoed weirdly in the confines of the sub-district streets, and Izmir's eyes flickered, darting around; suspicious. Even slaved to his autosenses, the tank felt close and confined; like a loose-knit bag over his eyes.
Izmir and the other two permanent crew were locked into their seats; their armour soft-connected via their backpack ports. The fourth Iron Warrior squatted awkwardly in the little remaining space; his feet braced against the crew's dormant charging backpacks. Jogged around in the heat and the dark, the tank crawled onwards – into danger; towards an uncertain victory.


+++

+ Acerbus, Predator battle tank +


+ Standard order dictates three Astartes to man a Destructor-armament Predator – the commander, who operates the main turret and directs the crew; a primary gunner, who controls the sponsons; and a driver, who is responsible for navigation and mobility. +

+ Unlike the advanced micro-noosphere of other vehicles available to the Legions – such as the dread Land Raider, Sicaran variants or Crotalid assault transports – vehicles based on the rugged Rhino were rugged, practical and built with redundancy and reliability in mind. This was an intentional part of the concept briefs: Astartes tanks were designed to take advantage of the sophistication of the crew's personal equipment – their power armour. With the armoured crew having shielded internal comms, advanced autosenses and numerous other targetting and survival aids, the tank itself could get by with the bare minimum. In case of damage or loss, the vehicle could be quickly repaired or replaced. In the unlikely event of it being captured, the tank would prove impractical to most enemies – if for no other reason than the distorted scale necessary for the post-human crew. +


+ As a result, the Deimos-pattern Predator was a spartan environment, with little thought given to aesthetics or comfort. Nevertheless, some advanced systems were in place. The crew's thrones were designed to integrate with the rear of power armour plate, essentially replacing the need for a backpack while in place. The backpacks could be stored near the rear of the tank for retrieval, and could in turn be plugged-in to recharge. This gives an example of the spare elegance of the design; as the three backpacks could be used in a pinch to substitute for an engine subcompartment – allowing a Predator with catastrophic damage to limp away even if all four engines were destroyed. +


+ This Predator – designated Acerbus – is marked with simple visuals; yellow stripes and an alphanumeric key marking it as tank One Hundred of Muster IX. The alpha symbol following the Muster indicates it being a dedicated infantry support tank, rather than a full part of an armoured cavalry division. +

+ The Iron Warriors were well-supplied with comparatively simple Rhino-based vehicles; as more advanced designs – even those partly created by Perturabo himself – were preferentially deployed to other Legions. The IVth turned this to an advantage, spearheading massed armour deployments and making the most of the lightning-strike capabilities available to an armoured force that required little support and virtually no rest. +

+ This was achieved by integrating a Jardimcy Legionary to the crew; an additional 'spare' Astartes who was – in theory – carried in shuttle groups in Rhino carriers that accompanied the main column; but in practise often forced to cram into the tank alongside the small amount of supplies each Predator carried. The Jardimcy would take over duties for injured or exhausted crew, extending the vehicle's combat capabilities. They were also used to replace casualties in the field; reducing the need for a supply train and allowing the column as a whole to continue driving forward. +


+ The presence of the Imperial Eagle remained common even deep in the Horus Heresy. The reasons for this are many and varied – everything from the IIIrd Legion's conscious mockery of Imperial ideals; the Alpha Legion's misdirection; and simple misunderstandings or the dissemination of misinformation. In the case of Acerbus, the Eagle was maintained in honour of the Imperium – the Iron Warriors felt they were fighting against the tyranny of the Emperor himself, not the institutions the IVth had sweated and bled to build. +


+ Resplendent in Legion livery of gunmetal and black, a large bulldozer blade for rubble clearance has been installed on the Predator. This was an extremely common upgrade; particularly amongst those crewed by siege-orientated dodekatheon members. +

+ A number of gleaming blue lenses are visible here; each of which are available for any member of crew to use via their power armour's 'hood'; the pict-slave's vision being directed, ghostly and green, into the viewer's visual cortex. +

Finally, the Predator Destructor's fearsome standard armament of two 'Godhammer' lascannons and the distinctive quad-firing burst autocannon are visible. These made the tank a versatile terror against everything from heavy infantry to medium-weight battle tanks. In concert with its pack-mates, the Space Marine Predator was a versatile machine capable of bringing down even the god-machines of the Titan Legions – albeit at great cost! +


+ Amongst the Iron Warriors, names were commonly given to Predators following their first successful campaign. On the face of things, this may seem an uncharacteristic indulgence for the fiercely unsentimental IVth Legion, but classification and naming had a ritual significance – almost to the point of obsession – to pre-Compliance Olympia. Such a history was not easily erased; and the cold exterior of most Iron Warriors only imperfectly subsumed a furnace of suppressed creativity and emotion. +


+ Simple geometric and high-contrast yellow and black markings on the turret and top of tanks made the vehicles easily identifiable from the air; helping to minimise 'friendly-fire' accidents. The 'IV' here has been crudely daubed on by hand – perhaps by a literal-minded Iron Warrior – and could not possibly be seen from orbit. +