Thursday, November 9

+ inload: Dead Earth Miniatures' Piscean review +

+ A tin of Saharduins + 

+ Dead Earth Miniatures' Piscean review +

+ Who? What +

+ Dead Earth miniatures, run by ex-GW sculptor Stephen May (@stevepaintsandsculpts on Instagram), is an indie producer of exquisitely characterful miniatures, which you can buy here [+noosphericexloadlink embedded+]. The growing range is mainly Necromunda-adjacent, with figures that would be ideal for old-school Ratskins and Brats, amongst others. While it's clear May has a real love for the 40k universe, these figures would all also be perfectly at home in many other skirmish games. +

+ Long-time inloaders will know my fixation on fishy little aliens, so will be utterly unsurprised that I recently supported Dead Earth Miniature's 'The Piscean' Kickstarter, which featured the charming and slippery fellow pictured above. +

+++

+ Materials and constructions +

+ The figure arrived packaged in a bubble envelope as four separate sprues along with a 40mm base. The resin it's cast in is high quality, with a good balance of strength and flex. Given the sculptor's pedigreee, I'd be inclined to guess that if it's not the same stuff Forge World use, it's certainly something very similar.  +

+ There was little flash and no mould slippage on the copy I received, which is always a relief for short-run resin figures. Likewise there was no distortion or reshaping necessary, with the minor exception of one of the cables above – and given the very fine nature of these parts, I think that's virtually inevitable. +

+ Given the sinuous nature of the figure, it's unsurprising that it's had to be cut into a few pieces. These cut are well-judged, with joins largely hidden in naturalistic ways, such as the neck under a cable, and the sleeved arm joining at a shoulder strap. The parts have been well-cast, with little or no warping, so there are only very fine gaps – you can see one at the shoulder in my assembled version below, but as you can see the neck and foot joins are almost invisible. +

+ There were no instructions included, which can be tricky for non-human figures (it's not always obvious where alien anatomy goes!) but there are handy guide structures on the components meaning that they only fit together in one position. Construction is therefore straightforward, and aside from having to fish out a pair of tweezers to get the pipes on either side of the head, was very swift. One set of these pipes required running under hot water to bend into place, but that's well within the wheelhouse of anyone likely to be building them. +
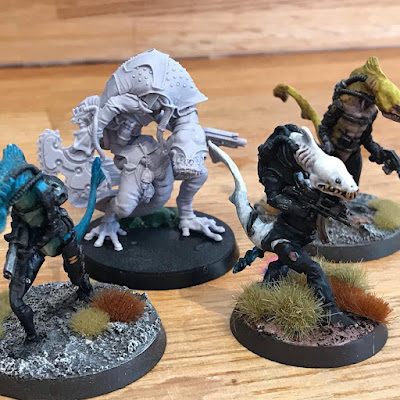
+ The assembled Piscean, pictured alongside a couple of Knightmare Games Fishmen, and GW's original Saharduin +

+++

+ Painting +

+ Still WIP at the time of this review, I wanted to include a few notes on painting the figure – which is proving a treat. I couldn't resist working up the face a little more, and you can see character and detail apparent in the sculpt even at this stage. +

+ One of the lovely aspects of weird one-off aliens like this is the absolute freedom for colour schemes. There's no set expectation for them. I toyed with a brighter colour (as I'd used for the Knightmare Miniatures ones above), but since this sculpt is far more salamander-esque, I decided to go for a more muted, earthy tone. He's got a bit of a Star Wars feel at the moment, which is no bad thing – as noted above, while the Piscean would fit in nicely with the 40k universe, he'd be equally at home in other universes, like Gates of Antares. +


+ Having opted for green skin, I decided that battered brown-black leather would help set it off, so I'm using that for the straps, and a more neutral grey for the rest of the clthing/armour. This low-key scheme is at an early stage, and I'll be working it up before adding some contrasting markings to provide some eye-catching highlights and a flash of exotic colour. +

+++

+ The good, the bad, and the fishy +

+ Overall, I'm delighted with the figure. Partially that's down to my enthusiasm for retrohammer-flavoured fishmen models, but even objectively this was a real treat. The sculpting is top-notch, and as one might expect of an ex-FW sculptor, fits into the aesthetic of my largely GW collection really naturally. Happily, the production quality – often the weakpoint of indie studios – is also excellent. +

+ On the downside, I've heard a couple of comments from other backers that their model arrived broken, so hopefully for future projects Dead Earth Miniatures will consider using small cardboard boxes for packaging to help minimise damage on figure(s). +

+APPENDEDIT: I've just been informed by another backer that her model turned up in a bubblewrap envelope within a cardboard box, so looks like this issue has already been resolved – good show, DEM!+

+ The pricing – £22 Kickstarter, £24 retail – is in the same ball park as Forge World's kits, which I think is fair for a figure of this size and quality, even if it squeezed me out of going for the variants and options that formed part of the Kickstarter. I think Dead Earth Miniatures might have run out of time on getting pics of those options up before the Kickstarter finished, but have offered backers a freepost option, which I thought was a nice touch – and means that I may well pick up a variant if the bits catch my fancy. +

+ In summary, this is an extremely well-sculpted and thoughtfully designed figure that I'd have no hesitation in recommending. Quality-wise it's doing everything right, packed with interesting detail and a treat to the painter. I'd not have blinked if you'd told me it was an official Necromunda Hired Gun figure, and given the high quality of that range, that's a compliment. +


Wednesday, October 18

+ inload: Preparation for battle +

+ Midweek musings +

+ Both The Ashes of Armageddon and Some Things Are Best Left Forgotten have received updates recently – and after you've inloaded the low-down from both of those, there's a more general hobby inload here. Today we've got a few low-key musings, mostly unrelated to one another – but I hope they're interesting to you! +

+ The Ashes of Armageddon +

+ 'Pah – What chance do the greenskins have?' +
[//Famous last words+]

+ This project, themed around the Second War for Armageddon, has kicked off rather nicely, and there are some fantastic artists involved. I'm planning to do a little painting challenge event – something simple like a single Steel Legionary or single ork. I don't want to exclude the Space Marines, however – so I'm wondering if the theme is 'non-combat' or something, to encourage people to paint up munitorum servitors, grots doing interesting stuff, or relaxing crew. Any thoughts on what would get you excited in terms of a contest? +

+++

+ Steel Legion +

+ The Steel Legion are ticking along nicely, with 11 all polished off. It's going to need more than that to hold back the hordes of Waa-Ghazgkhull, though!  I'm very pleased with how these are coming out. While they're not going to win any prizes, they do look pleasingly improved over their previous incarnation. That's a bit of a relief, to be honest: I never quite know whether a scheme is going to work en-masse, and it's very disheartening to repaint a serviceable model and then find you prefer the previous scheme. +


+ It's surprising what a little detail around the face can do to bring a sculpt to life. While most of these Guardsmens' faces are obscured by the respirators, painting the goggles and picking out the eyes somehow lifts things. For the goggles, I've mainly used blue-grey, but there are some orange and green ones dotted around. This was an aesthetic choice, rather than intended to signify anything. I guess they do allow for differentiation, so could serve a functional purpose if necessary – helping to explain which ones are making shots, or saves; or perhaps picking out the comms-guy – stuff like that. +


+++

+ Pioneers +

+ Speaking of challenges, I was flattered to be asked to take part in @diceandpigment's 'Custom Chapter Challenge' on Instagram. It seemed a bit of a cop-out to just use one of my existing Chapters, like the Gatebreakers or Silver Stars, so I've painted up a completely new Chapter fuelled by last minute panic. This is Phratr Iustitian of the Pioneers:

+ Action star posing and all +

+ Confession time – while I'd had every intention of really getting stuck in, time ran away with me, so I had to jump in the deep end – he was built and painted in around six hours, which I think's a pretty good run! +


+ The build is simple – one of the new flamer marines from Leviathan, with a weapon, head and backpack swap. The Mark VI backpack is particularly effective, I think; it's a bit bulkier than the ones I usually use, and fits the bulk of the primaris marine. A bit of trimming to remove the neckguard, flaring kneepads and ankle stabiliser things finished him off, then it was into painting mode. +


+ Those of you who've been inloading for a while might remember Sebastian Ottavus Arcimboldo of the Scarlet Blades [+noosphericinloadlink embedded+]. He used a split scheme with the knees and below a different colour – an approach that I haven't seen much, and one that I thought worth re-investigating. In terms of colour, I wanted a pairing that I haven't seen much, so went for green and purple. +

+ The Chapter badge is the astronomical sign for 'Libra' +

+ He painted up quite smoothly, but looked a little plain, so I picked a simple strip concept, and added some vertical and horizontal stripes in the secondary purple colour. There's not any hidden meaning behind this, but it was nice to find that it's the colours of the Suffragettes. Not entirely convinced the Suffragettes would be pleased with a hyper-human representing them, but who knows? Maybe Ms. Pankhurst would be a Marine collector after all. +

+ These were then decorated with some simple pseudo-Eastern freehand, as the gren and purple combination evoked Ancient Persia, Japan, India and China. I didn't want to make it reductive or a caricature, so I've really opted for 'Space Marine' first and foremost, rather than lean too heavily into one particular real-world culture. +


+ I have no plans for the Pioneers, but it's always nice to have little forces like this in your back pocket. If you like 'em, feel free to give one a go. +

+++

+ Dawn of War +

+ No, not the computer game.

+ On the pictures of the Pioneer above, you'll spot a new background – and that's my freshly re-painted Realm of Battle Board, now in attractive 'Armageddon Wasteland'. 

+ Gridlines not intentional! +

+ This'll be the first time the 3rd Company have played a game since – [SCRAPSHUNTERRORABORT] a 9th edition game against Lucifer216 that I've just realised I never exloaded. [I'll have to fix that sharpish!]. In that case, this will be the first time I've shown the army in battle on the blog, and what better place to take them through their paces than Armageddon, where the GW Studio version fought? +


+ The list I'm bringing is the modern version of the army shown in WD139, so there are three decades worth of progress. Inflation has definitely hit! While the original army was 1,995pts, the modern iteration, based on the Munitorum Field Manual v1.4, barely scrapes past 1,250pts. +


+ Above you can see  the original, and here's the modern equivalent. I ummed and erred about whether to take them as Blood Angels or plain Adeptus Astartes, and ended up opting for the latter, on the basis that I think that's more in keeping with the Rogue Trader/2nd ed. background. +


Faction  Adeptus Astartes – Gladius Task Force
Army rule  Oath of Moment
Detachment rule  Combat Doctrines
  • Captain Erasmus Tycho – 80pts Artificer Armour – 10pts
    • Warlord
  • Epistolary Ureolo – 75pts
  • Chaplain Savonarola – 70ptsThe Honour Vehement – 15pts
  • Medic Sansavino (Apothecary) – 50pts
  • Tactical Squad Raphael – 160pts
    • Combat Squad Raphael
    • Combat Squad Mephisto
  • Tactical Squad Lazarus – 160pts
    • Combat Squad Lazarus
    • Combat Squad Cleon
  • Devastator Squad Castigarius (10) – 200pts
    • Combat Squad Paulo
    • Combat Squad Michelino
  • Terminator Squad Redemptor (5) – 190pt
  • Thudd Gun (Thunderfire Cannon) – 90pts
    • Techmarine Haynes Mirandola – (part of Thunderfire Cannon)
  • Rhino – 75pts
  • Land Speeder – 80pts
    • Lieutenant – (part of the Land Speeder)
Total 1260pts


+ I'm looking forward to the game – we'll be taking inspiration for the mission from the Armageddon storyline. The Blood Angels arrived alongside the Ultramarines and Salamanders some nine months after Waa-Ghazghkull arrived. In the lore, the Space Marines manage to halt the orks and push the war into a stalemate while the Imperial Guard retrench, eventually triumphing (albeit pyrrhicly!). +

+ The missions from 2nd edition's Battle for Armageddon scenarios booklet focussed on the later war, with the Blood Angels desperately trying to hold the orks behind the river and preventing them from launching fresh assaults. For this mission, we'll be looking at the early war, and filling in some of the gaps there. After all, it's fun to take inspiration from the past, but the purpose of the setting is to give us a space to allow us to write our own fun and explore this most dystopian of settings. +

+++

Wednesday, October 11

+ inload: Painting the Steel Legion +

+ Once more with steel + 


+ Steel Legion reporting for duty, sah! This handful of brave lads in khaki is the first group polished off for my contribution to the Ashes of Armageddon project [+noosphericexloadlink embedded+]. +

+ For those brave enough to stumble along with the repainting of this army, you'll know that they started off in a polar desert scheme, with the bases textured but only base-painted. +

+++

+ Finishing the Bases +


+ Most of the work, then, was bringing up the bases to scratch. I used acrylic sand texture medium to fill in the gaps in the larger gravel/paste I'd used, then dipped the bases in water before painting them with Skrag brown. Once dry, these were drybrushed successively with Balor Brown and Ushabti Bone. +

+ At this point I finished off the rest of the model as described below, before coming back to the base to repaint the rims with Rhinox Hide, and adding static grass tufts to a few of them. The tufts were lightly drybrushed with Ushabti bone to rob them off that slightly glossy synthetic look. +

+ The result is a significantly better base than before – and while I'm pleased with the individual details, I think this simple stage, more than any other, is responsible for improving the look of the army overall. It took two evenings to rebase the whole army (~70 figures) – so not a huge time investment for the result. +

+ If you decide to spruce up an existing army, then I suggest your start with the bases. You might find that's all you need. +

+++

+ Painting the figure +

+ The coats had been painted to a decent standard, and so a coat of the contrast paint Aggaros Dunes was a quick and easy way to tint the existing shading and highlighting. As with the bases, this was a batch process, and this was still quicker – each figure took around thirty seconds to repaint. +


+ From here, it was a case of refining and improving – but since I have five dozen to do, I wanted to balance the finish against the time available. The finish is not highly refined, but I think it looks decent, even quite close-up, as here. Certainly en masse and at tabletop distance, they should look good. +

+ The process was simple: using the existing highlighting (left over from their previous uniforms) to guide me, I used mixes of Balor Brown and Ushabti Bone in various proportions to develop them further and neaten things up. Once that was dry, I added Army Painter Mummy Robes (a lovely warm off-white) to the same mix and ticked in some highlights to sharpen things up a little. As this was fabric, I didn't want to push these highlights too far – older sculpts like this tend to be a bit softer in detail, and I wanted to make sure the contrast between areas that should be sharp (like the rifle) had some 'space' to work in. +


+ To break up the uniformity of the single-piece sculpts a little, I've given some figures cloth helmet covers – treated like the other fabric – while most have dark grey uncovered helmets, which were painted Charadon Granite before being successively highlighted with Army Painter Dark Stone and then the same with a little Vallejo Cold White added. +


+ The rifle – already painted with Charadon Granite and Boltgun metal – was given a wash of Nuln Oil. Once dry, I highlighted it with Army Painter Dark Stone. On the example above, I used Mummy Robes to add a few kill markings. (... judging by the number, he's either a very talented shot, or a liar!)


+ That left just tidying up existing details – and things like the water canteen, straps and equipment received unifying washes of Agrax Earthshade before I picked out highlights using the mixes remaining on my palette. +


+ And to finish? The best bit: details. The leather got a soft-stipple highlight of Calth Brown, then I dived in on the skin. The Steel Legion figures have very little skin showing, and even that it quite hidden away, so I left it fairly simple: a layer of a pink-yellow-white mix (varying the proportions from figure to figure) over the ears, neck and visible part of the face. +

+ Once dry, I washed this with Reikland Flesh Shade before re-establishing the detail. I then thinned down a very dark brown mix of Abaddon Black and Rhinox Hide to outline the shape of the visible face – this helps it read out of the similarly-coloured rebreather (and in the case of those with helmet covers, the helmet, too). +

+ I used the same mix to paint the eyes, and once dry, touched in tiny dots of white mixed with a hint of Balor Brown (to stop them looking too bright). +

+ The finishing touch was to paint in the goggles and army badge. The latter was easy – Warpstone green for the field and off-white for the bolt symbol. The goggles were a mix of Sotek Green and Dawnstone that was then gradually highlighted up with the addition of more white. A direct light reflection added a little 'ting!' as the final pop. +

+ As noted for the helmet variation above, I'll be throwing in some different goggle colours and similar details. It's perhaps no substitute for a proper conversion, but you'd be surprised what a different a spot of colour and personalisation makes for overall visual variety and interest. +

+++

+ Steel Legion 7th Army +

+ I'll be using these models to represent one of the Regiments of the 7th Army from the boardgame Battle for Armageddon. +

Counter from Battle for Armageddon

+ The idea for the green icon came from the counters in the game – the 4th–7th are all marked with the icon above. I thought it'd be fun to tie that into the colour scheme. +

+++

+ The rewards of defeat +

+ The 7th are – as you can see from the campaign map below – poised to get a kicking from the Evil Suns; and possible Ghazghkull himself! In all likelihood, the army will be destroyed in short order in campaign terms. +

+ So why would anyone pick a soon-to-be-gone army for a project like this? Well, I wanted to show the narrative opportunities that this gives – and how it can help you to develop a story for your models. Life is cheap in Warhammer 40,000, but there's a big difference between that as a concept and declaring the the model that you've spent ages converting and painting is dead. We've all had that game where the army commander turns out to just be knocked-out or teleported away – but doing this too much makes things feel valueless and a bit comic-booky. +

+ How do we square that? My answer is that the figures don't necessaruly represent individuals, but rather archetypes. The models above might be from X Regiment and Y Company – but for the purposes of the project, they can happily fit in for any member of the 7th Army; or, given that the green colour is also used for the 4th, 5th and 6th armies, any of them, too. +

+ The 7th army, like all the counters in the boardgame, represents around a hundred thousand or more individuals. The loss of the counter in the game is thus not the end. While the Army might cease to exist in strategic terms (at least 'til it's rebuilt), hundreds or even thousands of survivors might be able to regroup, or be absorbed into other armies. +

+ The scale of loss is thus brought home, but you can continue to use and enjoy your figures in game... and I'd argue that you'll instantly and organically have generated a far more interesting back-story, with built-in villains and motivations. +

+++

+ Map campaigns and ready-made narrative +

+ To illustrate this idea, let's imagine the 7th are attacked by the two stacks of Evil Suns counters bordering the region they're in. +

+ Instantly, you've got a story. The 7th have allies – the Styx Secondary Border Defence Force – a base, and villains. You'll spot that the orks have to attack over a river – so there's instantly a game scenario for you. Whatever the result, whether they throw back the first attack but then crumble under the second, you'll have a natural story created. +


+ If you retreat, then that adds to your officers' story – how does he or she feel about it? Do they want revenge – and if so, against which ork army? Are the soldiers relieved, frightened, or eager to retake their base? How badly were they defeated? +

+ Even if the counter is destroyed, you'll see narrative possibilities. How did your Regiment, out of all that were lost, survive? Are they fight-capable, or are they going to need to change to guerilla tactics? +

+ The above also applies equally to the orks, of course – for every story, there's a flip side. If you play out the game against your mate, you'll find you've instantly got a set-up for your next meeting, a rival for your commander, a wrong to be righted or a victory to be celebrated – so much more rewarding than an everyday 'pick-up-and-play' game. +

+ To summarise, trying to come up with compelling stories can be tricky; so a method like this project uses – using a boardgame to create organic prompts and throw up ideas. If you choose to get involved – and I hope you do! – than I hope this helps to reassure you that defeat can be every bit as enjoyable as victory.+

+++

+ A few final shots of the figures, just because. +


+ This figure is a converted sergeant: I cut off the fixed arm and attached a rifle from Victoria Miniatures. +


+ This weapon specialist has 'Mire' on his helmet – perhaps a native of the lost Death Mire Hive in Armageddon Prime? +

Friday, October 6

+ inload: Stirring the Ashes +

+ The Season of Storms approaches +


+ Updates have been happening over on The Ashes of Armageddon [+noosphericexloadlink embedded+], and the project is picking up steam. If you've not had a chance to look over it, then this overview post is the best starting point – though it's not inherently any more complicated than sharing pictures of Orks and Guardsmen – ideally beating the snot out of each other! +

+ For my part, I've been concentrating on writing articles that – I hope – make it easier for people to get involved and have fun with their hobby, whether they're painting, writing or playing. I plan, however, to bring in my own orks and Steel Legion; if for no other reason than I like to practise what I preach. +

+++

+ To that end, My Steel Legion repaint is ticking over smoothly – and surprisingly quickly. 


+ Roughly half (above) have had the first stage of basing completed and new overcoats issued – as detailed in a previous inload [+noosphericinloadlink embedded+], while the ones below have not yet had their lids painted grey and their new coats handed out. +


+ From the stage above, it took me about five minutes apiece to work up the soldiers below, so I think it's reasonable to get them turned around in a decent timescale. +


+++


+ Of course, it's as much about the greenskins as the Guard, though happily here I've already got quite a few models I can use to help plug gaps in articles:


Tuesday, September 26

+ inload: Issuing new uniforms +

+ Rebasing and repainting my Steel Legion +


+ The Great Refresh continues for the Steel Legion, with the aim to take them from the image on the left to that on the right. +

+++

+ Basing +


+ I found a rather neat shortcut for getting the initial colour on the bases – submerging the base (and the model's feet) in a pot of clean water, gently tapping off the excess, then touching a brush loaded with Skrag Brown to the damp surface. As with wet-in-wet watercolour, the fluid paint rushes off the brush and spreads organically into the texture – and if you get the consistency right, it stays clear of the base edges and boots. This hugely sped things up for me, and I was able to get a platoon of thirty Guardsmen and all their command staff done in half an hour. +

+ A couple of notes on this, if you're tempted to try. This technique relies on having a surface that's quite textural – if you try it on a smoother base, you'll end up with a blotchy finish. Secondly, this technique relies on a paint with good coverage. Earth colours (like Skrag Brown, used here) tend to have good coverage even when very dilute, but some paints will likely recede from the surface, leaving it looking a bit patchy. As you'll see below, the finish is quite even, and because you don't need to reach in to recesses – the paint flows everywhere that is wet – it's easy to avoid accidentally getting paint on the model. + 


+ From here, I'll give the bases a light layer of a desert colour (something like Zamesi Desert), leaving some of the brown showing in recesses. Once dry, I'll drybrush it with a slightly lighter tint. +

+++

+ New kit +

+ As well as basing, I'll be updating the greatcoats to a tan leather. Doing this to more than seventy models is – perhaps understandably – a bit daunting, particularly when you're broadly happy with the original paint job. +

+ I confess that part of me wants to keep the ice-world feel. I know that if I worked them all up to the standard I'd done on the few finished pieces, they'd be a striking force. Against this is the sense that they'll still look how I want with the desert scheme, and they'll also become a lot more likely to be used rather than left in a box! +


+ In the manner of all good officers, the good General Ynginel Howl strode forth first to show his men how things would work. As hoped, the white coat  (left) acted as a grisaille underpainting, and a layer of the Contrast paint Aggaros Dunes simply tinted the existing work there. +


+ While the original paintjob is a little rough-and-ready, this strikes me as a much better place to proceed from than starting from scratch with the coats. I'm planning to add highlights and perhaps an oil glaze to even things out and strengthen the shading. +

+++

+ With the General showing the way, his soldiers followed on. Here's the first five to get their new coats. +


+ Again, this was a mercifully swift process – the Contrast paint is very forgiving, able to be applied quite liberally and still achieving success –and these took roughly a minute or so each. +

+ It's early days, but being able to take relatively large steps with a whole platoon at each stage is a great psychological boost. +

+++